ZP-0089: Difference between revisions
m (Yoyojacky moved page Rack Tower Pro SKU: ZP-0089 to ZP-0089) |
|||
| (14 intermediate revisions by the same user not shown) | |||
| Line 1: | Line 1: | ||
==Rack Tower Pro== | ==Rack Tower Pro== | ||
[[ File:Baceng1.jpg|right | | [[ File:Baceng1.jpg|right |500px]] | ||
==Description== | ==Description== | ||
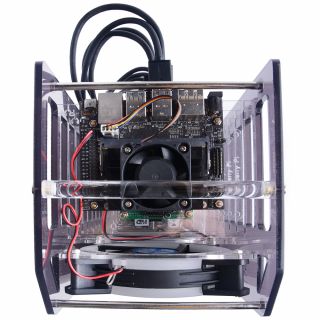
Rack Tower pro stands for a new concept for the 8-layer acrylic case for cluster.<br> | Rack Tower pro stands for a new concept for the 8-layer acrylic case for cluster.<br> | ||
This 8-layer acrylic oversized fan enclosure is a new product designed to provide shell protection and cooling solutions for Raspberry Pi clusters, Raspberry Pi NAS servers, Jetson Nano clusters, and disk array clusters.<br> | This 8-layer acrylic oversized fan enclosure is a new product designed to provide shell protection and cooling solutions<br> | ||
for Raspberry Pi clusters, Raspberry Pi NAS servers, Jetson Nano clusters, and disk array clusters.<br> | |||
It is very delicate. The long fixing screws are designed with flat head screws, smooth and easy to install. <br> | It is very delicate. The long fixing screws are designed with flat head screws, smooth and easy to install. <br> | ||
The fool-proof design of the positioning holes can prevent you from having trouble during installation.<br> | The fool-proof design of the positioning holes can prevent you from having trouble during installation.<br> | ||
A variety of screws with different specifications can meet your various product fixing needs. <br> | A variety of screws with different specifications can meet your various product fixing needs. <br> | ||
For example, Raspberry Pi, 2 | For example, Raspberry Pi, 2.5-inch hard drive, Jetson Nano and so on.<br> | ||
In addition, the large fan is driven by 5V, which can be directly powered by the Raspberry Pi, and it will have a colorful halo when it is running, which is very cool.<br> | In addition, the large fan is driven by 5V, which can be directly powered by the Raspberry Pi, and it will have a colorful halo when it is running, which is very cool.<br> | ||
==Features== | ==Features== | ||
* Easy to assemble | * Easy to assemble | ||
* Colorful LED | * Colorful LED 5V 12mm RGB Fan | ||
* Compatible with Raspberry Pi, 2.5MM HDD, Jetson Nano | * Compatible with Raspberry Pi, 2.5MM HDD, Jetson Nano | ||
* | * Extremely heat dissipation effect | ||
* Crystal Hander easy to carry on | * Crystal Hander easy to carry on | ||
* Flexible Mounting position | * Flexible Mounting position | ||
* Super Quite | |||
<pre> | <pre> | ||
If you want to make better use of space, you can place the Raspberry Pi on one side of the bracket, and on the right side, you can place other small equipment, such as UPS power, etc., and it can also be used as a place for cables. | If you want to make better use of space, you can place the Raspberry Pi on one side of the bracket, and on the right side, you can place other small equipment, such as UPS power, etc., and it can also be used as a place for cables. | ||
| Line 33: | Line 36: | ||
|[[File:Baceng14 jn.jpg| 320px | none ]] | |[[File:Baceng14 jn.jpg| 320px | none ]] | ||
|} | |} | ||
===Application Senario=== | |||
{| | |||
|[[File:Baceng13 jn.jpg| 320px | left ]] | |||
|[[File:Baceng14 jn.jpg| 320px | none ]] | |||
|[[File:Baceng15 jn.jpg| 320px | none ]] | |||
|} | |||
===Assembling Details=== | ===Assembling Details=== | ||
{| | {| | ||
| Line 39: | Line 49: | ||
|[[File:Baceng7.jpg| 320px | none ]] | |[[File:Baceng7.jpg| 320px | none ]] | ||
|} | |} | ||
==Effect Display Diagram== | ==Effect Display Diagram== | ||
{| | {| | ||
| Line 62: | Line 73: | ||
* 1 x Installation instructions | * 1 x Installation instructions | ||
[[File: | [[File:Baceng16.jpg| 500px | left]] | ||
<br style="clear:both"> | <br style="clear:both"> | ||
| Line 68: | Line 79: | ||
<pre>Please read this guide carefully before you starting assemble.</pre> | <pre>Please read this guide carefully before you starting assemble.</pre> | ||
* Step 1. Fixed the copper sticks to acrylic layer after peeling off the protection film. | * Step 1. Fixed the copper sticks to acrylic layer after peeling off the protection film. | ||
[[File: | [[File:Bacenganz1.jpg| left| 500px ]] | ||
<br style="clear:both;"> | <br style="clear:both;"> | ||
* Step 2. Paste heat sinks to Raspberry Pi and fix the raspberry pi to the acrylic layer with M2.5 nuts. | * Step 2. Paste heat sinks to Raspberry Pi and fix the raspberry pi to the acrylic layer with M2.5 nuts. | ||
[[File: | [[File:Bacenganz2.jpg| left| 500px ]] | ||
<br style="clear:both;"> | <br style="clear:both;"> | ||
* Step 3. Fixed the bracket holder to the fan with long steel screws and nuts. | * Step 3. Fixed the bracket holder to the fan with long steel screws and nuts. | ||
[[File: | [[File:Bacenganz4.jpg| left| 500px ]] | ||
<br style="clear:both;"> | <br style="clear:both;"> | ||
* Step 4. Fixed other device as mentioned before, for example: 8 pieces of Raspberry Pi or other combinations.And then place them as following picture, please pay attention to the direction where there is a “R” mark. Connect the fan cable to Raspberry Pi on 5V and GND Pin. | |||
* Step 4. Fixed other device as mentioned before, for example: | [[File:Bacenganz3.jpg| left| 500px ]] | ||
[[File: | |||
<br style="clear:both;"> | <br style="clear:both;"> | ||
<font color=red>NOTE: Please beware of the direction of the acrylic holder.</font> | <font color=red>NOTE: Please beware of the direction of the acrylic holder.</font> | ||
[[File: | [[File:Bacenganz5.jpg| left| 500px ]] | ||
<br style="clear:both;"> | <br style="clear:both;"> | ||
<font color=red>Caution: Incorrect polarity may cause damage to your device!</font> | <font color=red>Caution: Incorrect polarity may cause damage to your device!</font> | ||
* Step 5. Place another pieces of acrylic layer on the top and fixed it with long steel screws. | * Step 5. Place another pieces of acrylic layer on the top and fixed it with long steel screws. | ||
[[File: | [[File:Bacenganz8.jpg| left| 500px ]] | ||
<br style="clear:both;"> | <br style="clear:both;"> | ||
* Step 6. Install acrylic crystal hander with M3x9mm screws. | * Step 6. Install acrylic crystal hander with M3x9mm screws. | ||
[[File: | [[File:Bacenganz7.jpg| left| 500px ]] | ||
<br style="clear:both;"> | <br style="clear:both;"> | ||
==Tutorial Video == | |||
[[File:Youtube.jpeg|thumb|left|200px]] | |||
<br style="clear:both;" > | |||
Please follow the links: | |||
* [ Rack Tower Pro Assemble tutorial | https://youtu.be/rA5XGzvu2eY ] <br> | |||
==Keywords== | ==Keywords== | ||
* Rack Tower pro, Acrylic case, Raspberry Pi 4B, Jetson Nano, Huge Fan, Heat dissipation, 52Pi | * Rack Tower pro, Acrylic case, Raspberry Pi 4B, Jetson Nano, Huge Fan, Heat dissipation, 52Pi | ||
==FAQ== | ==FAQ== | ||
* Q: Dose it fit for Raspberry Pi Zero ? | * Q: Dose it fit for Raspberry Pi Zero ? | ||
A: No, the mounting holes are fit for Raspberry Pi 4B /3B+ /3B and Jetson Nano. | A: No, the mounting holes are fit for Raspberry Pi 4B /3B+ /3B and Jetson Nano. | ||
* Q: Dose it support 3.5 inch HardDisk with it? | |||
A: No, It is hard to assemble it to this case. It is for 2.5inch HDD or SSD. | |||
Revision as of 19:36, 27 August 2021
Rack Tower Pro
Description
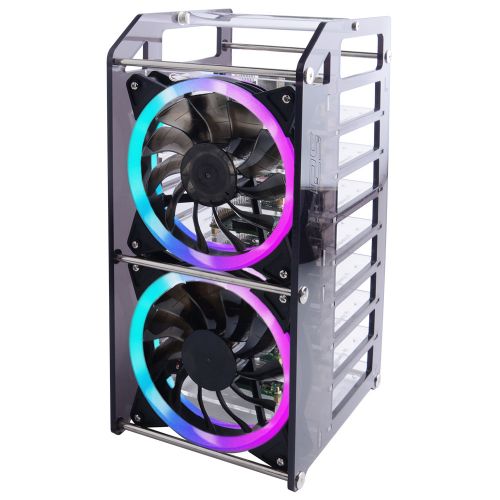
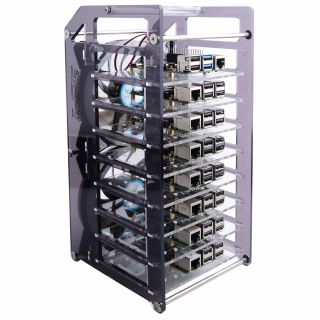
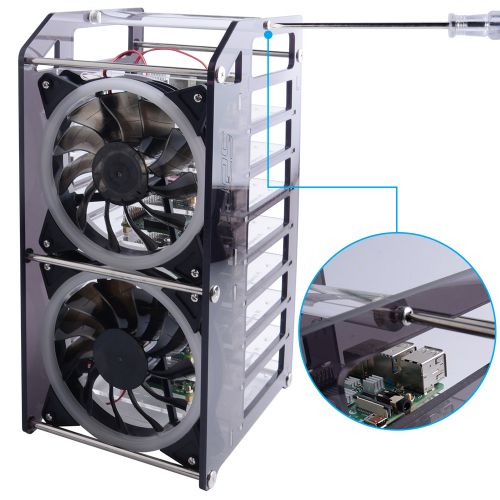
Rack Tower pro stands for a new concept for the 8-layer acrylic case for cluster.
This 8-layer acrylic oversized fan enclosure is a new product designed to provide shell protection and cooling solutions
for Raspberry Pi clusters, Raspberry Pi NAS servers, Jetson Nano clusters, and disk array clusters.
It is very delicate. The long fixing screws are designed with flat head screws, smooth and easy to install.
The fool-proof design of the positioning holes can prevent you from having trouble during installation.
A variety of screws with different specifications can meet your various product fixing needs.
For example, Raspberry Pi, 2.5-inch hard drive, Jetson Nano and so on.
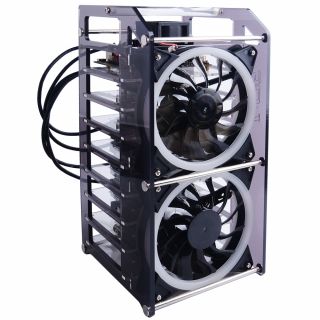
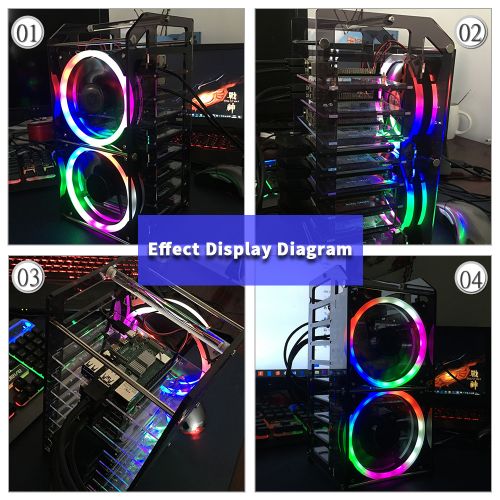
In addition, the large fan is driven by 5V, which can be directly powered by the Raspberry Pi, and it will have a colorful halo when it is running, which is very cool.
Features
- Easy to assemble
- Colorful LED 5V 12mm RGB Fan
- Compatible with Raspberry Pi, 2.5MM HDD, Jetson Nano
- Extremely heat dissipation effect
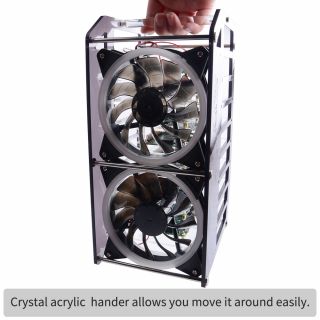
- Crystal Hander easy to carry on
- Flexible Mounting position
- Super Quite
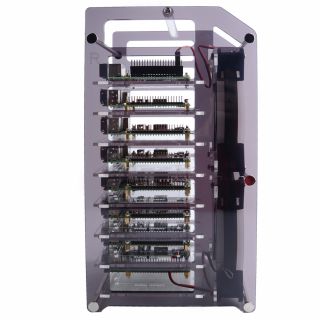
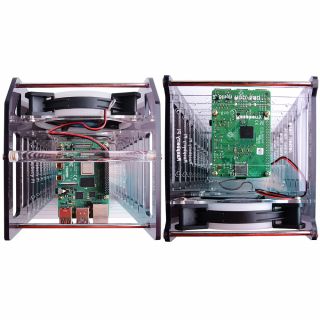
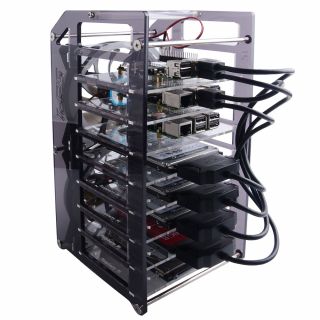
If you want to make better use of space, you can place the Raspberry Pi on one side of the bracket, and on the right side, you can place other small equipment, such as UPS power, etc., and it can also be used as a place for cables.
Gallery
Application Senario
Assembling Details
Effect Display Diagram
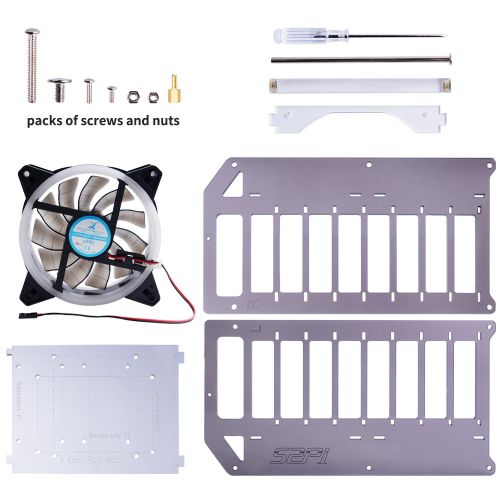
Package Includes
- One set of acrylic case.
- 1 x Right baffle
- 1 x Left baffle
- 8 x Middle interlayer
- 4 x Fan bracket
- 1 x 125mm Acrylic cylinder
- 5 x 130mm Male and female rivet
- 2 x M3x8mm Screw (for handle)
- 2 x 120mm RGB LED 5V fan
- 8 x M3x30mm screw (for 120mm Fan)
- 8 x M3 nut (for 120mm fan)
- 32 x M2.5x5+6mm copper column(for RPi)
- 32 x M2.5 nut (for middle interlayer)
- 32 x M3x5 wide head screw(for 4 hard disks)
- 1 x Long transparent screwdriver
- 1 x Installation instructions
How to Assemble
Please read this guide carefully before you starting assemble.
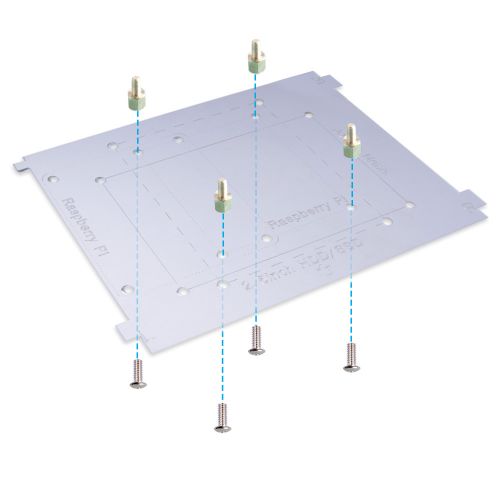
- Step 1. Fixed the copper sticks to acrylic layer after peeling off the protection film.
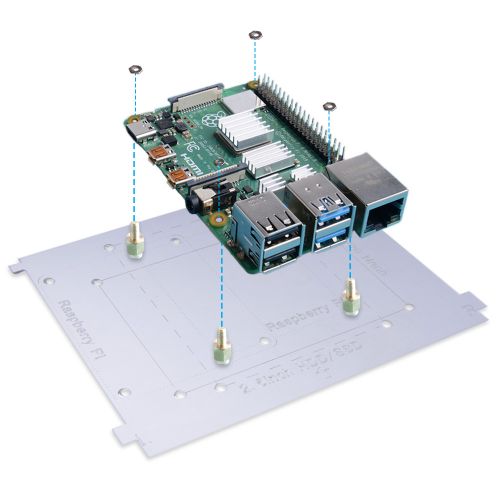
- Step 2. Paste heat sinks to Raspberry Pi and fix the raspberry pi to the acrylic layer with M2.5 nuts.
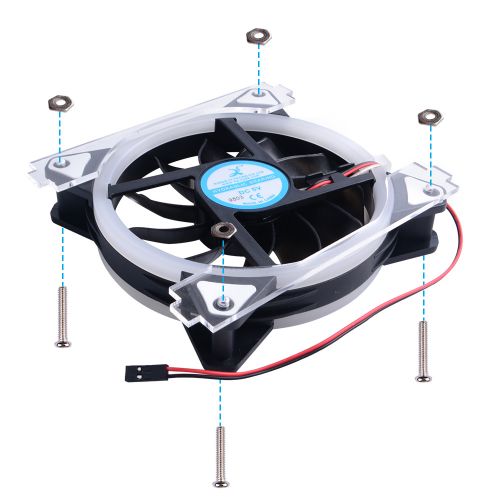
- Step 3. Fixed the bracket holder to the fan with long steel screws and nuts.
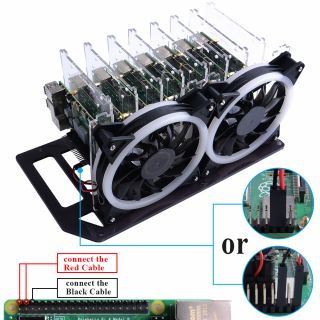
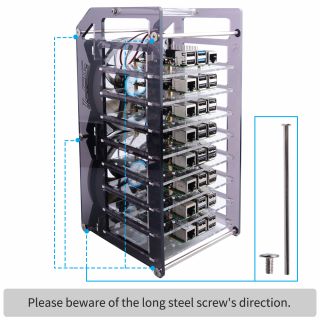
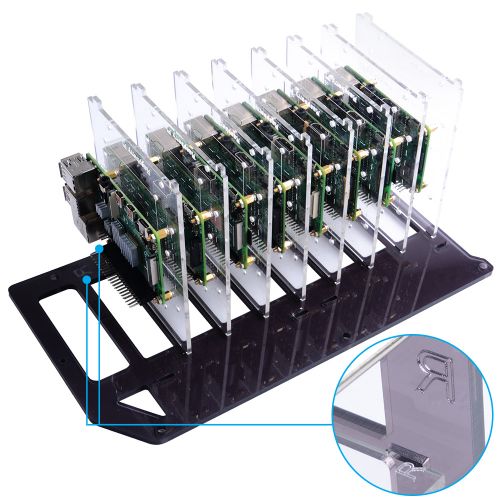
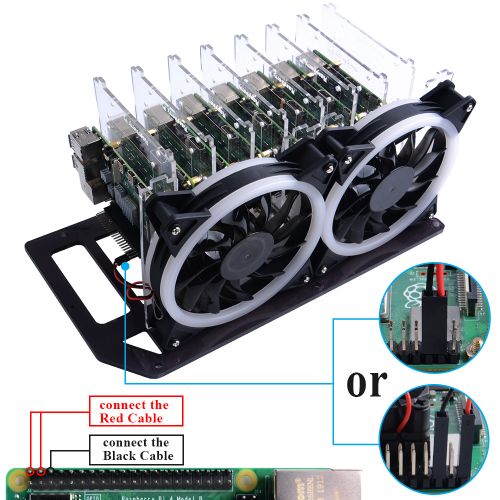
- Step 4. Fixed other device as mentioned before, for example: 8 pieces of Raspberry Pi or other combinations.And then place them as following picture, please pay attention to the direction where there is a “R” mark. Connect the fan cable to Raspberry Pi on 5V and GND Pin.
NOTE: Please beware of the direction of the acrylic holder.
Caution: Incorrect polarity may cause damage to your device!
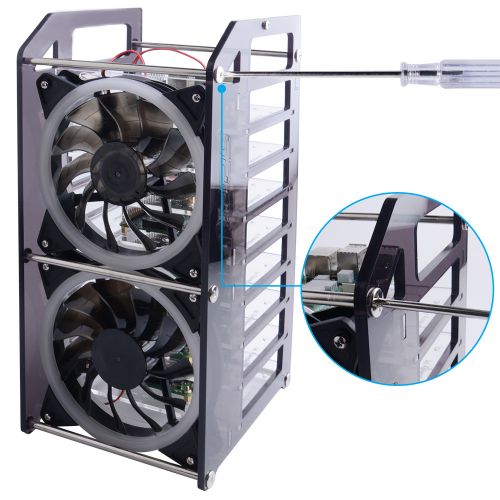
- Step 5. Place another pieces of acrylic layer on the top and fixed it with long steel screws.
- Step 6. Install acrylic crystal hander with M3x9mm screws.
Tutorial Video
Please follow the links:
- [ Rack Tower Pro Assemble tutorial | https://youtu.be/rA5XGzvu2eY ]
Keywords
- Rack Tower pro, Acrylic case, Raspberry Pi 4B, Jetson Nano, Huge Fan, Heat dissipation, 52Pi
FAQ
- Q: Dose it fit for Raspberry Pi Zero ?
A: No, the mounting holes are fit for Raspberry Pi 4B /3B+ /3B and Jetson Nano.
- Q: Dose it support 3.5 inch HardDisk with it?
A: No, It is hard to assemble it to this case. It is for 2.5inch HDD or SSD.
