X3000 SKU:EZ-0051: Difference between revisions
Jump to navigation
Jump to search


| Line 6: | Line 6: | ||
|} | |} | ||
<br style="clear:both;"> | <br style="clear:both;"> | ||
---- | |||
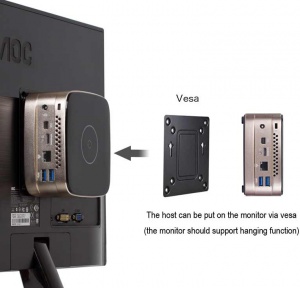
==How to Mount it to TV== | |||
[[File:X3000 860p10.jpg|none|300px]] | [[File:X3000 860p10.jpg|none|300px]] | ||
<br style="clear:both;"> | <br style="clear:both;"> | ||
---- | ---- | ||
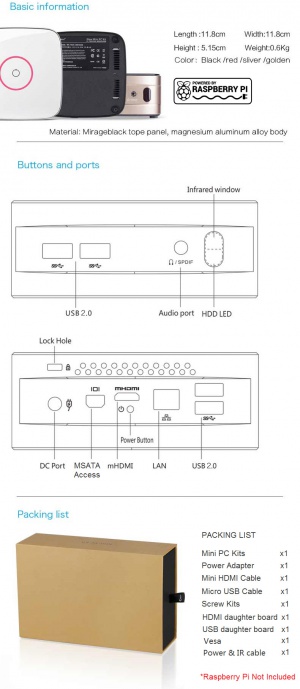
==Tech Specs== | |||
{| class="wikitable" | |||
! Parameter!! Value | |||
|- | |||
|For Use With || RASPBERRY PI 3 MODEL B / PI 2 MODEL B / PI 1 MODEL A+ / PI 1 MODEL B+ | |||
|- | |||
|Operating System || Raspbian Jessie / OSMC / Openelec / Volumio ...etc | |||
|- | |||
|Power Supply Unit || AC 90 ~ 240V input, 5Vdc 3A output | |||
With 3 snap-in plugs for North America (US), Europe (EU), United Kingdom (UK) | |||
|- | |||
|I/O Ports || | |||
- USB 2.0 x4 | |||
- Micro USB port x1 (MSATA SSD external access with PC, MAC) | |||
- Mini HDMI | |||
- 10/100 Ethernet RJ45 jack | |||
- 3.5mm Audio jack ( HDMI audio output and 5.1CH SPDIF optical output) | |||
- MSATA port - Supports up to 1TB MSATA internal SSD | |||
|- | |||
|Wireless || WIFI (IEEE 802.11b/g/n, Internal 2.4GHz antenna) | |||
- Built in IR sensor (38KHz, GPIO2 used) | |||
|- | |||
|Misc || | |||
- Turn on / off with 2-second touch | |||
- Colorful breathing light | |||
- Forced air cooling by built-in DC fan | |||
- Built in High quality audio headphone amplifier (TI TPA6133A) | |||
|- | |||
|Main Application Field || | |||
- Home Theater Personal Computer(HTPC) | |||
- Education | |||
- Office | |||
- Hotel Rooms. Diskless, locally run, smart design, upgrading hotel service | |||
- DIY a finished Raspberry Pi Computer | |||
|} | |||
---- | |||
[[File:X3000 860p4.jpg|left|300px]] | |||
<br style="clear:both;"> | |||
*A. FITTING THE RASPBERRY PI | |||
Required Accessories<br> | |||
[[File:X3000 860p5.jpg|left|300px]] | |||
<br style="clear:both;"> | |||
[[File:X3000 860p11.jpg|left|300px]] | |||
<br style="clear:both;"> | |||
Accessories Installation <br> | |||
[[File:X3000 860p6.jpg|left|300px]] | |||
<br style="clear:both;"> | |||
[[File:X3000 860p7.jpg|left|300px]] | |||
<br style="clear:both;"> | |||
---- | |||
==Raspberry Pi board Installation == | |||
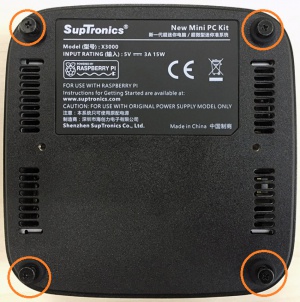
*1) Remove the four screws at the bottom of the chassis and remove the bottom cover | |||
[[File:X3000 860p18.jpg|left|300px]] | |||
<br style="clear:both;"> | |||
[[File:X3000 860p8.jpg|left|300px]] | |||
<br style="clear:both;"> | |||
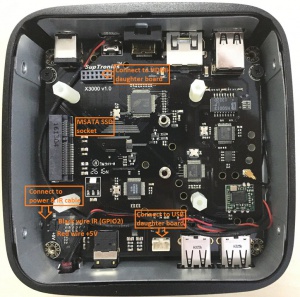
MSATA SSD SHOULD BE INSTALLED BEFORE FITTING THE RASPBERRY PI. <br> | |||
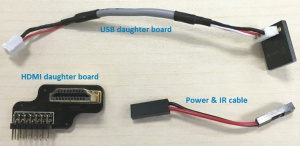
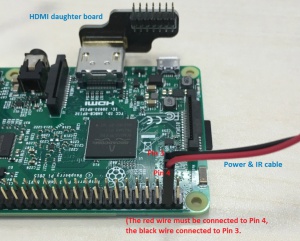
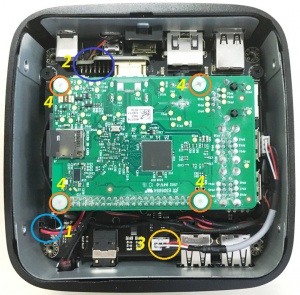
*2) Connect the power & IR cable from Raspberry Pi to the 2-pin male pin header | |||
*3) Plugs the HDMI daughter board into the 14-pin HDMI female pin header | |||
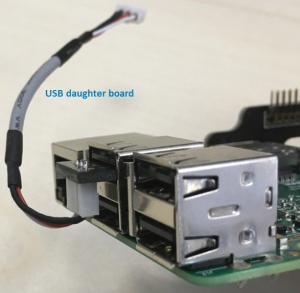
*4) Connect the cable of USB daughter board to the 3-pin PH connector | |||
*5) Screwing the Raspberry Pi board | |||
[[File:X3000 860p9.jpg|left|300px]] | |||
<br style="clear:both;"> | |||
---- | |||
==B. POWER ON / OFF == | |||
<font color=red>TO TURN ON</font><br> | |||
*1) HDMI cable and power adapter should be connected before powering on. | |||
*2) Touch the power symbol and hold until the colorful breathing light is ON. | |||
[[File:X3000 336p.jpg|left|300px]] | |||
<br style="clear:both;"> | |||
---- | |||
<font color=red>TO SHUTDOWN</font><br> | |||
*1) Power off your system using the system menu - IMPORTANT! | |||
*2) Touch the power symbol and hold until the colorful breathing light is OFF. | |||
*3) It is recommended to unplug the power supply unit when you are not using it. | |||
<pre> | |||
C1. OPERATING SYSTEM CONFIGURATION - OSMC | |||
C2. OPERATING SYSTEM CONFIGURATION - VOLUMIO | |||
C3. OPERATING SYSTEM CONFIGURATION - RASPBIAN JESSIE | |||
</pre> | |||
*Based on RASPBIAN JESSIE | |||
<pre> | |||
Version: March 2016 | |||
Release date: 2016-03-18 | |||
Kernel version: 4.1 | |||
HDMI setting | |||
</pre> | |||
*<1> To ensure that the necessary kernel modules are loaded at boot | |||
<code>pi@raspberrypi ~ $ sudo nano /boot/config.txt</code><br> | |||
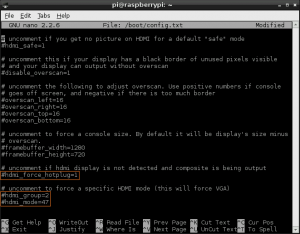
*<2> Uncomment following three lines in config.txt by removing '#' located at start of the line. (check Images below) | |||
[[File:Vga1.png|left|300px]] | |||
<br style="clear:both;"> | |||
<pre> | |||
hdmi_force_hotplug=1 pretends that HDMI device is always attached | |||
hdmi_group specifies whether monitor is DMT type (Computers) or CEA type (TV) | |||
hdmi_mode specifies the resolution of monitor. | |||
</pre> | |||
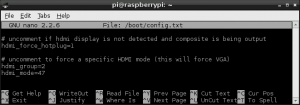
*<3> For hdmi_group value selection : If you’re using output as Computer monitor then replace value ’1′ with ’2′, so the new config will be like : | |||
<pre> | |||
hdmi_group=2 | |||
</pre> | |||
(Select value 1 for TV, Select value 2 for monitor)<br> | |||
*<4> For hdmi_mode value selection : Now open eLinux RPi config scroll down, there in hdmi_mode two tables are given, select the correct resolution as per your monitor. | |||
(Table1 if you’re using TV & Table2 if you’re using Monitor)<br> | |||
Since my monitor’s resolution is 1440×900 px, hdmi_mode=47 fits me the best. So, the modified config.txt will be like.<br> | |||
<pre> | |||
hdmi_mode=47 | |||
</pre> | |||
Overall my uncommented lines will look something like : <br> | |||
[[File:Vga2.png|left|300px]] | |||
<br style="clear:both;"> | |||
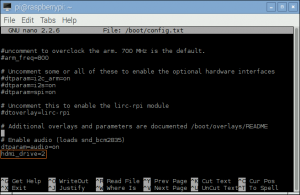
*<5> adding the "hdmi_drive=2" line at the bottom | |||
[[File:Hdmi setting.png|left|300px]] | |||
<br style="clear:both;"> | |||
*<6> Save your changes by pressing Ctrl-x then Y | |||
*<7> Reboot your Raspberry Pi | |||
<code>pi@raspberrypi ~ $ sudo reboot</code><br> | |||
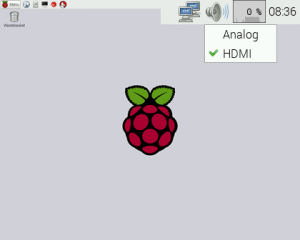
*<8> Mouse right click the speaker icon and select audio output of HDMI | |||
[[File:X600 setting 1.png|left|300px]] | |||
<br style="clear:both;"> | |||
*Testing the IR receiver | |||
*<9> Installing LIRC | |||
<code>pi@raspberrypi ~ $ sudo apt-get install lirc</code><br> | |||
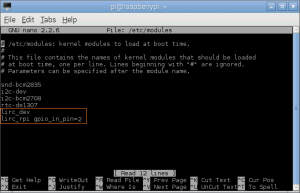
*<10> Add the two lines below to /etc/modules . This will start the modules up on boot. Pin 8 bellow will be used to take the output from the IR sensor. | |||
<code>pi@raspberrypi ~ $ sudo nano /etc/modules</code><br> | |||
<pre> | |||
lirc_dev | |||
lirc_rpi gpio_in_pin=2 | |||
</pre> | |||
[[File:Ir 0 - x3000 (1).png|left|300px]] | |||
<br style="clear:both;"> | |||
*<11> Save your changes by pressing Ctrl-x then Y | |||
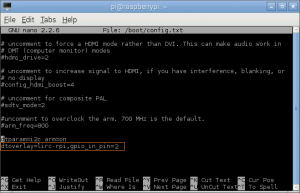
*<12> If you are using 3.18.x RaspberryPi firmware you must modify one additional file for the lirc-rpi kernel extension to be loaded: | |||
Edit your /boot/config.txt file <br> | |||
<code>pi@raspberrypi ~ $ sudo nano /boot/config.txt</code><br> | |||
and add:<br> | |||
<code>dtoverlay=lirc-rpi,gpio_in_pin=2</code><br> | |||
[[File:Ir 0 - x3000 (2).png|left|300px]] | |||
<br style="clear:both;"> | |||
[[File:Ir2.gif|left|300px]] | |||
<br style="clear:both;"> | |||
Revision as of 14:02, 18 October 2016
X3000 Mini PC Kits
 |
 |
 |
How to Mount it to TV

Tech Specs
| Parameter | Value |
|---|---|
| For Use With | RASPBERRY PI 3 MODEL B / PI 2 MODEL B / PI 1 MODEL A+ / PI 1 MODEL B+ |
| Operating System | Raspbian Jessie / OSMC / Openelec / Volumio ...etc |
| Power Supply Unit | AC 90 ~ 240V input, 5Vdc 3A output
With 3 snap-in plugs for North America (US), Europe (EU), United Kingdom (UK) |
| I/O Ports |
- USB 2.0 x4 - Micro USB port x1 (MSATA SSD external access with PC, MAC) - Mini HDMI - 10/100 Ethernet RJ45 jack - 3.5mm Audio jack ( HDMI audio output and 5.1CH SPDIF optical output) - MSATA port - Supports up to 1TB MSATA internal SSD |
| Wireless | WIFI (IEEE 802.11b/g/n, Internal 2.4GHz antenna)
- Built in IR sensor (38KHz, GPIO2 used) |
| Misc |
- Turn on / off with 2-second touch - Colorful breathing light - Forced air cooling by built-in DC fan - Built in High quality audio headphone amplifier (TI TPA6133A) |
| Main Application Field |
- Home Theater Personal Computer(HTPC) - Education - Office - Hotel Rooms. Diskless, locally run, smart design, upgrading hotel service - DIY a finished Raspberry Pi Computer |

- A. FITTING THE RASPBERRY PI
Required Accessories


Accessories Installation


Raspberry Pi board Installation
- 1) Remove the four screws at the bottom of the chassis and remove the bottom cover


MSATA SSD SHOULD BE INSTALLED BEFORE FITTING THE RASPBERRY PI.
- 2) Connect the power & IR cable from Raspberry Pi to the 2-pin male pin header
- 3) Plugs the HDMI daughter board into the 14-pin HDMI female pin header
- 4) Connect the cable of USB daughter board to the 3-pin PH connector
- 5) Screwing the Raspberry Pi board

B. POWER ON / OFF
TO TURN ON
- 1) HDMI cable and power adapter should be connected before powering on.
- 2) Touch the power symbol and hold until the colorful breathing light is ON.

TO SHUTDOWN
- 1) Power off your system using the system menu - IMPORTANT!
- 2) Touch the power symbol and hold until the colorful breathing light is OFF.
- 3) It is recommended to unplug the power supply unit when you are not using it.
 	C1. OPERATING SYSTEM CONFIGURATION - OSMC
 	C2. OPERATING SYSTEM CONFIGURATION - VOLUMIO
 	C3. OPERATING SYSTEM CONFIGURATION - RASPBIAN JESSIE
- Based on RASPBIAN JESSIE
Version: March 2016
Release date: 2016-03-18
Kernel version: 4.1
HDMI setting
- <1> To ensure that the necessary kernel modules are loaded at boot
pi@raspberrypi ~ $ sudo nano /boot/config.txt
- <2> Uncomment following three lines in config.txt by removing '#' located at start of the line. (check Images below)

hdmi_force_hotplug=1      pretends that HDMI device is always attached
hdmi_group                            specifies whether monitor is DMT type (Computers) or CEA type (TV)
hdmi_mode                            specifies the resolution of monitor.
- <3> For hdmi_group value selection : If you’re using output as Computer monitor then replace value ’1′ with ’2′, so the new config will be like :
hdmi_group=2
(Select value 1 for TV, Select value 2 for monitor)
- <4> For hdmi_mode value selection : Now open eLinux RPi config scroll down, there in hdmi_mode two tables are given, select the correct resolution as per your monitor.
(Table1 if you’re using TV & Table2 if you’re using Monitor)
Since my monitor’s resolution is 1440×900 px, hdmi_mode=47 fits me the best. So, the modified config.txt will be like.
hdmi_mode=47
Overall my uncommented lines will look something like :

- <5> adding the "hdmi_drive=2" line at the bottom

- <6> Save your changes by pressing Ctrl-x then Y
- <7> Reboot your Raspberry Pi
pi@raspberrypi ~ $ sudo reboot
- <8> Mouse right click the speaker icon and select audio output of HDMI

- Testing the IR receiver
- <9> Installing LIRC
pi@raspberrypi ~ $ sudo apt-get install lirc
- <10> Add the two lines below to /etc/modules . This will start the modules up on boot. Pin 8 bellow will be used to take the output from the IR sensor.
pi@raspberrypi ~ $ sudo nano /etc/modules
lirc_dev
lirc_rpi gpio_in_pin=2
.png)
- <11> Save your changes by pressing Ctrl-x then Y
- <12> If you are using 3.18.x RaspberryPi firmware you must modify one additional file for the lirc-rpi kernel extension to be loaded:
Edit your /boot/config.txt file
pi@raspberrypi ~ $ sudo nano /boot/config.txt
and add:
dtoverlay=lirc-rpi,gpio_in_pin=2
.png)
