K-0171: Difference between revisions
| (7 intermediate revisions by the same user not shown) | |||
| Line 1: | Line 1: | ||
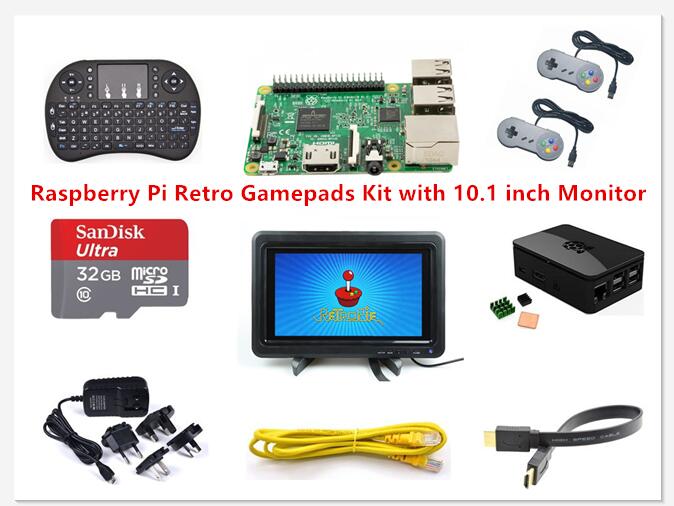
==Raspberry Pi Retro Gamepads Kit with 10.1 inch Monitor == | ==Raspberry Pi Retro Gamepads Kit with 10.1 inch Monitor == | ||
[[File:Gamepad.jpg|left|800px]] | |||
<br style="clear:both;"> | |||
---- | ---- | ||
==Description== | ==Description== | ||
Raspberry Pi Retro Gamepads Kit with 10.1 inch Monitor fits for those people who want to play old fashion video game in Raspberry Pi. <br>It contains an operating system called RetroPie, and RetroPie allows you to turn your Raspberry Pi or PC into a retro-gaming machine. <br>It builds upon Raspbian, EmulationStation, RetroArch and many other projects to enable you to play your favorites Arcade, home-console, and classic PC games with the minimum set-up.<br>For power users it also provides a large variety of configuration tools to customize the system as you want.<br> | Raspberry Pi Retro Gamepads Kit with 10.1 inch Monitor fits for those people who want to play old fashion video game in Raspberry Pi. <br>It contains an operating system called RetroPie, and RetroPie allows you to turn your Raspberry Pi or PC into a retro-gaming machine. <br>It builds upon Raspbian, EmulationStation, RetroArch and many other projects to enable you to play your favorites Arcade, home-console, and classic PC games with the minimum set-up.<br>For power users it also provides a large variety of configuration tools to customize the system as you want.<br> | ||
| Line 22: | Line 25: | ||
*5. Connect Power supply to Raspberry Pi’s MicroUSB port. | *5. Connect Power supply to Raspberry Pi’s MicroUSB port. | ||
*6. Connect Switch power supply to 10.1 inch HD monitor. | *6. Connect Switch power supply to 10.1 inch HD monitor. | ||
---- | |||
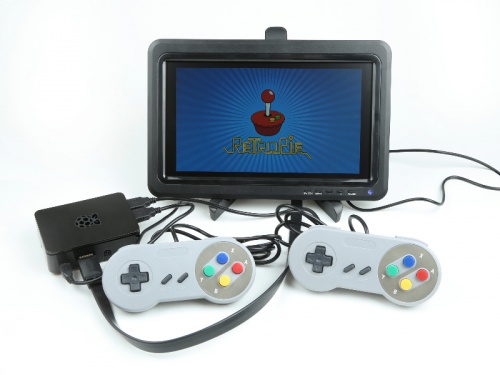
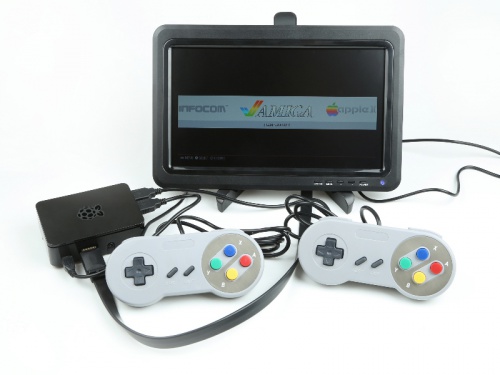
There are some pictures showing how to assemble them together. | |||
{|- | |||
[[File:Gamepad001.jpg|left|500px]] | |||
[[File:Gamepad002.jpg|none|500px]] | |||
|} | |||
---- | ---- | ||
| Line 42: | Line 51: | ||
|Remote controller ||1 | |Remote controller ||1 | ||
|- | |- | ||
|Switching Power Adapter ||1 | |Switching Power Adapter DC12V/1A ||1 | ||
|- | |- | ||
|HDMI cable ||1 | |HDMI cable 30cm ||1 | ||
|- | |- | ||
|Ethernet cable ||1 | |Ethernet cable 1.5m ||1 | ||
|- | |- | ||
|Aluminum heat sinks and copper heat sinks || 3 | |Aluminum heat sinks and copper heat sinks || 3 | ||
| Line 55: | Line 64: | ||
|- | |- | ||
|Portable Foid Stand||1 | |Portable Foid Stand||1 | ||
|- | |||
|Power Supply With AU EU UK US Plug (5V/2.5A) || 1 | |||
|} | |} | ||
---- | ---- | ||
| Line 62: | Line 73: | ||
<br style="clear:both;" > | <br style="clear:both;" > | ||
Please follow the link: | Please follow the link: | ||
[ How to assemble it and configure it | https://youtu.be/ | [ How to assemble it and configure it | https://youtu.be/DRRTHOPu0s0] | ||
---- | ---- | ||
Revision as of 01:28, 23 December 2016
Raspberry Pi Retro Gamepads Kit with 10.1 inch Monitor
Description
Raspberry Pi Retro Gamepads Kit with 10.1 inch Monitor fits for those people who want to play old fashion video game in Raspberry Pi.
It contains an operating system called RetroPie, and RetroPie allows you to turn your Raspberry Pi or PC into a retro-gaming machine.
It builds upon Raspbian, EmulationStation, RetroArch and many other projects to enable you to play your favorites Arcade, home-console, and classic PC games with the minimum set-up.
For power users it also provides a large variety of configuration tools to customize the system as you want.
Once you buy this kit, you do not need to buy other hardware, just assemble it and have fun according to our instructions and tutorial video.
Features
- 1. Easy to setup
- 2. High Performance
- 3. High Quality & high definition
- 4. Multiple functional panel
- 5. Preload RetroPie Operating System
- 6. Plug & Play
Instructions
- 1. Hook up your Raspberry Pi with the 10.1 inch HD monitor by HDMI cable.
- 2. Insert TF card to Raspberry Pi’s Card slot.
- 3. Insert Remote receiver of mini keyboard to Raspberry Pi USB Port.
- 4. Connect Two Gamepads to Raspberry Pi USB ports.
- 5. Connect Power supply to Raspberry Pi’s MicroUSB port.
- 6. Connect Switch power supply to 10.1 inch HD monitor.
There are some pictures showing how to assemble them together.
Package Include
| Products | Quantity |
|---|---|
| Raspberry Pi 3 Model B | 1 |
| 32GB SanDisk TF card (Preinstalled RetroPie) | 1 |
| Card adapter | 1 |
| Card protect case | 1 |
| Black ABS plastic enclosure | 1 |
| 10.1 inch HD 1366x768 Monitor | 1 |
| Remote controller | 1 |
| Switching Power Adapter DC12V/1A | 1 |
| HDMI cable 30cm | 1 |
| Ethernet cable 1.5m | 1 |
| Aluminum heat sinks and copper heat sinks | 3 |
| Mini keyboard | 1 |
| USB Game Pad | 2 |
| Portable Foid Stand | 1 |
| Power Supply With AU EU UK US Plug (5V/2.5A) | 1 |
Video Tutorial
Please follow the link:
[ How to assemble it and configure it | https://youtu.be/DRRTHOPu0s0]


