K-0582: Difference between revisions
Jump to navigation
Jump to search

| Line 45: | Line 45: | ||
==How to start== | ==How to start== | ||
===Getting Start with Micro Python and Thonny IDE=== | |||
<pre>All experimental environments are completed under the Raspberry Pi 4B hardware device and Raspberry Pi OS system. It will be very convenient if you use Raspberry Pi to perform the following operations.</pre> | |||
* 1. First, solder the Pin header for your Raspberry Pi Pico. | |||
* 2. Download the MicroPython UF2 file from: [ https://micropython.org/download/rp2-pico/rp2-pico-latest.uf2 ] | |||
* 3. Push and hold the `BOOTSEL` button and plug your Pico into the USB port of your Raspberry Pi or other computer. Release the `BOOTSEL` button after your Pico is connected. It will mount as a Mass Storage Device called `RPI-RP2`. Drag and drop the MicroPython UF2 file onto the RPI-RP2 volume. Your Pico will reboot. You are now running MicroPython. | |||
if you have any problem with the steps, please refer to :[ https://datasheets.raspberrypi.org/pico/raspberry-pi-pico-python-sdk.pdf ] | |||
* 4. Turn on your Raspberry Pi and Plug the Raspberry Pi Pico via MicroUSB cable to USB port. | |||
* 5. Reinstall `Thonny` IDE on your Raspberry Pi by typing follwing command in terminal: | |||
<pre> | |||
sudo apt-get update | |||
sudo apt-get upgrade -y | |||
sudo apt -y purge thonny | |||
sudo apt -y install thonny | |||
thonny | |||
</pre> | |||
* 6. Open a new terminal and typing: | |||
<pre> | |||
cd ~ | |||
git clone https://github.com/geeekpi/picokit.git | |||
cd picokit | |||
</pre> | |||
There are some demo codes in this warehouse, which can be opened by `Thonny`, copied and pasted, and then saved to the `main.py` file in Pico. | |||
===How to upload demo code=== | |||
* For example: Upload LED Blinking demo code | |||
====Raspberry Pi Pico Pinout==== | |||
* Pinout | |||
[[File:Pinout.png|left|320px]] | |||
<br style="clear:both;"> | |||
* Function Definitions: | |||
[[File:20210430132330.png|left|320px]] | |||
<br style="clear:both;"> | |||
==Keywords== | ==Keywords== | ||
* Raspberry Pi Pico Starter Kit, pico kit, starter kit for pico, raspberry Pi pico kit | * Raspberry Pi Pico Starter Kit, pico kit, starter kit for pico, raspberry Pi pico kit | ||
Revision as of 13:24, 30 April 2021
Raspberry Pi Pico Starter Kit

Description
Raspberry Pi Pico Starter kit includes commonly used sensors, for example: LED lights, 9g servo, LCD1602 display module, resisters and buzzer, PIR sensor. You can build your own circuit on the breadboard kit, and DIY your own micro controller project through micropython or C, C++ programming.
Features
- Contains a Raspberry Pi Pico. (RP2040 microcontroller with 2MByte Flash)
- Easy to use
- Rich documentation resources
- Diversified peripherals
- Small and portable
Gallery
- Product Outlook
 |
|
 |
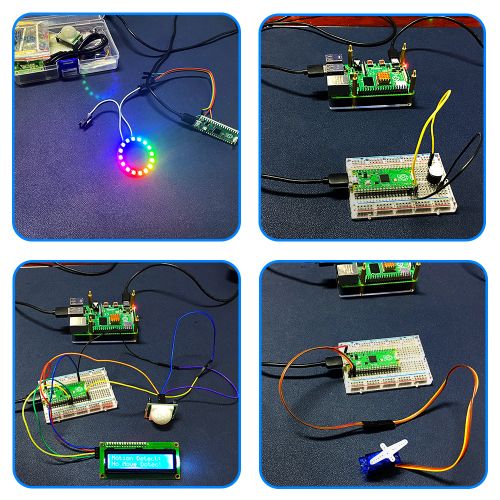
- Application senario

 |
 |
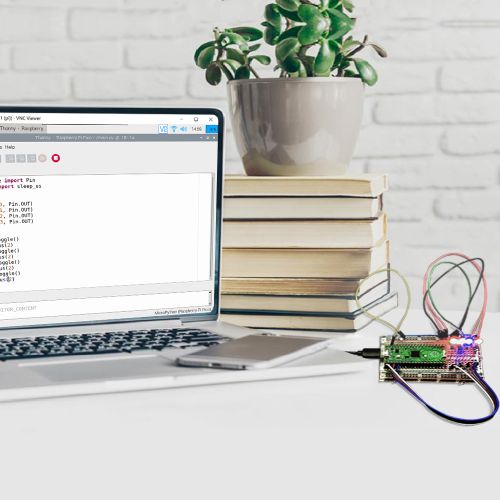
- Programing with Mac

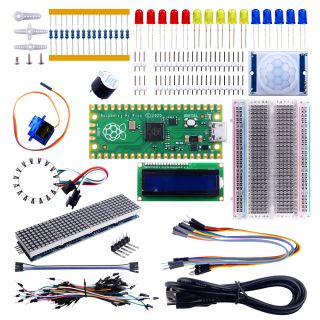
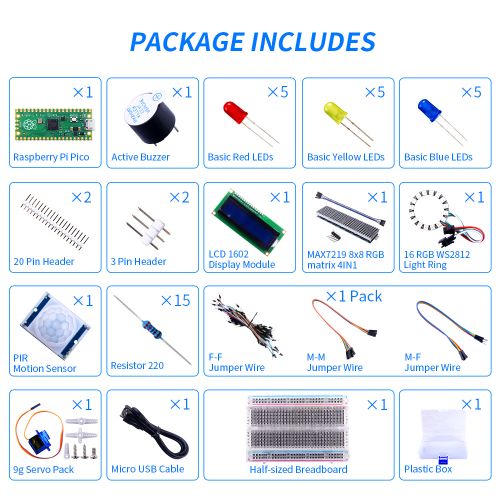
Package Includes
- 1 x LCD1602 display module
- 1 x PIR sensor
- 1 x LED Pack(Red, Blue, Green)
- 1 x Buzzer
- 1 x 9g 180-degree servo
- 1 x 16 RGB NeoPixel Ring
- 1 x Half-Sized Breadboard
- 1 x Resistor Pack
- 1 x Jumper wire Pack
- 1 x Max7219 32x8 Matrix
- 1 x Instructions Book

How to start
Getting Start with Micro Python and Thonny IDE
All experimental environments are completed under the Raspberry Pi 4B hardware device and Raspberry Pi OS system. It will be very convenient if you use Raspberry Pi to perform the following operations.
- 1. First, solder the Pin header for your Raspberry Pi Pico.
- 2. Download the MicroPython UF2 file from: [ https://micropython.org/download/rp2-pico/rp2-pico-latest.uf2 ]
- 3. Push and hold the `BOOTSEL` button and plug your Pico into the USB port of your Raspberry Pi or other computer. Release the `BOOTSEL` button after your Pico is connected. It will mount as a Mass Storage Device called `RPI-RP2`. Drag and drop the MicroPython UF2 file onto the RPI-RP2 volume. Your Pico will reboot. You are now running MicroPython.
if you have any problem with the steps, please refer to :[ https://datasheets.raspberrypi.org/pico/raspberry-pi-pico-python-sdk.pdf ]
- 4. Turn on your Raspberry Pi and Plug the Raspberry Pi Pico via MicroUSB cable to USB port.
- 5. Reinstall `Thonny` IDE on your Raspberry Pi by typing follwing command in terminal:
sudo apt-get update
sudo apt-get upgrade -y
sudo apt -y purge thonny
sudo apt -y install thonny
thonny
- 6. Open a new terminal and typing:
cd ~
git clone https://github.com/geeekpi/picokit.git
cd picokit
There are some demo codes in this warehouse, which can be opened by `Thonny`, copied and pasted, and then saved to the `main.py` file in Pico.
How to upload demo code
- For example: Upload LED Blinking demo code
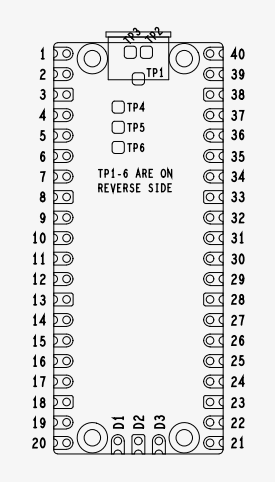
Raspberry Pi Pico Pinout
- Pinout

- Function Definitions:

Keywords
- Raspberry Pi Pico Starter Kit, pico kit, starter kit for pico, raspberry Pi pico kit