EP-0214: Difference between revisions
No edit summary |
|||
| (3 intermediate revisions by the same user not shown) | |||
| Line 3: | Line 3: | ||
==Descriptions== | ==Descriptions== | ||
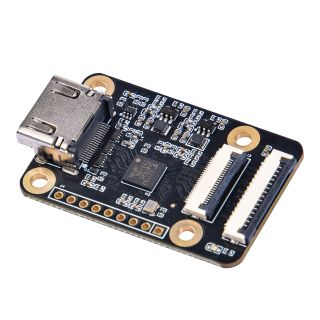
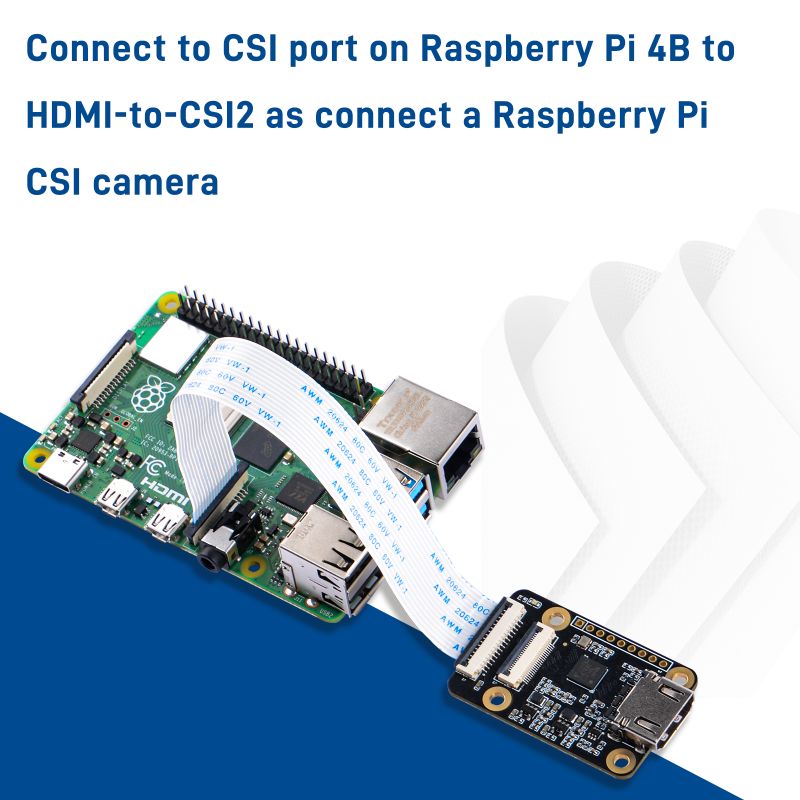
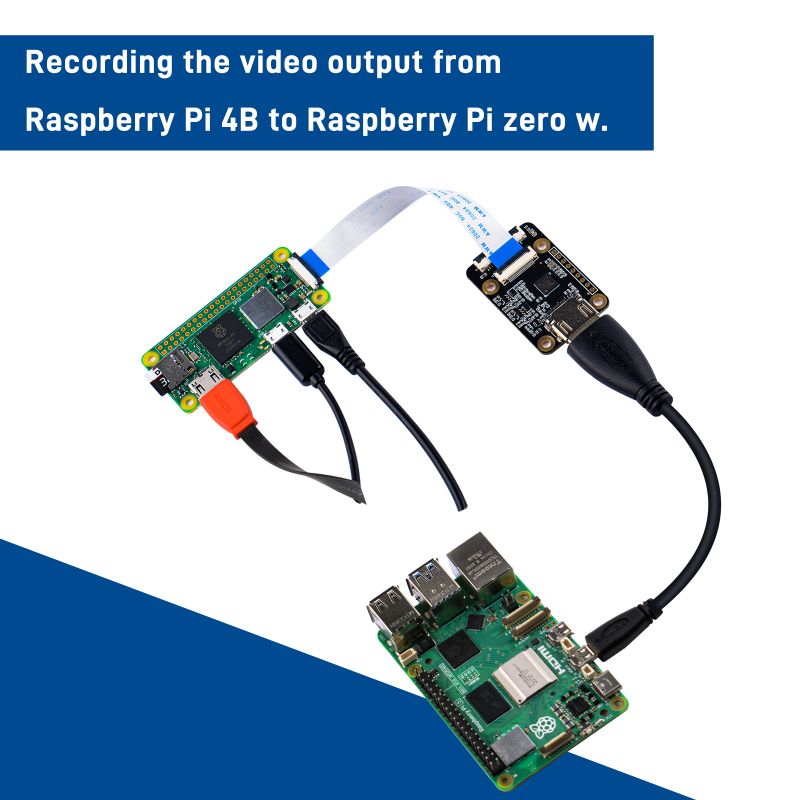
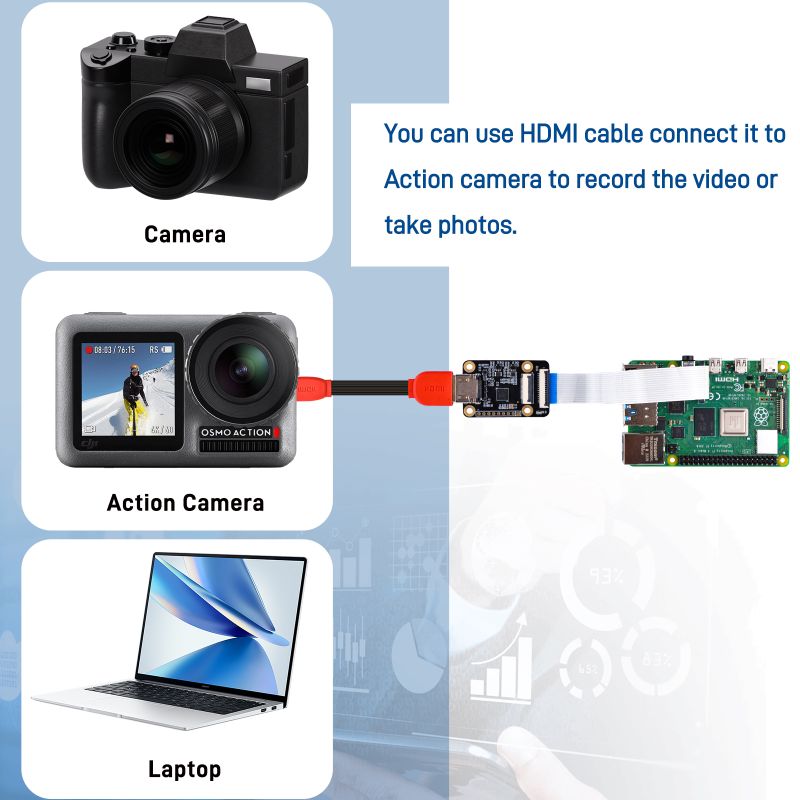
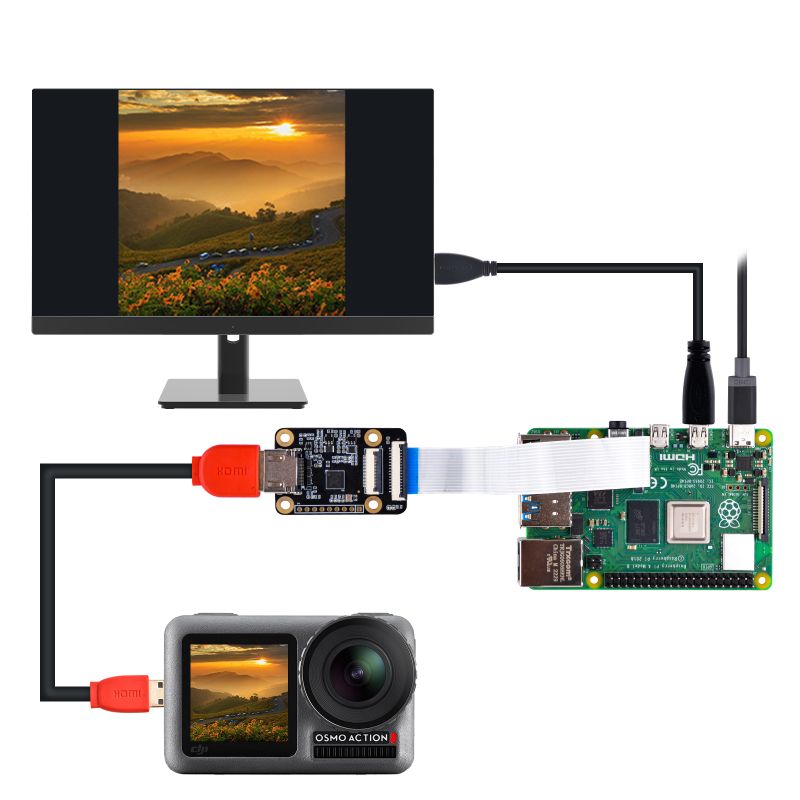
Raspberry Pi | Raspberry Pi HDMI to CSI-2 Module with Toshiba TC358743XBG chip, Hdmi-input supports up to 1080p25fps, output supports up to 60fps. Compatible with Raspberry Pi 4B/3B+/3B/Pi Zero/W/2W. HDMI To CSI Adapter for Raspberry Pi is an HDMI to CSI camera port adapter designed for the Raspberry Pi 4/3 with up to 1080p@30fps support from HDMI input and is backwards compatible. It allows you to use any camera with an HDMI output, such as Canon, Nikon or GoPro action cameras, as a standard Raspberry Pi CSI camera, even you can record the screen which is output from another Raspberry Pi HDMI port. | ||
Raspberry Pi Computer Module 4 can use HDMI to CSI-2 Module on PiKVM OS. | |||
<pre> NOTE:This product has provided all hardware accessories. The software can currently be used directly on Raspberry Pi 4B, 3B+/3B/Zero series and other devices. However, software support for Raspberry Pi 5 software is currently not available. | <pre> NOTE: This product has provided all hardware accessories. The software can currently be used directly on Raspberry Pi 4B, 3B+/3B/Zero series and other devices. However, software support for Raspberry Pi 5 software is currently not available. | ||
</pre> | </pre> | ||
== | ==Features== | ||
* Easy to assemble | * Easy to assemble | ||
* FPC cable supports 15Pin@ 2Lanes or 22Pin @ 4Lanes (CM4 Computer module only) | * FPC cable supports 15Pin@ 2Lanes or 22Pin @ 4Lanes (CM4 Computer module only) | ||
| Line 24: | Line 24: | ||
==Gallery== | ==Gallery== | ||
* Product Size | |||
[[File:EP-0214-02.jpg|left|800px]] | |||
<br style="clear:both;"> | |||
* FPC cable compatibility | |||
[[File:EP-0214-04.jpg|left|800px]] | |||
<br style="clear:both;"> | |||
* Pinout definition | |||
[[File:EP-0214-09.jpg|left|800px]] | |||
<br style="clear:both;"> | |||
* Connection style | |||
[[File:EP-0214-06.jpg|left|800px]] | |||
<br style="clear:both;"> | |||
* Application scenario | |||
[[File:EP-0214-05.jpg|left|800px]] | |||
<br style="clear:both;"> | |||
[[File:EP-0214-07.jpg|left|800px]] | |||
<br style="clear:both;"> | |||
* Recording video from an sports camera | |||
[[File:EP-0214-08.jpg|left|800px]] | |||
<br style="clear:both;"> | |||
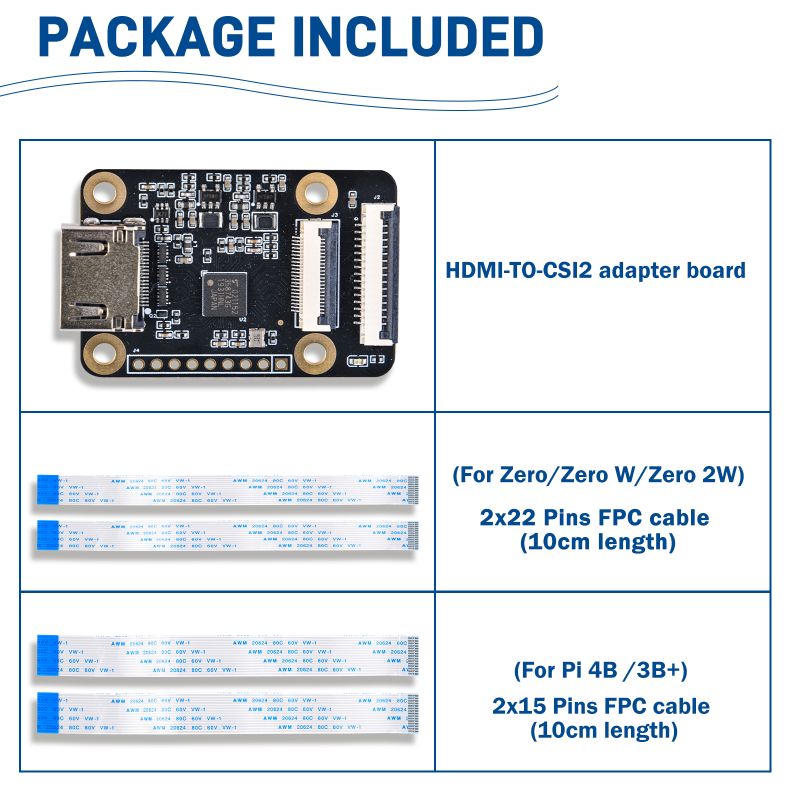
==Package Includes== | |||
* 1 x HDMI-TO-CSI2 adapter board | |||
* 2 x 22Pin FPC cable | |||
* 2 x 15Pin FPC cable | |||
[[File:EP-0214-03.jpg|left|800px]] | |||
<br style="clear:both;"> | |||
==Getting Start== | ==Getting Start== | ||
===For Raspberry Pi 4B/3B+/3B/3A+/Pi zero/Pi zero W/Pi zero 2 W=== | ===For Raspberry Pi 4B/3B+/3B/3A+/Pi zero/Pi zero W/Pi zero 2 W=== | ||
| Line 285: | Line 314: | ||
PS: We recommend that you modify the above framerate parameter to the actual frame rate of your HDMI signal, the actual frame rate value is from the result of 'v4l2-ctl --query-dv-timings' command. | PS: We recommend that you modify the above framerate parameter to the actual frame rate of your HDMI signal, the actual frame rate value is from the result of 'v4l2-ctl --query-dv-timings' command. | ||
</font><br> | </font><br> | ||
==Keywords== | |||
* HDMI-to-csi2, video capture card, HDMI recorder, HDMI signal capture board, Toshiba TC358743XBG | |||
Latest revision as of 15:46, 21 March 2024
HDMI-TO-CSI2 adapter board for Raspberry Pi
Descriptions
Raspberry Pi HDMI to CSI-2 Module with Toshiba TC358743XBG chip, Hdmi-input supports up to 1080p25fps, output supports up to 60fps. Compatible with Raspberry Pi 4B/3B+/3B/Pi Zero/W/2W. HDMI To CSI Adapter for Raspberry Pi is an HDMI to CSI camera port adapter designed for the Raspberry Pi 4/3 with up to 1080p@30fps support from HDMI input and is backwards compatible. It allows you to use any camera with an HDMI output, such as Canon, Nikon or GoPro action cameras, as a standard Raspberry Pi CSI camera, even you can record the screen which is output from another Raspberry Pi HDMI port. Raspberry Pi Computer Module 4 can use HDMI to CSI-2 Module on PiKVM OS.
NOTE: This product has provided all hardware accessories. The software can currently be used directly on Raspberry Pi 4B, 3B+/3B/Zero series and other devices. However, software support for Raspberry Pi 5 software is currently not available.
Features
- Easy to assemble
- FPC cable supports 15Pin@ 2Lanes or 22Pin @ 4Lanes (CM4 Computer module only)
- Chipset: Toshiba TC358743XBG
- Input signal: Full-sized HDMI
- Soldering Pad support
- Output signal: CSI
- Function: HDMI-TO-CSI2 (H2C for short)
- Limitation: HDMI input support up to 1080p30fps
- Compatible with: Raspberry Pi 4B/3B+/3B/3A+/Pi zero/Pi zero W/Pi zero 2W
Note: This module does not support OctoPi OS.
Gallery
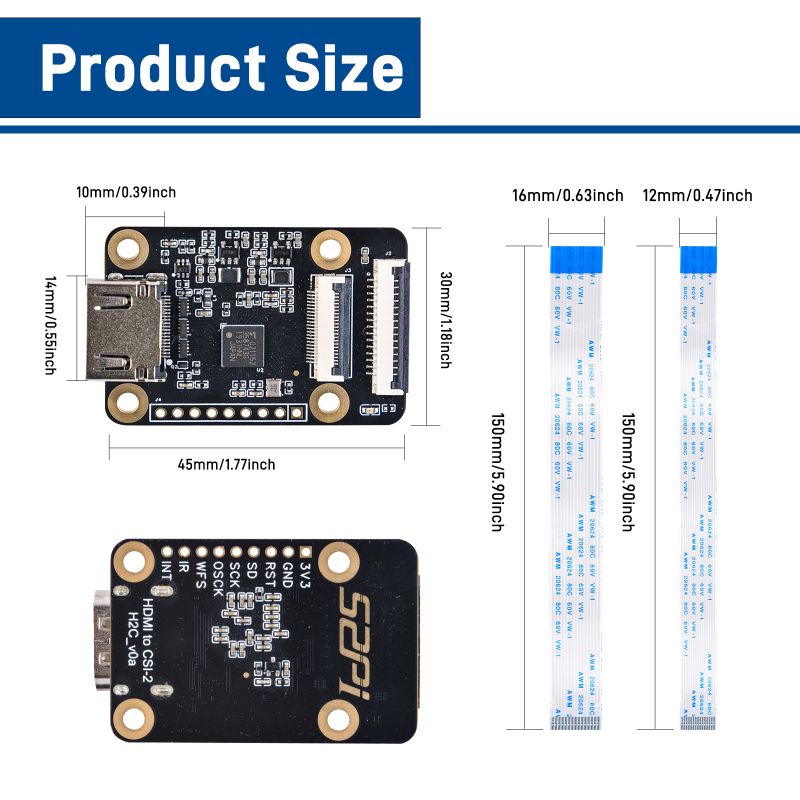
- Product Size
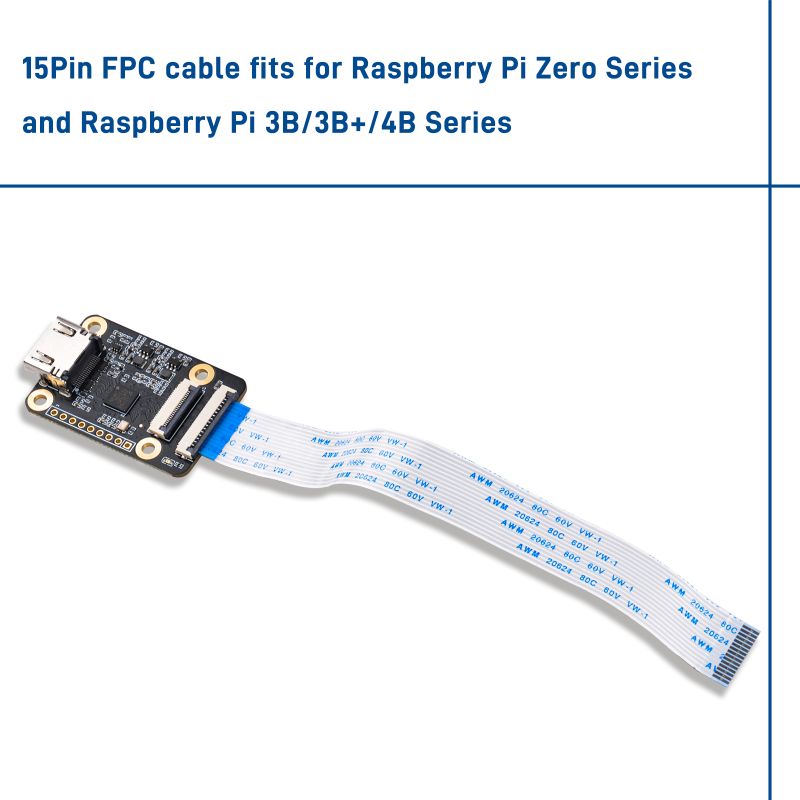
- FPC cable compatibility
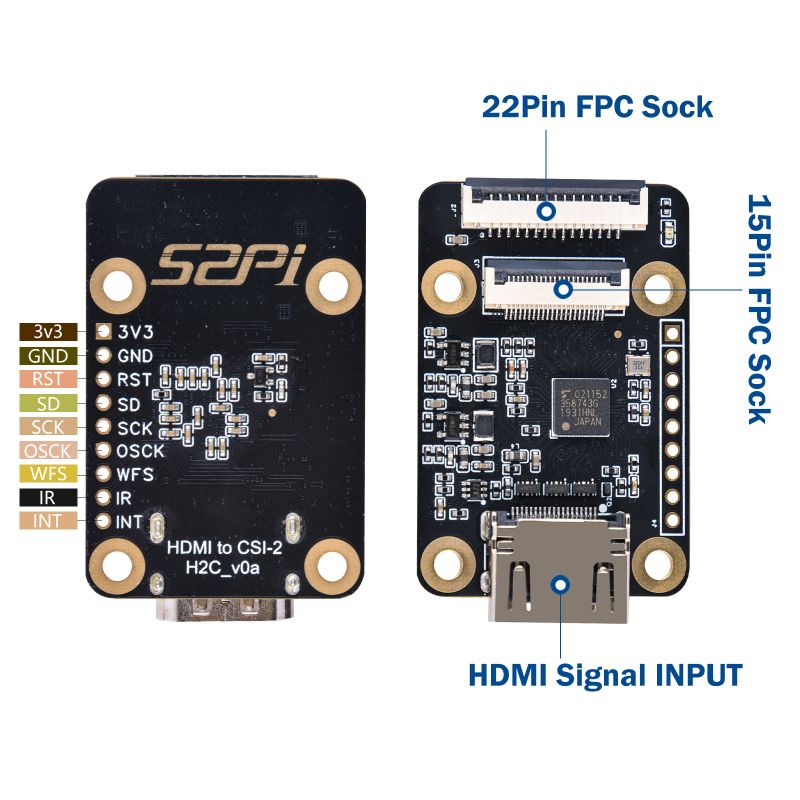
- Pinout definition
- Connection style
- Application scenario
- Recording video from an sports camera
Package Includes
- 1 x HDMI-TO-CSI2 adapter board
- 2 x 22Pin FPC cable
- 2 x 15Pin FPC cable
Getting Start
For Raspberry Pi 4B/3B+/3B/3A+/Pi zero/Pi zero W/Pi zero 2 W
NOTE: We recommend you to use the Raspberry Pi OS which download from Raspberry Pi Official Website.
To use the kernel drivers, please update your system. There are a few things that have changed with the 5.4 kernel, so these instructions are for 5.4 or later. If "uname -a" reports anything less, then fix this before proceeding. To use the kernel drivers, please update your system. There are a few things that have changed with the 5.4 kernel, so these instructions are for 5.4 or later. If "uname -a" reports anything less, then fix this before proceeding.
pi@raspberrypi:~ $ uname -a
Linux raspberrypi 5.10.63-v7l+ #1459 SMP Wed Oct 6 16:41:57 BST 2021 armv7l GNU/Linux
1. Update & upgrade the raspberry pi system (It will take a long time depend on the different country)
sudo apt-get update
sudo apt-get upgrade
2. Enable camera module (the camera is enabled by default in Raspberry pi Bullseys OS)
sudo raspi-config
sudo reboot
Navigate to 'Interfacing Options' and hit Enter. Now select the 'Camera' option, and hit the Enter key to enable it. Select “Finish” and select to reboot your Raspberry Pi.
[NOTE] reboot is important!!
3. Edit /boot/config.txt (that will need sudo)
sudo nano /boot/config.txt
Add the line:
dtoverlay=tc358743
dtoverlay=tc358743-audio
4. Check the amount of memory assigned to the CMA heap with "dmesg | grep cma". The first line should be along the lines of
pi@raspberrypi:~ $ dmesg | grep cma
[    0.000000] cma: Reserved 256 MiB at 0x000000001ec00000
If it reports less than 96MB assigned to CMA, then edit /boot/cmdline.txt and add
cma=96M
to the start of the line. Do NOT add any carriage returns.
5. Reboot. If all is well you should get a /dev/video0 device, and "v4l2-ctl --list-devices" will tell you that it is provided by Unicam. After connecting all the cables, power on the Raspberry Pi, opening the Raspberry Pi terminal, enter the following command:
pi@raspberrypi:~ $ ls /dev/video0
If it show following device:
/dev/video0
then execute following command:
pi@raspberrypi:~ $ v4l2-ctl --list-devices
It will shows something like:
bcm2835-codec-decode (platform:bcm2835-codec):
	/dev/video10
	/dev/video11
	/dev/video12
	/dev/video18
	/dev/media1

bcm2835-isp (platform:bcm2835-isp):
	/dev/video13
	/dev/video14
	/dev/video15
	/dev/video16
	/dev/media0

unicam (platform:fe801000.csi):
	/dev/video0
	/dev/video1
	/dev/media2
6. This driver puts all the control in the hands of the user, or the user's application. By default there is no EDID loaded into the chip to allow it to tell the HDMI source what resolutions are supported. There are EDID editors around. If you create a file edid.txt, then you can push this to the device using
The comment of 720p edid.txt file:
00ffffffffffff005262888800888888
1c150103800000780aEE91A3544C9926
0F505400000001010101010101010101
010101010101011d007251d01e206e28
5500c48e2100001e8c0ad08a20e02d10
103e9600138e2100001e000000fc0054
6f73686962612d4832430a20000000FD
003b3d0f2e0f1e0a2020202020200100
020321434e041303021211012021a23c
3d3e1f2309070766030c00300080E300
7F8c0ad08a20e02d10103e9600c48e21
0000188c0ad08a20e02d10103e960013
8e210000188c0aa01451f01600267c43
00138e21000098000000000000000000
00000000000000000000000000000000
00000000000000000000000000000000
Or you can use 1080p30fps edid file:
 00 FF FF FF FF FF FF 00 52 62 88 88 00 88 88 88
 1C 15 01 03 80 A0 5A 78 0A 0D C9 A0 57 47 98 27
 12 48 4C 00 00 00 01 01 01 01 01 01 01 01 01 01
 01 01 01 01 01 01 01 1D 80 18 71 38 2D 40 58 2C
 45 00 80 38 74 00 00 1E 01 1D 80 18 71 38 2D 40
 58 2C 45 00 80 38 74 00 00 1E 00 00 00 FC 00 44
 43 44 5A 2D 48 32 43 20 4D 4F 44 0A 00 00 00 FD
 00 14 78 01 FF 10 00 0A 20 20 20 20 20 20 01 B9
 02 03 1A 71 47 A2 22 22 22 22 22 22 23 09 07 01
 83 01 00 00 65 03 0C 00 10 00 01 1D 80 18 71 38
 2D 40 58 2C 45 00 80 38 74 00 00 1E 01 1D 80 18
 71 38 2D 40 58 2C 45 00 80 38 74 00 00 1E 01 1D
 80 18 71 38 2D 40 58 2C 45 00 80 38 74 00 00 1E
 01 1D 80 18 71 38 2D 40 58 2C 45 00 80 38 74 00
 00 1E 00 00 00 00 00 00 00 00 00 00 00 00 00 00
 00 00 00 00 00 00 00 00 00 00 00 00 00 00 00 03
1080p25fps edid file:
00 FF FF FF FF FF FF 00 52 62 88 88 00 88 88 88
1C 15 01 03 80 A0 5A 78 0A 0D C9 A0 57 47 98 27
12 48 4C 00 00 00 01 01 01 01 01 01 01 01 01 01
01 01 01 01 01 01 01 1D 80 D0 72 38 2D 40 10 2C
45 80 80 38 74 00 00 1E 01 1D 80 18 71 38 2D 40
58 2C 45 00 80 38 74 00 00 1E 00 00 00 FC 00 44
43 44 5A 2D 48 32 43 20 4D 4F 44 0A 00 00 00 FD
00 14 78 01 FF 10 00 0A 20 20 20 20 20 20 01 C8
02 03 1A 71 47 A1 22 22 22 22 22 22 23 09 07 01
83 01 00 00 65 03 0C 00 10 00 01 1D 80 18 71 38
2D 40 58 2C 45 00 80 38 74 00 00 1E 01 1D 80 18
71 38 2D 40 58 2C 45 00 80 38 74 00 00 1E 01 1D
80 18 71 38 2D 40 58 2C 45 00 80 38 74 00 00 1E
01 1D 80 18 71 38 2D 40 58 2C 45 00 80 38 74 00
00 1E 00 00 00 00 00 00 00 00 00 00 00 00 00 00
00 00 00 00 00 00 00 00 00 00 00 00 00 00 00 04
Then you can create a file called edid.txt:
cd ~
sudo nano edid.txt
- copy the above commend in edid.txt, save&exit;
and then set the edid file as following:
pi@raspberrypi:~ $ v4l2-ctl --set-edid=file=edid.txt --fix-edid-checksums
It shows:
CTA-861 Header
  IT Formats Underscanned: yes
  Audio:                   yes
  YCbCr 4:4:4:             no
  YCbCr 4:2:2:             no

HDMI Vendor-Specific Data Block
  Physical Address:        3.0.0.0
  YCbCr 4:4:4 Deep Color:  no
  30-bit:                  no
  36-bit:                  no
  48-bit:                  no

CTA-861 Video Capability Descriptor
  RGB Quantization Range:  yes
  YCC Quantization Range:  no
  PT:                      Supports both over- and underscan
  IT:                      Supports both over- and underscan
  CE:                      Supports both over- and underscan
7. The driver does NOT automatically switch to the resolution detected. Use the command:
pi@raspberrypi:~ $ v4l2-ctl --query-dv-timings
It will shows something like:
	Active width: 1280
	Active height: 720
	Total width: 1650
	Total height: 750
	Frame format: progressive
	Polarities: -vsync -hsync
	Pixelclock: 74250000 Hz (60.00 frames per second)
	Horizontal frontporch: 0
	Horizontal sync: 370
	Horizontal backporch: 0
	Vertical frontporch: 0
	Vertical sync: 30
	Vertical backporch: 0
	Standards:
	Flags:
You MUST set the timings via "v4l2-ctl --set-dv-bt-timings". You can pass in an index to the detected mode, or use:
v4l2-ctl --set-dv-bt-timings query
to select the currently detected timings.
v4l2-ctl -V
should now reflect the resolution detected.
8. The chip supports two formats - BGR3 (the default) and UYVY. BGR3 is 24bpp, and UYVY is YUV4:2:2 16bpp.
Over the normal 2 CSI-2 lanes the data rate is such that BGR3 can run at a maximum of 1080p30, whilst UYVY will go up to 1080p50. Use the following command to select UYVY, however your application may override that.
v4l2-ctl -v pixelformat=UYVY
9. Check that the audio drivers / card is available to ALSA.
pi@raspberrypi:~ $ arecord -l
It will display as following:
**** List of CAPTURE Hardware Devices ****
card 1: tc358743 [tc358743], device 0: bcm2835-i2s-dir-hifi dir-hifi-0 [bcm2835-i2s-dir-hifi dir-hifi-0]
  Subdevices: 1/1
  Subdevice #0: subdevice #0
Note: card 1 means that the card number for the TC358743XBG is "1" and it might be different.
10. Install GStreamer tool;
sudo apt install gstreamer1.0-tools
Check gstreamer tool version:
pi@raspberrypi:~ $ gst-launch-1.0 --version
gst-launch-1.0 version 1.18.4
GStreamer 1.18.4
http://packages.qa.debian.org/gstreamer1.0
Note:
Different versions have different command line parameters, which is very annoying.
11. Use gstreamer to record video and audio
- GStreamer v1.14 command
gst-launch-1.0 v4l2src io-mode=5 ! video/x-raw, format=UYVY, framerate=25/1 ! v4l2h264enc output-io-mode=4 ! video/x-h264,profile=high ! h264parse ! queue ! matroskamux name=mux ! filesink location=foo.mkv alsasrc device=hw:1 ! audio/x-raw,rate=48000,channels=2 ! audioconvert ! avenc_aac bitrate=48000 ! aacparse ! queue ! mux.
foo.mkv is the output file.
If your gstreamer is version 1.8 or above, you can try the following test command. In addition, alsasrc device=hw:1 represents the sound card of TC358743, you can use "arecord -l" to query.
- The command to recode a video with audio. (GStreamer 1.18.4)
gst-launch-1.0 -vvv v4l2src ! "video/x-raw,framerate=30/1,format=UYVY" ! v4l2h264enc extra-controls="controls,h264_profile=4,h264_level=13,video_bitrate=256000;" ! "video/x-h264,profile=high, level=(string)4.2" ! h264parse ! queue ! matroskamux name=mux ! filesink location=foo.mkv alsasrc device=hw:1 ! audio/x-raw,rate=48000,channels=2 ! audioconvert ! avenc_aac bitrate=48000 ! aacparse ! queue ! mux.
- The sample command to recode a video without audio.
gst-launch-1.0 -vvv v4l2src ! "video/x-raw,framerate=30/1,format=UYVY" ! v4l2h264enc extra-controls="controls,h264_profile=4,h264_level=13,video_bitrate=256000;" ! "video/x-h264,profile=high, level=(string)4.2" ! h264parse ! queue ! matroskamux name=mux ! filesink location=foo.mkv
Press CTRL+C to end recording.
PS: We recommend that you modify the above framerate parameter to the actual frame rate of your HDMI signal, the actual frame rate value is from the result of 'v4l2-ctl --query-dv-timings' command.
Keywords
- HDMI-to-csi2, video capture card, HDMI recorder, HDMI signal capture board, Toshiba TC358743XBG
