EP-0106: Difference between revisions
| Line 29: | Line 29: | ||
* Open a terminal and typing : | * Open a terminal and typing : | ||
<code>sudo raspi-config</code><br> | <code>sudo raspi-config</code><br> | ||
<pre>Navigate to interface options and then select i2c and enable it.</pre | <pre>Navigate to interface options and then select i2c and enable it.</pre> | ||
* Install smbus2 module (python3), please make sure your pi is connecting to internet. | * Install smbus2 module (python3), please make sure your pi is connecting to internet. | ||
* Typing this command in the terminal: | * Typing this command in the terminal: | ||
Revision as of 16:15, 30 May 2019
DockperPi Sensor Hub Development Board
Description
The Raspberry Pi module for obtaining environmental parameters in the Internet of Things.
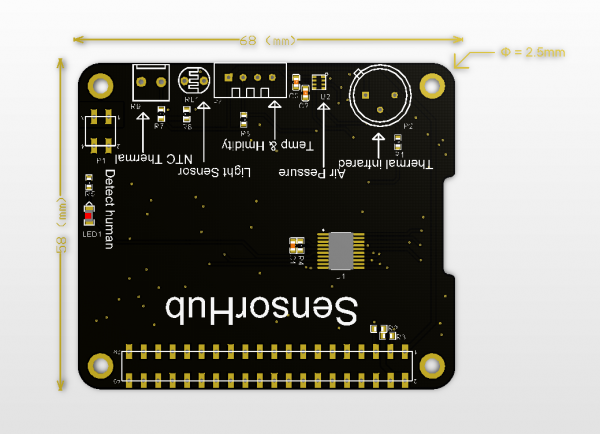
It integrates various environmental sensors: temperature sensors, humidity sensors, air pressure sensors, lighting and thermal imaging sensors.
You can use them in smart homes.
To obtain various parameters in life, these parameters can be processed to control the home reasonably and intelligently.
For example, the temperature of the temperature sensor can be used to control the heating device or the air conditioner.
The thermal imaging sensor can detect if someone is in the living room.
Features
- Easy to use
- Temperature Detection, Thermistor Detection Temperature Range – 30℃~127℃ DHT11 – 20℃~60℃ Plate-borne Temperature Sensor - 40℃~80℃.
- Humidity detection, sensor detection range 20% RH ~ 95% RH
- Light intensity detection, detection range: 0LUX~1800LUX
- Pressure detection, detection range: 300 ~ 1100 hPa
- Biopsy test (biopsy test with corresponding indicator), maximum detection angle of 100 degrees, maximum distance of 12mSupply voltage 3.3V
- Multiple Language programming
Package Includes
- 1 x Sensor Hub development board
- 4 x M2.5x11 + 6 copper rod
- 8 x M2.5x5 screws and nuts
- 1 x NTC temperature sensor (waterproof)
- 1 x Introductions
Mechanical Drawings
How to use
- Mount it on Raspberry Pi’s GPIO and enable I2C function.
- Open a terminal and typing :
sudo raspi-config
Navigate to interface options and then select i2c and enable it.
- Install smbus2 module (python3), please make sure your pi is connecting to internet.
- Typing this command in the terminal:
sudo pip3 install smbus2
- Run and test
git clone https://github.com/geeekpi/dockerpi
cd dockerpi/Sensorhub/
chmod +x sensorhub.py
./sensorhub.py
- C code compile and running (please make sure you have wiringPi library has already installed)
gcc –o sensorhub sensorhub.c –lwiringPi
./sensorhub
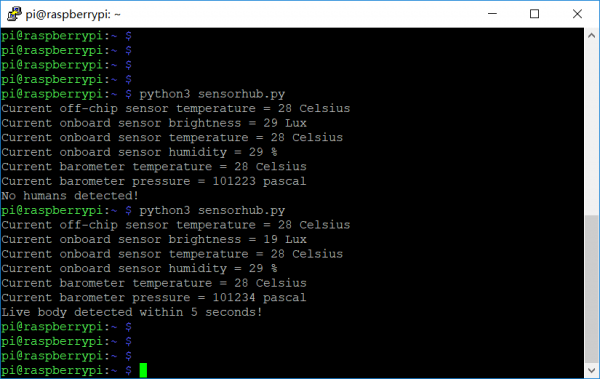
- You will see the feedback as following picture.
Keywords
SensorHub, Docker pi, raspberry pi, humidity, temperature, airpressure, NTC, pir sensor, DHT11, DHT12, light sensor.

