EP-0105: Difference between revisions
Jump to navigation
Jump to search
| Line 61: | Line 61: | ||
==How to use== | ==How to use== | ||
===How to assemble== | |||
{| | |||
|[[File:IoTnodeA8.jpg|left|440px]] | |||
|[[File:IoTnodeA7.jpg|none|440px]] | |||
|} | |||
===How to configure== | |||
* FLash TF card with the latest raspbian image. | |||
* Modify /boot/config.txt file and add following parameter: | |||
<pre> dtoverlay=sc16is752-i2c </pre> | |||
* Reboot Raspberry Pi | |||
* Login Raspberry pi and make sure connect to internet, open a terminal and typing: | |||
<pre> | |||
sudo apt-get update | |||
sudo apt-get -y install gpsd gpsd-clients python-gps | |||
</pre> | |||
* Modify "/etc/default/gpsd" file and add following parameters: | |||
<pre> | |||
DEVICES="/dev/ttySC1" | |||
GPSD_OPTIONS='-F /var/run/gpsd.sock' | |||
</pre> | |||
===How to use GPS module=== | |||
* <b><font color=red>NOTE: GPS module is OUTDOOR module, please test it outside.</font></b> | |||
* Open a terminal and typing: | |||
<pre> | |||
sudo systemctl restart gpsd.socket | |||
sudo cgps -s | |||
</pre> | |||
* Python Programming: | |||
<pre> | |||
#!/usr/bin/env python3 | |||
import serial | |||
import smbus | |||
from gps import * | |||
import os | |||
# Restart gpsd service. | |||
os.system("sudo systemctl restart gpsd.socket") | |||
# Open serial port | |||
ser = serial.Serial('/dev/ttySC0', 115200) | |||
if ser.isOpen == False: | |||
ser.open() | |||
try: | |||
print("Turn on GPS switch") | |||
ser.write(str.encode("AT+GPS=1\r")) | |||
time.sleep(1) | |||
os.system("sudo cgps -s") | |||
except KeyboardInterrupt: | |||
ser.flushInput() | |||
ser.close() | |||
</pre> | |||
* Save it and execute it: | |||
<pre> | |||
chmod +x mygps.py | |||
./mygps.py | |||
</pre> | |||
===How to use GPRS module=== | |||
* | |||
===How to use Lora module=== | |||
* | |||
==Package Include== | ==Package Include== | ||
Revision as of 19:57, 21 June 2019
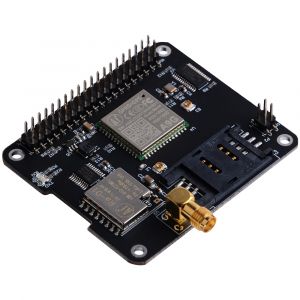
IoT Node(A)

Descriptions
Iot Node(A) is one of Docker Pi series module.
It contains GSM module, GPS module and Lora module onboard.
Features
- Easy to Use
- Support I2C protocol communication
- High Quality A9G module
- High Quality Lora module
- Low Power Consumption
- Long Range Transmission
- Working temperature: 0°C ~ 65°C
- LORA antenna gain: 2db
- GPS antenna gain: 1.5db
- GSM antenna gain: 2db
- Supply voltage: 5V + 3V dual power supply
- Pure I2C communication, does not occupy other IO, leads to the GPIO pin.
Specifications
GPRS section
- 1. Low power consumption, standby sleep current <1mA
- 2. Support GSM/GPRS four frequency bands, including 850, 900, 1800, 1900MHZ;
- 3. GPRS Class 10;
- 4. Support GPRS data service, maximum data rate, download 85.6Kbps, upload 42.8Kbps;
- 5. Support standard GSM07.07, 07.05 AT commands, and access the serial port through I2C interface conversion.
- 6. AT commands support standard AT and TCP/IP command ports
GPS section
- 1. Support BDS/GPS joint positioning
- 2. Support A-GPS, A-BDS
- 3. Support standard SIM card
LORA section
- 1. City working conditions: transmission distance of 500 meters (RF parameters: 0x50)
In all cases: the minimum guaranteed 300 meters transmission.
- 2. Support FSK, GFSK, MSK, GMSK, LoRaTM and OOK modulation methods
- 3. Ultra-high receiver sensitivity as low as -141 dBm
- 4. Support preamble detection
- 5. Packet engine with CRC, up to 256 bytes
- 6. LORA transceiver indicator
Mechanical Drawings
Gallery
|
 |
 |
 |
 |
 |
Documentations
- A9G Module Spicification: File:A9g product specification.pdf
- A9G Module AT Command Manual: File:A9G AT COMMAND manual.pdf
- A9G gprs series module at instruction set v1.0 File:A9G gprs series module at instruction set v1.0.pdf
- GPRS C SDK: File:GPRS C SDK-master.zip
How to use
=How to assemble
 |
 |
=How to configure
- FLash TF card with the latest raspbian image.
- Modify /boot/config.txt file and add following parameter:
dtoverlay=sc16is752-i2c
- Reboot Raspberry Pi
- Login Raspberry pi and make sure connect to internet, open a terminal and typing:
sudo apt-get update
sudo apt-get -y install gpsd gpsd-clients python-gps
- Modify "/etc/default/gpsd" file and add following parameters:
DEVICES="/dev/ttySC1"
GPSD_OPTIONS='-F /var/run/gpsd.sock'
How to use GPS module
- NOTE: GPS module is OUTDOOR module, please test it outside.
- Open a terminal and typing:
sudo systemctl restart gpsd.socket
sudo cgps -s
- Python Programming:
#!/usr/bin/env python3
import serial
import smbus
from gps import *
import os

# Restart gpsd service.
os.system("sudo systemctl restart gpsd.socket")
# Open serial port
ser = serial.Serial('/dev/ttySC0', 115200)

if ser.isOpen == False:
    ser.open()
try:
    print("Turn on GPS switch")
    ser.write(str.encode("AT+GPS=1\r"))
    time.sleep(1)
    os.system("sudo cgps -s")
except KeyboardInterrupt:
    ser.flushInput()
    ser.close()
- Save it and execute it:
chmod +x mygps.py
./mygps.py
How to use GPRS module
How to use Lora module
Package Include
- 1 x IoT Node(A) Board
- 4 x M2.5*11mm Copper stick
- 4 x M2.5 Nuts
- 1 x Instructions
FAQ
Keywords
- IoT, lora, GPS, GPRS, GSM, antana, Raspberry pi 3B, Node, radio devices