EP-0099: Difference between revisions
| Line 59: | Line 59: | ||
==Demo code== | ==Demo code== | ||
* Turn on channel No.1 relay | |||
<code>i2cset -y 1 0x10 0x01 0xFF</code><br> | |||
* Turn off channel No.1 relay | |||
<code>i2cset -y 1 0x10 0x01 0x00</code><br> | |||
---- | |||
* Turn on channel No.2 relay | |||
<code>i2cset -y 1 0x10 0x02 0xFF</code><br> | |||
* Turn off channel No.2 relay | |||
<code>i2cset -y 1 0x10 0x02 0x00</code><br> | |||
* Turn on channel No.3 relay | |||
<code>i2cset -y 1 0x10 0x03 0xFF</code><br> | |||
* Turn off channel No.3 relay | |||
<code>i2cset -y 1 0x10 0x03 0x00</code><br> | |||
---- | |||
* Turn on channel No.4 relay | |||
<code>i2cset -y 1 0x10 0x04 0xFF</code><br> | |||
* Turn off channel No.4 relay | |||
<code>i2cset -y 1 0x10 0x04 0x00</code><br> | |||
---- | |||
* Program in Shell script | |||
Create a file and name it "relay.sh" <br> | |||
<pre> | |||
#!/bin/bash | |||
# create a loop to turn each relay on and off. | |||
while true | |||
do | |||
for i in `seq 1 4` | |||
do | |||
i2cset -y 1 0x10 $i 0xff | |||
sleep 1 | |||
i2cset -y 1 0x10 $i 0x00 | |||
sleep 1 | |||
done | |||
done | |||
</pre> | |||
---- | |||
* Program in Language C. | |||
Create source code and name it "relay.c"<br> | |||
#include <stdio.h> | |||
#include <wiringPi.h> | |||
#include <wiringPiI2C.h> | |||
#define DEVCIE_ADDR 0x10 | |||
#define RELAY1 0x01 | |||
#define RELAY2 0x02 | |||
#define RELAY3 0x03 | |||
#define RELAY4 0x04 | |||
#define ON 0xFF | |||
#define OFF 0x00 | |||
int main(voide){ | |||
printf("Turn on Relays in C\n"); | |||
int fd; | |||
int i = 0; | |||
fd = wiringPiI2CSetup(DEVICE_ADDR); | |||
for(;;){ | |||
for (i=1; i<=4; i++){ | |||
printf("turn on relay No.$d", i); | |||
wiringPiI2CWriteReg8(fd, i, 0xFF); | |||
sleep(200); | |||
printf("turn off relay No.$d", i); | |||
wiringPiI2CWriteReg8(fd, i, 0x00); | |||
sleep(200); | |||
} | |||
} | |||
return 0; | |||
} | |||
</pre> | |||
** Compile it with following command: | |||
<code>gcc relay.c -lwiringPi -o relay</code><br> | |||
** run it | |||
<code>./relay</code><br> | |||
Revision as of 13:50, 6 December 2018
4 Channel Relay Hat Board For Raspberry Pi
Description
4 Channel Relay Hat Board For Raspberry Pi is one of the "docker pi" module.
It has 4 channel relay that you can put it on your smart home project.
This four-channel relay uses high-quality relay modules combined with
the most popular microcontroller technology to communicate with the Raspberry Pi.
You can use multiple modules stacked together for use.
You can stack up to four layers.
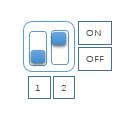
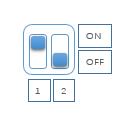
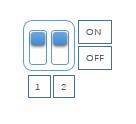
Switch the I2C address of the device through the DIP switch on the circuit board to ensure that
the four-layer module gets different addresses, thus avoiding the problem of address duplication.
The module is very fast, easy to install, and supports multi-language development, making it ideal for smart home projects.
Features
- Easy to use
- 4 channel relay
- Support I2C protocol
- Support for stacking
- Support address switching by dial switch
- Support multi-language programming
- Support 3A 250V AC
- Support 3A 30V DC
- Support relay status light prompt
Device Address Map
| DIP switch status icon | Device Address |
|---|---|
 |
0x10 |
 |
0x11 |
 |
0x12 |
 |
0x13 |
Gallery
To be continue...
How to use it
- Install i2c-tools package to operate the device.
sudo apt-get update
sudo apt-get -y install i2c-tools
- Turn on the I2C interface
Open a terminal and Run sudo raspi-config
Use the down arrow to select 5 Interfacing Options.
Arrow down to P5 I2C .
Select yes when it asks you to enable I2C.
Also select yes if it asks about automatically loading the kernel module.
Use the right arrow to select the <Finish> button.
Select yes when it asks to reboot.
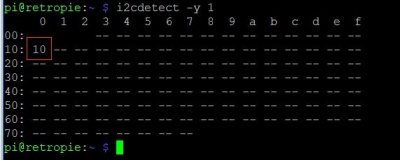
- Detect the register of the chip on board
i2cdetect -y 1
you will see this result, the default device address is 0x10:
Demo code
- Turn on channel No.1 relay
i2cset -y 1 0x10 0x01 0xFF
- Turn off channel No.1 relay
i2cset -y 1 0x10 0x01 0x00
- Turn on channel No.2 relay
i2cset -y 1 0x10 0x02 0xFF
- Turn off channel No.2 relay
i2cset -y 1 0x10 0x02 0x00
- Turn on channel No.3 relay
i2cset -y 1 0x10 0x03 0xFF
- Turn off channel No.3 relay
i2cset -y 1 0x10 0x03 0x00
- Turn on channel No.4 relay
i2cset -y 1 0x10 0x04 0xFF
- Turn off channel No.4 relay
i2cset -y 1 0x10 0x04 0x00
- Program in Shell script
Create a file and name it "relay.sh"
#!/bin/bash
# create a loop to turn each relay on and off.
while true
do
   for i in `seq 1 4`
   do
      i2cset -y 1 0x10 $i 0xff
      sleep 1
      i2cset -y 1 0x10 $i 0x00
      sleep 1
   done
done
- Program in Language C.
Create source code and name it "relay.c"
- include <stdio.h>
- include <wiringPi.h>
- include <wiringPiI2C.h>
- define DEVCIE_ADDR 0x10
- define RELAY1 0x01
- define RELAY2 0x02
- define RELAY3 0x03
- define RELAY4 0x04
- define ON 0xFF
- define OFF 0x00
int main(voide){
   printf("Turn on Relays in C\n");
   int fd;
   int i = 0;
   fd = wiringPiI2CSetup(DEVICE_ADDR);
   for(;;){
      for (i=1; i<=4; i++){
         printf("turn on relay No.$d", i);
         wiringPiI2CWriteReg8(fd, i, 0xFF);
         sleep(200);
         printf("turn off relay No.$d", i);
         wiringPiI2CWriteReg8(fd, i, 0x00);
         sleep(200);
      }
   }
   return 0;
}
- Compile it with following command:
gcc relay.c -lwiringPi -o relay
- run it
./relay
