EP-0108: Difference between revisions
Jump to navigation
Jump to search
| Line 89: | Line 89: | ||
==Direct control wtihout programming(Raspberry Pi)== | ==Direct control wtihout programming(Raspberry Pi)== | ||
==Program in language C(Raspberrry Pi)== | |||
==Progarm in language Python(Raspberry Pi)== | |||
==Progarm in language java(Raspberry Pi)== | |||
==Keywords== | ==Keywords== | ||
==Video Tutorial== | ==Video Tutorial== | ||
Revision as of 16:12, 6 August 2019
DockerPi Motor Board(A) SKU:EP-0108
Description
DockerPi Motor Board(A) is a DockerPi series expansion board.It can control two 12V DC motors.
DockerPi Motor Board(A) can be used in Raspberry Pi.You could communicate with it by opening I2C.
DockerPi Motor Board(A) can be used only one,but it still can be stacked with other DockerPi expansion board.
If you need to run for a long time ,we recommend that you use our DockerPi Power expansion board to provide more power.
Features
- DockerPi Series
- Programmable
- Control directly(without progarmming)
- Extend GPIO Pins
- Two DC 12V motors
- Can stack with other stack board
Specification
Official Compatibility Test
Not only support the following development boards, other development boards can be compatible if they have I2C peripherals. (Note: some software changes may be required)
| Platform | DockerPi Motor Board | Notes |
|---|---|---|
| Raspberry Pi All Platform | √ | Not Include CM Series & EOL Platform |
Gallery
Package Includes
Register Map
| Register Address | Function | Value |
|---|---|---|
| 0x01 | Set Motor 1 speed | Set Motor 1 speed Low 8 bit |
| 0x02 | Set Motor 1 speed | Set Motor 1 speed High 8 bit |
| 0x03 | Set Motor 2 speed | Set Motor 2 speed Low 8 bit |
| 0x04 | Set Motor 2 speed | Set Motor 2 speed High 8 bit |
| 0x05 | Set Motor 1 count | Set Motor 1 count Low 8 bit |
| 0x06 | Set Motor 1 count | Set Motor 1 count High 8 bit |
| 0x07 | Set Motor 2 count | Set Motor 2 count Low 8 bit |
| 0x08 | Set Motor 2 count | Set Motor 2 count High 8 bit |
| 0x09 | Set status of Direction | Set Motor 1 and Motor 2 Direction |
| 0x0A | Now Motor 1 speed | Now Motor 1 speed Low 8 bit |
| 0x0B | Now Motor 1 speed | Now Motor 1 speed High 8 bit |
| 0x0C | Now Motor 2 speed | Now Motor 2 speed Low 8 bit |
| 0x0D | Now Motor 2 speed | Now Motor 2 speed High 8 bit |
| 0x0E | Now Motor 1 count | Now Motor 1 count Low 8 bit |
| 0x0F | Now Motor 1 count | Now Motor 1 count High 8 bit |
| 0x10 | Now Motor 2 count | Now Motor 2 count Low 8 bit |
| 0x11 | Now Motor 2 count | Now Motor 2 count High 8 bit |
| 0x12 | Now status of Direction | Now status of Direction |
| 0x13 | Enable | Enable data write |
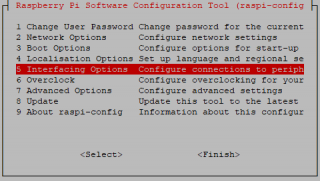
Configuring I2C(Raspberry Pi)
Run sudo raspi-config and follow the prompts to install i2c support for the ARM core and linux kernel
Go to Interfacing Options

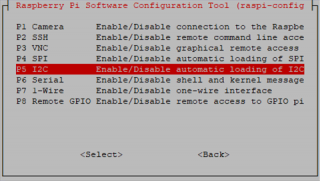
then I2C

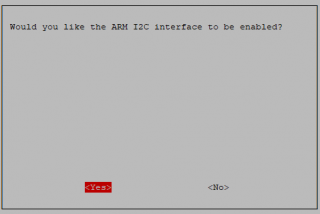
Enable!

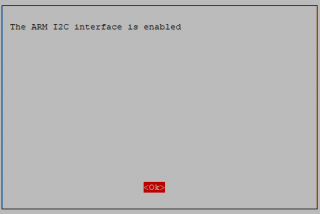
Done!
