ZP-0092: Difference between revisions
Jump to navigation
Jump to search
| (5 intermediate revisions by the same user not shown) | |||
| Line 12: | Line 12: | ||
* 6-Layer Design | * 6-Layer Design | ||
* Fit for Cluster | * Fit for Cluster | ||
* Color: Transparent / Brown | |||
* Weight: 0.335Kg | |||
==Gallery== | ==Gallery== | ||
{| | |||
|[[ File:Liutm1.jpg|left|320px]] | |||
|[[ File:Liutm2.jpg|none|320px]] | |||
|[[ File:Liutm3.jpg|none|320px]] | |||
|} | |||
{| | |||
|[[ File:Liutm4.jpg|left|320px]] | |||
|[[ File:Liutm5.jpg|none|320px]] | |||
|[[ File:Liutm6.jpg|none|320px]] | |||
|} | |||
==Package Includes== | ==Package Includes== | ||
== | * 1 x 1 Pack of 6-Layer Acrylic Cluster framework For RPi 4B | ||
* 6 x Aluminum Heat Sink pack (For RPi 4B) | |||
* 6 x Aluminum and Copper Heat Sink Pack (For RPi 3B+) | |||
* 1 x Screw driver | |||
[[File:Liutm12.jpg|left|500px]] | |||
<br style="clear:both;"> | |||
==How to Assemble== | |||
* 1. Fix Copper stick to acrylic panel after peeling off the protection film. | |||
* 2. Fix Raspberry Pi to acrylic case with short copper stick and screws. | |||
* 3. Repeat step 2 and fix each layer together. | |||
* 4. Fix top cover with steel nuts and finish the job. | |||
[[File:Liutm11.jpg|left|500px]] | |||
<br style="clear:both;"> | |||
==Keywords== | ==Keywords== | ||
* 6-Layer Acrylic Cluster framework For RPi 4B, cluster case, Raspberry Pi 4B | |||
Revision as of 17:33, 27 March 2020
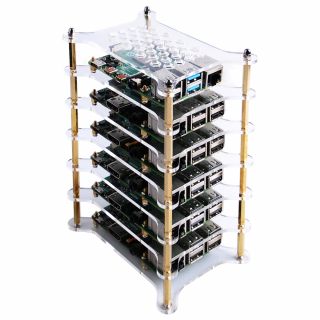
6-Layer Acrylic Cluster framework For RPi 4B

Descriptions
This is an acrylic cluster frame housing that can accommodate 6 Raspberry Pis.
The overall structure is simple, easy to assemble, and well ventilated, which provides open cooling conditions for heat dissipation.
Features
- Easy to asseble
- Acrylic Material
- Good at Heat Dissipation
- 6-Layer Design
- Fit for Cluster
- Color: Transparent / Brown
- Weight: 0.335Kg
Gallery
|
 |
 |
 |
 |
 |
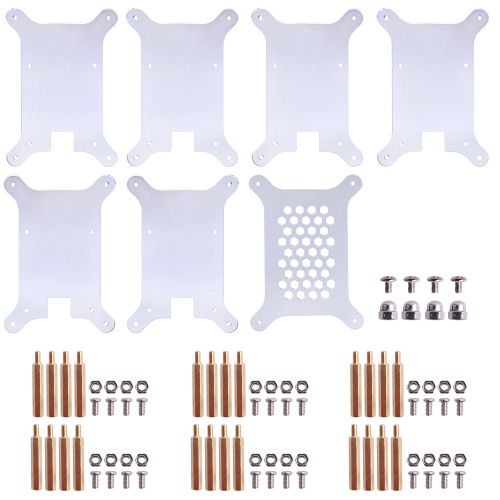
Package Includes
- 1 x 1 Pack of 6-Layer Acrylic Cluster framework For RPi 4B
- 6 x Aluminum Heat Sink pack (For RPi 4B)
- 6 x Aluminum and Copper Heat Sink Pack (For RPi 3B+)
- 1 x Screw driver

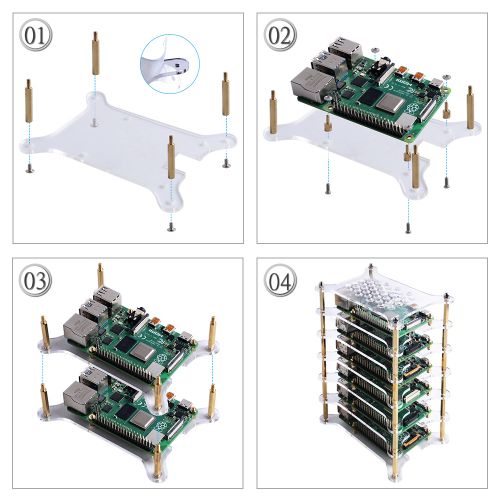
How to Assemble
- 1. Fix Copper stick to acrylic panel after peeling off the protection film.
- 2. Fix Raspberry Pi to acrylic case with short copper stick and screws.
- 3. Repeat step 2 and fix each layer together.
- 4. Fix top cover with steel nuts and finish the job.

Keywords
- 6-Layer Acrylic Cluster framework For RPi 4B, cluster case, Raspberry Pi 4B