EP-0180
Quad NVMe expansion board for Raspberry Pi 5
Description
The Raspberry Pi 5 Expansion Board is a versatile accessory designed to enhance the capabilities of the Raspberry Pi 5 through a PCIe interface. This board not only provides a power conversion solution but also serves as a high-speed storage expansion device. It is equipped with a 20V Power Delivery (PD) input that converts the power supply to a stable 5.1V/5A output, ensuring reliable operation of the Raspberry Pi 5. The board requires a 20V PD-compatible power source for activation and can power both the Raspberry Pi and attached storage devices.
Features
- Power Delivery Support: Converts 20V PD input to a regulated 5.1V/5A output for the Raspberry Pi 5.
- Dual-Purpose Power Supply: Powers both the Raspberry Pi 5 and connected storage devices.
- Storage Expansion: Supports four M.2 NVMe SSDs for high-speed data storage and retrieval.
- Versatile Form Factor Compatibility: Accommodates M.2 SSDs in sizes 2230, 2242, 2260, and 2280.
- Application Flexibility: Ideal for use in Samba file systems or NAS setups, providing a robust disk expansion foundation.
Specifications
- Interface: PCIe
- Input Voltage: 20V Power Delivery (PD)
- Output Voltage & Current: 5.1V / 5A
- SSD Support: M.2 NVMe SSDs in 2230, 2242, 2260, and 2280 sizes
- Power Requirement: Must be powered by a 20V PD-compatible power source to initiate operation.
- Use Case: Suitable for Raspberry Pi 5 models, enhancing storage capabilities for applications such as Samba servers or Network Attached Storage (NAS).
Gallery
TBD.
How to assmeble it?
TBD.
Package Includes
TBD.
How to enable PCIe on Raspberry Pi 5
- We assume that you are using Raspberry Pi OS (bookworm) 2024-03-15
Step 1
- Enable PCIe function
Edit /boot/firmware/config.txt file and adding following parameter in to the file.
dtparam=pciex1
dtparam=pciex1_gen=3
Save it and then do remember reboot your Raspberry Pi to take effect.
Step 2
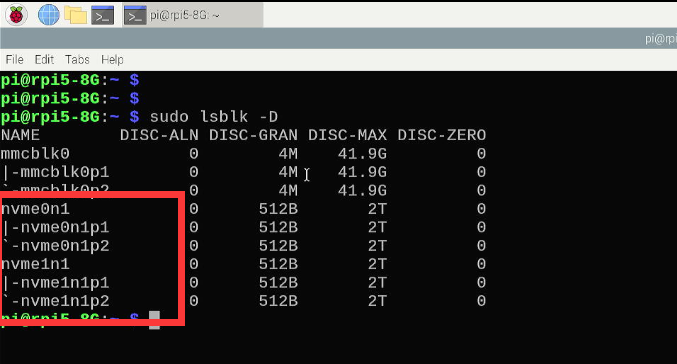
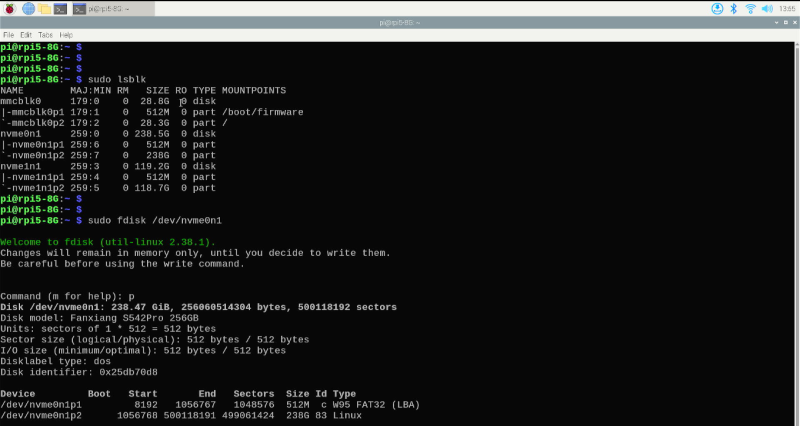
- Check if the SSD drive has been recognized
sudo lspci
sudo lsblk
Result be like:
Step 3
- Partitioning
Please divide the partition according to actual needs. Here I simply divided a partition and formatted it into ext4. Please refer to the configuration method related to the fdisk command to operate.
sudo fdisk /dev/nvme0n1
>d
>n
>p
>1
> Enter > Enter
> w
sudo partprobe /dev/nvme0n1
- Formating
sudo mkfs.ext4 /dev/nvme0n1p1
- Create mounting point and mount the partition to directory.
mkdir mynvme01
sudo mount -t ext4 /dev/nvme0n1p1 /home/pi/mynvme01 -v
- Grant access permission
sudo chown -R pi:pi /home/pi/mynvme01
sudo chmod -R 775 /home/pi/mynvme01
- Modify the /etc/fstab to enable automount function.
sudo nano /etc/fstab
adding:
/dev/nvme0n1p1 /home/pi/mynvme01 ext4 defaults,noatime 0 0
save it and execute:
sudo umount /dev/nvme0n1p1
sudo mount -a
sudo systemctl daemon-reload
df -Th
NOTE: Same steps for the rest of NVMe SSDs.
How to setup Raid 0 on Raspberry Pi 5
- Prepare Hardware: Ensure you have multiple SD cards or USB flash drives, as well as a Raspberry Pi.
- Partitioning: Use the dd or fdisk command to clear the boot sector and partition table, then use fdisk or gdisk to create partitions of the same size,or just use all raw disk.
- Install mdadm: Install the RAID management tool by running:
sudo apt-get update && sudo apt-get install mdadm
- Create RAID Device: Use the mdadm command to create a RAID 0 device, for example:
sudo mdadm --create --verbose --level=0 --metadata=1.2 --raid-devices=4 /dev/md0 /dev/nvme{0..3}n1
- Format: Create a file system such as f2fs using:
sudo mkfs.ext4 /dev/md0
- Mount the RAID Device: Create a mount point and mount the RAID device, for example:
mkdir -pv /home/pi/myraid0
sudo mount -t ext4 /dev/md0 /home/pi/myraid0
- Set Up Boot Mounting: Edit the /etc/fstab file to add the mount information for the RAID device and update the mdadm configuration.
sudo vim.tiny /etc/fstab
Adding following parameters into it.
/dev/md0 /home/pi/myraid0 ext4 defaults,noatime 0 0
Save it and quit.
- Update mdadm Configuration: After the RAID array is active, you can update the mdadm configuration file to save the current setup. Run the following command:
sudo mdadm --detail --scan | sudo tee -a /etc/mdadm/mdadm.conf
This command appends the configuration details of all assembled arrays to the mdadm.conf file.
- Update initramfs:After updating the mdadm.conf, you need to update the initial RAM filesystem to ensure that the RAID array is recognized and assembled at boot time:
sudo update-initramfs -u
- Reboot System: Finally, reboot your system to ensure that the RAID array is assembled automatically upon startup:
sudo reboot
- Verify RAID Array:After the system reboots, check that the RAID array is active and functioning as expected:
cat /proc/mdstat
This command will display the status of all RAID arrays. Remember to replace /dev/md0 and the device names with the actual names used in your configuration. It's also a good practice to back up the mdadm.conf file before making changes, so you can restore it if something goes wrong.
How to setup Raid 5 on Raspberry Pi 5
Keywords
- Quad NVMe SSD expansion board for Raspberry Pi 5, nas cluster expansion board for rpi5, pcie M.2 NVME SSD exppansion board, m.2 nvme ssd adapter board for Raspberry Pi 5.


