EP-0109: Difference between revisions
| Line 321: | Line 321: | ||
</pre> | </pre> | ||
*Execute it! | *Execute it! | ||
<code> | <code>python3 toycar.py</code> | ||
*Plug the wireless handle receiver into the Raspberry Pi,then enjoy it! | *Plug the wireless handle receiver into the Raspberry Pi,then enjoy it! | ||
Revision as of 11:04, 29 September 2019
DockerPi DIY Programmable intelligent toycar
Description
DockerPi DIY Programmable intelligent toycar is based on DockerPi Motor Board(A) and DockerPi Power Board.You could DIY it's appearance and power.
Of course,if you want to get started directly,we also provide the power board and Arcylic board for you.We offer several packages to you.The DockerPi
Power Board could provide powerful power for the car.You could choose to design its appearance by yourself.Besides,you could connect the camera module
to achieve the function of identifying objects.The following we will show you how to use the keyboard and handle to control the car by pygame.
Remember:Don't assemble and disassemble the board when the power supply is working.They don't support hot plug
Features
- DockerPi Series
- Programmable
- Intelligent toycar
- Easy to control
- DIY
- Selective control
- Wireless control
Official Compatibility Test
Not only support the following development boards, other development boards can be compatible if they have I2C peripherals. (Note: some software changes may be required)
| Platform | DockerPi Power | Notes |
|---|---|---|
| Raspberry Pi All Platform | √ | Not Include CM Series & EOL Platform |
Gallery
Package Includes
- Foudation
  * 1 x Battery case
  * 1 x Motor Board
  * 1 x Power Board
- Addition
Announcements
- Please turn off the power when you connect it!
- DockerPi Series Board does not support hot plug
- Please do not install reverse battery
How to assemble
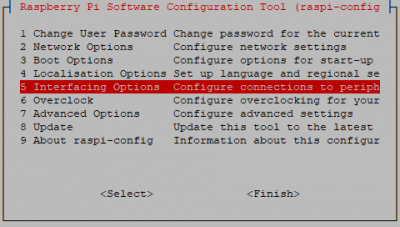
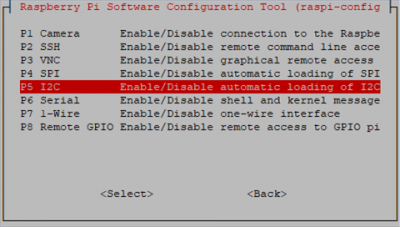
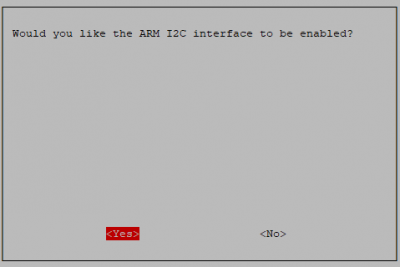
Configuring I2C(Raspberry Pi)
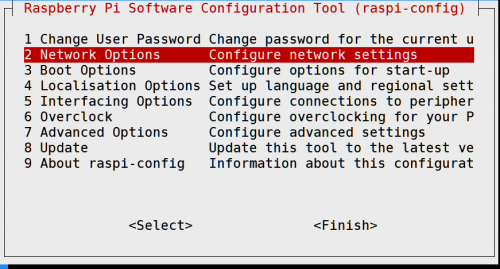
- Run sudo raspi-config and follow the prompts to install i2c support for the ARM core and linux kernel
- Go to Interfacing Options
then I2C
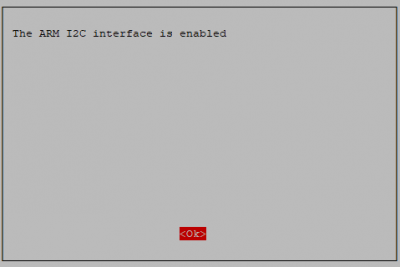
Enable!
Done!
How to use
Use the Handle to control the toycar
First you need prepare a TF card to burn the raspbian.You can download the system from the official website.
When you finished this,please connect it by ssh.
- First,please open the function of wireless function.Execute the following command:
sudo vim /etc/wpa_supplicant/wpa_supplicant.conf
- Please configure your wireless
- Then you need install the python3's module pygame
sudo apt-get -y install python3-pygame
- You also need to install python3's smbus
sudo apt-get -y install python3-smbus
- Please install the python3's joystick
sudo pip3 install joystick
- Please install the python3's matplotlib
sudo pip3 install matplotlib
- Please open the RaspberryPi's I2C
- You could install the following script to achieve the safeshut down function.
wget -qO- https://git.io/fj3b9 | sudo bash
Hardware environment
Hardware environment
Codes
- Create a new file and named:toycar.py and paste following codes:
import joystick
import sys
import time
import pygame
import smbus

bus = smbus.SMBus(1)
MOTOR_DRIVER_ADDRESS = 0x18
MOTOR_DRIVER_SPEED_1_L = 0x01
MOTOR_DRIVER_SPEED_1_H = 0x02
MOTOR_DRIVER_SPEED_2_L = 0x03
MOTOR_DRIVER_SPEED_2_H = 0x04
MOTOR_DRIVER_DIRECTION = 0x09
MOTOR_DRIVER_SPEED_NOW_1_L = 0x0a
MOTOR_DRIVER_SPEED_NOW_1_H = 0x0b
MOTOR_DRIVER_SPEED_NOW_2_L = 0x0c
MOTOR_DRIVER_SPEED_NOW_2_H = 0x0d
MOTOR_DRIVER_DIRECTION_NOW = 0x12
MOTOR_DRIVER_ENABLE = 0x13
MOTOR_DRIVER_MODE = 0X14
MOTOR_DRIVER_PWM_NOW_2_L = 0x1f
MOTOR_DRIVER_PWM_NOW_2_H = 0x20

def setspeed():
    bus.write_byte_data(MOTOR_DRIVER_ADDRESS,MOTOR_DRIVER_SPEED_1_L,speed & 0xff)
    bus.write_byte_data(MOTOR_DRIVER_ADDRESS,MOTOR_DRIVER_SPEED_1_H,speed >> 8)
    bus.write_byte_data(MOTOR_DRIVER_ADDRESS,MOTOR_DRIVER_SPEED_2_L,speed & 0xff)
    bus.write_byte_data(MOTOR_DRIVER_ADDRESS,MOTOR_DRIVER_SPEED_2_H,speed >> 8)
    bus.write_byte_data(MOTOR_DRIVER_ADDRESS,MOTOR_DRIVER_ENABLE,1)
def turnright():
    temp0 = 300
    bus.write_byte_data(MOTOR_DRIVER_ADDRESS,MOTOR_DRIVER_SPEED_1_L,temp0 & 0xff)
    bus.write_byte_data(MOTOR_DRIVER_ADDRESS,MOTOR_DRIVER_SPEED_1_H,temp0 >> 8)
    bus.write_byte_data(MOTOR_DRIVER_ADDRESS,MOTOR_DRIVER_SPEED_2_L,(temp0 -100) & 0xff)
    bus.write_byte_data(MOTOR_DRIVER_ADDRESS,MOTOR_DRIVER_SPEED_2_H,(temp0 -100) >> 8)
    bus.write_byte_data(MOTOR_DRIVER_ADDRESS,MOTOR_DRIVER_ENABLE,1)
def turnleft():
    temp0 = 300
    bus.write_byte_data(MOTOR_DRIVER_ADDRESS,MOTOR_DRIVER_SPEED_1_L,(temp0 - 100) & 0xff)
    bus.write_byte_data(MOTOR_DRIVER_ADDRESS,MOTOR_DRIVER_SPEED_1_H,(temp0 - 100) >> 8)
    bus.write_byte_data(MOTOR_DRIVER_ADDRESS,MOTOR_DRIVER_SPEED_2_L,temp0 & 0xff)
    bus.write_byte_data(MOTOR_DRIVER_ADDRESS,MOTOR_DRIVER_SPEED_2_H,temp0 >> 8)
    bus.write_byte_data(MOTOR_DRIVER_ADDRESS,MOTOR_DRIVER_ENABLE,1)
def setdirection(sysnax):
    bus.write_byte_data(MOTOR_DRIVER_ADDRESS,MOTOR_DRIVER_DIRECTION,sysnax)
# Define some colors
BLACK    = (   0,   0,   0)
WHITE    = ( 255, 255, 255)
# This is a simple class that will help us print to the screen
class TextPrint:
    def __init__(self):
        self.reset()
        self.font = pygame.font.Font(None, 20)
    def print(self, screen, textString):
        textBitmap = self.font.render(textString, True, BLACK)
        screen.blit(textBitmap, [self.x, self.y])
        self.y += self.line_height
    def reset(self):
        self.x = 10
        self.y = 10
        self.line_height = 15
    def indent(self):
        self.x += 10
    def unindent(self):
        self.x -= 10
pygame.init()
# Set the width and height of the screen [width,height]
size = [500, 700]
screen = pygame.display.set_mode(size)
pygame.display.set_caption("My Game")
#Loop until the user clicks the close button.
done = False
# Used to manage how fast the screen updates
clock = pygame.time.Clock()
# Initialize the joysticks
pygame.joystick.init()
# Get ready to print
textPrint = TextPrint()
# -------- Main Program Loop -----------
while done==False:
    # EVENT PROCESSING STEP
    for event in pygame.event.get(): # User did something
        if event.type == pygame.QUIT: # If user clicked close
            done=True # Flag that we are done so we exit this loop
    # DRAWING STEP
    # First, clear the screen to white. Don't put other drawing commands
    # above this, or they will be erased with this command.
    screen.fill(WHITE)
    textPrint.reset()
    # Get count of joysticks
    joystick_count = pygame.joystick.get_count()
    #textPrint.print(screen, "Number of joysticks: {}".format(joystick_count) )
    textPrint.indent()
    # For each joystick:
    for i in range(joystick_count):
        joystick = pygame.joystick.Joystick(i)
        joystick.init()
        # Usually axis run in pairs, up/down for one, and left/right for
        # the other.
        axes = joystick.get_numaxes()
        #textPrint.print(screen, "Number of axes: {}".format(axes) )
        #textPrint.indent()
        for i in range( axes ):
            axis = joystick.get_axis( i )
            textPrint.print(screen, "Axis {} value: {:>6.3f}".format(i, axis) )
            if i==1 and axis== -1.0:
                print("Left up",axis)
            if i==1 and axis > 0.3:
                print("Left down",axis)
            if i==0 and axis== -1:
                print("Left left",axis)
            if i==0 and axis > 0.3:
                print("Left right",axis)
            if i==4 and axis== -1.0:
                print("Right up",axis)
            if i==4 and axis > 0.3:
                print("Right down",axis)
            if i==3 and axis== -1:
                print("Right left",axis)
            if i==3 and axis > 0.3:
                print("Right right",axis)
            if i==2 and axis > 0.3:
                print("LT",axis)
            if i==5 and axis > 0.3:
                print("RT",axis)

        textPrint.unindent()
        buttons = joystick.get_numbuttons()
        textPrint.print(screen, "Number of buttons: {}".format(buttons) )
        textPrint.indent()

        for i in range( buttons ):
            button = joystick.get_button( i )
            textPrint.print(screen, "Button {:>2} value: {}".format(i,button) )
            if i==0 and button ==1:
                print("A")
            if i==1 and button ==1:
                print("B")
            if i==2 and button ==1:
                print("X")
            if i==3 and button ==1:
                print("Y")
            if i==4 and button ==1:
                print("LB")
            if i==5 and button ==1:
                print("RB")
            if i==6 and button ==1:
                print("BACK")
            if i==7 and button ==1:
                print("START")
            if i==8 and button ==1:
                print("Logitech")
            if i==9 and button ==1:
                print("Left GA")
            if i==10 and button ==1:
                print("Right GA")

        textPrint.unindent()
        # Hat switch. All or nothing for direction, not like joysticks.
        # Value comes back in an array.
        hats = joystick.get_numhats()
        textPrint.print(screen, "Number of hats: {}".format(hats) )
        textPrint.indent()

        for i in range( hats ):
            speed = 300
            hat = joystick.get_hat( i )
            textPrint.print(screen, "Hat {} value: {}".format(i, str(hat)) )
            if hat==(1,0) :
                print("FX right")
                turnright()
            if hat==(-1,0) :
                print("FX left")
                turnleft()
            if hat==(0,1):
                print("FX up")
                setspeed()
                setdirection(2)
                if hat==(1,0) :
                    print("FX right")
                    turnright()
                if hat==(-1,0) :
                    print("FX left")
                    turnleft()

            if hat==(0,0):
                print("正在减速")
                temp1 = (bus.read_byte_data(MOTOR_DRIVER_ADDRESS,MOTOR_DRIVER_PWM_NOW_2_H) << 8) | (bus.read_byte_data(MOTOR_DRIVER_ADDRESS,MOTOR_DRIVER_PWM_NOW_2_L))
                print(temp1)
                speed = temp1
                while speed > 0 :
                    speed = speed - 8
                    time.sleep(0.01)
                    setspeed()
            if hat==(0,-1):
                print("FX down")
                setspeed()
                setdirection(1)
                if hat==(1,0) :
                        print("FX right")
                        turnright()
                if hat==(-1,0) :
                    print("FX left")
                    turnleft()
        textPrint.unindent()
        #textPrint.unindent()

    # ALL CODE TO DRAW SHOULD GO ABOVE THIS COMMENT
    # Go ahead and update the screen with what we've drawn.
    pygame.display.flip()
    # Limit to 20 frames per second
    clock.tick(20)
# Close the window and quit.
# If you forget this line, the program will 'hang'
pygame.quit ()
- Execute it!
python3 toycar.py
- Plug the wireless handle receiver into the Raspberry Pi,then enjoy it!
Use the Keyboard to control the toycar
Software environment
First you need prepare a TF card to burn the raspbian.You can download the system from the official website.
When you finished this,please connect it by ssh.
- First,please open the function of wireless function.Execute the following command:
sudo vim /etc/wpa_supplicant/wpa_supplicant.conf
- Please configure your wireless
- Then you need install the python3's module pygame
sudo apt-get -y install python3-pygame
- You also need to install python3's smbus
sudo apt-get -y install python3-smbus
- Please open the RaspberryPi's I2C
- You could install the following script to achieve the safeshut down function.
wget -qO- https://git.io/fj3b9 | sudo bash
Hardware environment
Codes
- Create a new file and named:toycar.py and paste following codes:
- Press the key of W:
- Press the key of S:
- Press the key of A:
- Press the key of D:
import pygame
import sys
import smbus
import time

#MOTOR_DRIVER Address
MOTOR_DRIVER_ADDRESS = 0x18
MOTOR_DRIVER_BUS = 1
bus = smbus.SMBus(MOTOR_DRIVER_BUS)

#MOTOR_DRIVER Functions
MOTOR_DRIVER_SPEED_1_L = 0x01
MOTOR_DRIVER_SPEED_1_H = 0x02
MOTOR_DRIVER_SPEED_2_L = 0x03
MOTOR_DRIVER_SPEED_2_H = 0x04
MOTOR_DRIVER_COUNT_1_L = 0x05
MOTOR_DRIVER_COUNT_1_H = 0x06
MOTOR_DRIVER_COUNT_2_L = 0x07
MOTOR_DRIVER_COUNT_2_H = 0x08
MOTOR_DRIVER_DIRECTION = 0x09
MOTOR_DRIVER_SPEED_NOW_1_L = 0x0a
MOTOR_DRIVER_SPEED_NOW_1_H = 0x0b
MOTOR_DRIVER_SPEED_NOW_2_L = 0x0c
MOTOR_DRIVER_SPEED_NOW_2_H = 0x0d
MOTOR_DRIVER_COUNT_NOW_1_L = 0x0e
MOTOR_DRIVER_COUNT_NOW_1_H = 0x0f
MOTOR_DRIVER_COUNT_NOW_2_L = 0x10
MOTOR_DRIVER_COUNT_NOW_2_H = 0x11
MOTOR_DRIVER_DIRECTION_NOW = 0x12
MOTOR_DRIVER_ENABLE = 0x13
MOTOR_DRIVER_MODE = 0X14
MOTOR_DRIVER_PWM_NOW_2_L = 0x1f
MOTOR_DRIVER_PWM_NOW_2_H = 0x20

pygame.init()
screen = pygame.display.set_mode((600, 400))
pygame.display.set_caption('pygame event')
def setspeed():
    bus.write_byte_data(MOTOR_DRIVER_ADDRESS,MOTOR_DRIVER_SPEED_1_L,speed & 0xff)
    bus.write_byte_data(MOTOR_DRIVER_ADDRESS,MOTOR_DRIVER_SPEED_1_H,speed >> 8)
    bus.write_byte_data(MOTOR_DRIVER_ADDRESS,MOTOR_DRIVER_SPEED_2_L,speed & 0xff)
    bus.write_byte_data(MOTOR_DRIVER_ADDRESS,MOTOR_DRIVER_SPEED_2_H,speed >> 8)
    bus.write_byte_data(MOTOR_DRIVER_ADDRESS,MOTOR_DRIVER_ENABLE,1)
def decspeed():
    bus.write_byte_data(MOTOR_DRIVER_ADDRESS,MOTOR_DRIVER_SPEED_1_L,temp1 & 0xff)
    bus.write_byte_data(MOTOR_DRIVER_ADDRESS,MOTOR_DRIVER_SPEED_1_H,temp1 >> 8)
    bus.write_byte_data(MOTOR_DRIVER_ADDRESS,MOTOR_DRIVER_SPEED_2_L,temp1 & 0xff)
    bus.write_byte_data(MOTOR_DRIVER_ADDRESS,MOTOR_DRIVER_SPEED_2_H,temp1 >> 8)
    bus.write_byte_data(MOTOR_DRIVER_ADDRESS,MOTOR_DRIVER_ENABLE,1)
def turnleft():
    temp0 = 200
    bus.write_byte_data(MOTOR_DRIVER_ADDRESS,MOTOR_DRIVER_SPEED_1_L,temp0 & 0xff)
    bus.write_byte_data(MOTOR_DRIVER_ADDRESS,MOTOR_DRIVER_SPEED_1_H,((temp0 >> 8) | 0x80))
    bus.write_byte_data(MOTOR_DRIVER_ADDRESS,MOTOR_DRIVER_SPEED_2_L,(temp0 -100) & 0xff)
    bus.write_byte_data(MOTOR_DRIVER_ADDRESS,MOTOR_DRIVER_SPEED_2_H,((temp0 -100) >> 8) | 0x80)
    bus.write_byte_data(MOTOR_DRIVER_ADDRESS,MOTOR_DRIVER_ENABLE,1)
def turnright():
    temp0 = 200
    bus.write_byte_data(MOTOR_DRIVER_ADDRESS,MOTOR_DRIVER_SPEED_1_L,(temp0 - 100) & 0xff)
    bus.write_byte_data(MOTOR_DRIVER_ADDRESS,MOTOR_DRIVER_SPEED_1_H,((temp0 - 100) >> 8) | 0x80)
    bus.write_byte_data(MOTOR_DRIVER_ADDRESS,MOTOR_DRIVER_SPEED_2_L,temp0 & 0xff)
    bus.write_byte_data(MOTOR_DRIVER_ADDRESS,MOTOR_DRIVER_SPEED_2_H,((temp0 >> 8) | 0x80))
    bus.write_byte_data(MOTOR_DRIVER_ADDRESS,MOTOR_DRIVER_ENABLE,1)
def setdirection(sysnax):
    bus.write_byte_data(MOTOR_DRIVER_ADDRESS,MOTOR_DRIVER_DIRECTION,sysnax)

while True:
    for event in pygame.event.get():
        if event.type == pygame.QUIT:
            sys.exit()
        #
        keyboard_list = [pygame.K_w,pygame.K_s,pygame.K_a,pygame.K_d]
        keys_pressed = pygame.key.get_pressed()
        if keys_pressed[keyboard_list[0]]:
            print("w")
            speed = 200
            while (speed < 300):
                speed += 10
                setdirection(1)
                setspeed()
                if keys_pressed[keyboard_list[2]]:
                    print("a")
                    turnleft()
                elif keys_pressed[keyboard_list[3]]:
                    print("d")
                    turnright()

        elif keys_pressed[keyboard_list[1]]:
            print("s")
            speed = 200
            while (speed < 350):
                speed += 10
                setdirection(2)
                setspeed()
                if keys_pressed[keyboard_list[2]]:
                    print("a")
                    turnleft()
                elif keys_pressed[keyboard_list[3]]:
                    print("d")
                    turnright()
        elif keys_pressed[keyboard_list[2]]:
            print("a")
            turnleft()

        elif keys_pressed[keyboard_list[3]]:
            print("d")
            turnright()
        else:
            temp1 = (bus.read_byte_data(MOTOR_DRIVER_ADDRESS,MOTOR_DRIVER_PWM_NOW_2_H) << 8) | (bus.read_byte_data(MOTOR_DRIVER_ADDRESS,MOTOR_DRIVER_PWM_NOW_2_L))
            print(temp1)
            while (temp1 > 1):
                time.sleep(0.01)
                temp1 -= 4
                decspeed()
            else:
                temp1 = 0
                decspeed()
    pygame.display.update()
- Execute it!
sudo DISPLAY=:0.0 python3 toycar.py
- Plug the wireless keyboard receiver into the Raspberry Pi,then enjoy it!
FAQ
- Q: What is the maximum speed the car can reaching?
A: It will be faster than your imagination,the max is 1300r/min.However, i suggest you don't do like this,it may damage the car.
- Q: Sometimes,the toycar is out of my control,what's wrong with it?
A: Maybe the raspberry pie's wireless signal is too weak.Also,this is related to your program.
- Q: Why i have executed the command:sudo halt,but the Raspberypi and Power Board's Led is still working?
A: Because you havn't installed the script about power.Please install it then have a try.
- Q: If i have ran the program and the raspberrypi is fine,i have reed the value of register of speed,but the car has't any response?
 A: Please check the Power Board's power supply pin.It may be broken.
    Meantime,you may not plug the wireless keyboard receiver into the Raspberry Pi
Video
Keywords
DockerPi,DIY,toycar,intelligent,Programmable
