EP-0236: Difference between revisions
Jump to navigation
Jump to search


(Created page with "==CN01 M.2 M-key PCIe3.0 == ==Descriptions== This is a compact PCIE 3.0x1 expansion board specifically designed for the PCIe interface of the Raspberry Pi 5. It features an M.2 M-key specification, ensuring compatibility with a wide range of SSD devices. ==Features== * <strong>Compact Design </strong>: The board is small and lightweight, making it ideal for space-constrained projects. * <strong>PCIE 3.0x1 Interface </strong>: Supports the latest PCIe 3.0 standard with...") |
|||
| Line 35: | Line 35: | ||
===How to assemble it?=== | ===How to assemble it?=== | ||
TBD. | TBD. | ||
==How to enable PCIe on Raspberry Pi 5 ?== | |||
<pre>We assume that you are using Raspberry Pi OS 64bit on Raspberry Pi 5. (codename: bookworm) </pre> | |||
* Step 1. Modify /boot/firmware/config.txt file and adding following parameters: | |||
<pre> | |||
dtparam=pciex1 | |||
dtparam=pciex1_gen=3 # Optional, force to use gen3 speed on NVMe SSD, if can support this function is depends on your NVMe SSD's feature. | |||
</pre> | |||
[[File:Config.txt file.png|left|800px]] | |||
<br style=clear:both;"> | |||
* Step 2. Save it and reboot your Raspberry Pi 5 to take effect. | |||
===Disk Operations=== | |||
* Check if SSD drive has been recognized by Raspberry Pi 5. | |||
<pre>lsblk</pre> | |||
[[File:Check disk infor.png|left|800px]] | |||
<br style=clear:both;"> | |||
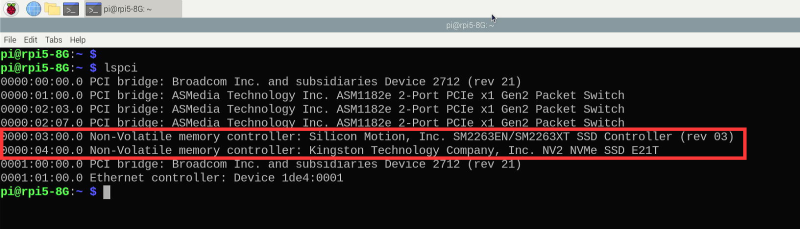
* Make sure the PCIe devices information | |||
[[File:Lspci.png|left|800px]] | |||
<br style=clear:both;"> | |||
* Create Partition | |||
<pre>sudo fdisk /dev/nvme0n1 </pre> | |||
create one partition by input following characters: | |||
<pre> | |||
n -> p -> 1 > Enter -> Enter -> w -> Enter | |||
</pre> | |||
n - new | |||
p - primary partition | |||
1 - partition number | |||
Enter -> first cylinder | |||
Enter -> take the whole disk as last cylinder. | |||
w - write the partition table to SSD | |||
q - quit | |||
* Format the partition | |||
<pre> | |||
sudo mkfs.ext4 /dev/nvme0n1p1 | |||
</pre> | |||
* Mount Partition to Raspberry Pi 5 | |||
<pre> mkdir -pv disk1 | |||
sudo mount -t ext4 /dev/nvme0n1p1 /home/pi/disk1 -v | |||
</pre> | |||
* Check if the partition has been mounted properly. | |||
<pre> | |||
df -Th | |||
</pre> | |||
<br style=clear:both;"> | |||
* Automout the partition by modify /etc/fstab file, you can use vim or nano editor to modify this file /etc/fstab. | |||
<pre>sudo vim.tiny /etc/fstab</pre> | |||
<font color=red> NOTE: Please take care of the modifications due to wrong parameters may cause the system corrupted. </font> | |||
<pre> | |||
/dev/nvme0n1p1 ext4 /home/pi/disk1 defaults,noatime 0 0 | |||
</pre> | |||
Save it and try to auto mount | |||
<pre>sudo mount -a </pre> | |||
* Check it by using | |||
<pre>df -Th </pre> | |||
==Package Includes== | ==Package Includes== | ||
TBD. | TBD. | ||
==Keywords== | ==Keywords== | ||
* CN01 M.2 M-key PCIe3.0 adapter board, KZ-0067 pcie adapter, PCIe3.0x1. | * CN01 M.2 M-key PCIe3.0 adapter board, KZ-0067 pcie adapter, PCIe3.0x1. | ||
Revision as of 14:07, 18 June 2024
CN01 M.2 M-key PCIe3.0
Descriptions
This is a compact PCIE 3.0x1 expansion board specifically designed for the PCIe interface of the Raspberry Pi 5. It features an M.2 M-key specification, ensuring compatibility with a wide range of SSD devices.
Features
- Compact Design : The board is small and lightweight, making it ideal for space-constrained projects.
- PCIE 3.0x1 Interface : Supports the latest PCIe 3.0 standard with a single lane, offering high-speed data transfer capabilities.
- M.2 M-key Specification : Compatible with a variety of SSDs, providing flexibility in storage options.
- Aluminum Alloy Enclosure : The enclosure not only protects the SSD but also enhances heat dissipation, ensuring stable operation.
- Enhanced Cooling : The design includes effective thermal management to prevent overheating and prolong the life of the SSD.
- Plug-and-Play : Easy to install and use, requiring no additional drivers for most operating systems.
- High Compatibility : Designed to work seamlessly with Raspberry Pi 5, enhancing its functionality with additional storage or network capabilities.
Specifications
- Form Factor: Compact PCIe 3.0x1 expansion board for Raspberry Pi 5.
- Interface Type: PCIe 3.0, 1-lane interface.
- M.2 Slot Type: M-key (Key M) supporting both NVMe and SATA protocols.
- SSD Size Compatibility:
2230 (22mm width and 30mm length)
2242 (22mm width and 42mm length)
2260 (22mm width and 60mm length)
2280 (22mm width and 80mm length)
- SSD Power supply: Via PogoPin contact with soldering points on Raspberry Pi 5's GPIO.
- Physical Dimensions: Dimensions tailored to fit the Raspberry Pi 5 without obstruction.
- Material: Durable aluminum alloy casing for enhanced protection and heat dissipation.
- Heat Dissipation: Efficient cooling design to maintain optimal SSD performance.
- Operating Temperature: Suitable temperature range for reliable operation.
- Compatibility: Confirmed compatibility with various Raspberry Pi 5 models.
- Mounting: Secure mounting solution included for attachment to the Raspberry Pi.
- Connectors: Necessary PCIe and M.2 connectors for SSD integration.
- Software Requirements: Modify /boot/firmware/config.txt and adding `dtparam=pciex1` and `dtparam=pciex1_gen=3`
Gallery
TBD.
How to assemble it?
TBD.
How to enable PCIe on Raspberry Pi 5 ?
We assume that you are using Raspberry Pi OS 64bit on Raspberry Pi 5. (codename: bookworm)
- Step 1. Modify /boot/firmware/config.txt file and adding following parameters:
dtparam=pciex1
dtparam=pciex1_gen=3  # Optional, force to use gen3 speed on NVMe SSD, if can support this function is depends on your NVMe SSD's feature.

- Step 2. Save it and reboot your Raspberry Pi 5 to take effect.
Disk Operations
- Check if SSD drive has been recognized by Raspberry Pi 5.
lsblk

- Make sure the PCIe devices information

- Create Partition
sudo fdisk /dev/nvme0n1
create one partition by input following characters:
n -> p -> 1 > Enter -> Enter -> w -> Enter
n - new p - primary partition 1 - partition number Enter -> first cylinder Enter -> take the whole disk as last cylinder. w - write the partition table to SSD q - quit
- Format the partition
sudo mkfs.ext4 /dev/nvme0n1p1
- Mount Partition to Raspberry Pi 5
 mkdir -pv disk1
sudo mount -t ext4 /dev/nvme0n1p1 /home/pi/disk1 -v
- Check if the partition has been mounted properly.
df -Th
- Automout the partition by modify /etc/fstab file, you can use vim or nano editor to modify this file /etc/fstab.
sudo vim.tiny /etc/fstab
NOTE: Please take care of the modifications due to wrong parameters may cause the system corrupted.
/dev/nvme0n1p1 ext4 /home/pi/disk1 defaults,noatime 0 0
Save it and try to auto mount
sudo mount -a
- Check it by using
df -Th
Package Includes
TBD.
Keywords
- CN01 M.2 M-key PCIe3.0 adapter board, KZ-0067 pcie adapter, PCIe3.0x1.