X600 SKU:EZ-0045
X600 EXPANSION BOARD
Features
| Parameter | Value |
|---|---|
| Input Voltage | 6V to 20Vdc converted to 5V, 3A via step-down DC/DC converter to power the Raspberry Pi and SATA device |
| Audio & Video |
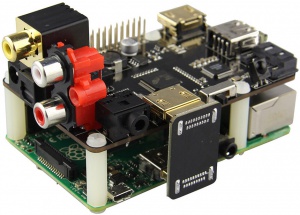
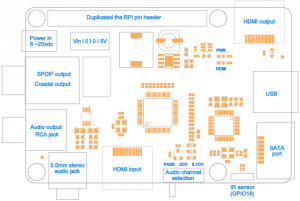
- Allows you to extract audio signals from HDMI of your Raspberry Pi - Converts HDMI audio to digital optical or Coaxial or stereo RCA analog - The SPDIF optical or Coaxial audio output supports all audio formats up to 5.1CH Dolby Digital 5.1CH / AC3 & DTS 5.1CH audio - Extract digital 2CH PCM stereo audio signal from the HDMI input and convert it to 2CH analog stereo output through its RCA style L/R analog output or earphone jack - Provides the Best Flexibility through Three NEW Audio EDID Settings: Pass, 2CH and 5.1CH - Maintains surround format when converting to digital optical audio - Supports high definition input up to 1080p@(24/60)Hz, output resolution follows input - Supports HDMI signal amplification and equalization output for repeater function - HDMI output supports all audio formats including more advanced Dolby Digital Plus, PCM5.1CH and beyond |
| SATA | Allows you to connect SATA devices to your Raspberry Pi |
| Wireless | Built in IR sensor (38KHz) |
| Misc |
- Power output socket - Directly connected on top of the Raspberry Pi using the board GPIO header pins - No wiring nor soldering is required - Duplicated the 40-pin header of the R-Pi in order to support existing expansion boards - Suitable for Raspberry Pi Model B+, Raspberry pi 2 Model B and Raspberry Pi 3 Model B NEW! |
| Dimensions | 85 x 56mm (Same size as Raspberry Pi) |
Notes
1. The RCA L/R output will not have sound if the incoming audio is multi-channel audio (>2CH). Set EDID switch to 2CH for RCA L/T stereo application.
2. TOSLINK optical audio output does not support Dolby Digital Plus (used by Roku and Chromecast) and higher formats, such as HD audio (Dolby TrueHD, DTS-HD Master Audio, PCM5.1 and beyond).
3. Set audio EDID to 5.1CH for DD5.1CH / DTS5.1CH, use optical output to connect to audio receiver for surround sound.
PACKING LIST
- 1 x X600 expansion board
- 4 x nylon spacers (M3 x 20mm)
- 8 x nylon screws (M3 x 6mm)
- 1 x USB adapter
- 1 x HDMI adapter
QUICK START GUIDE
- A. Fitting the expansion board
- B. Power supply
- C. Configuring Rasbian
- D. SATA port
- A. FITTING THE EXPANSION BOARD
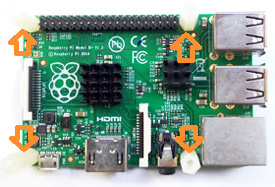
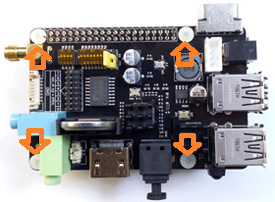
- 1. Push a screws up through the mounting hole on the underside of the Raspberry Pi and screw the spacer down until it is hand tight
- 2. Plugs the expansion board straight into your Raspberry Pi B+'s GPIO header and screw down
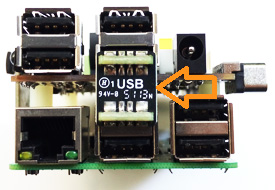
- 3. Insert the USB adapter
- 4. Insert the HDMI adapter
B. POWER SUPPLY
X600 expansion board supplies the RPi with a regulated +5V through the GPIO header using a 2A poly-resettable (PTC) fuse.
With the wide voltage input range (6~20vdc), the RPi can be powered from a wide variety of external sources such as batteries, power adapters, solar battery sources, etc.
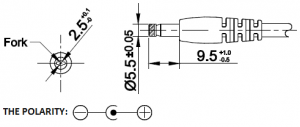
Recommended Power Adapter : 110~240VAC input, 12VDC 2A output
Dimension of input plug (Unit: mm)
WARNING: DO NOT APPLY POWER TO YOUR RASPBERRY PI VIA THE PI’s MICRO USB SOCKET.
C. CONFIGURING RASPBIAN
- Based on RASPBIAN JESSIE
Version: March 2016
Release date: 2016-03-18
Kernel version: 4.1
HDMI setting
- <1> To ensure that the necessary kernel modules are loaded at boot
pi@raspberrypi ~ $ sudo nano /boot/config.txt
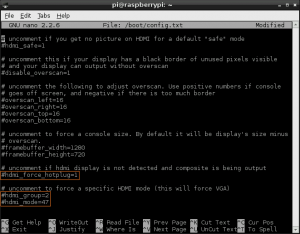
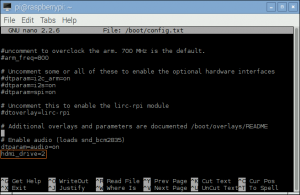
- <2> Uncomment following three lines in config.txt by removing '#' located at start of the line. (check Images below)
hdmi_force_hotplug=1      pretends that HDMI device is always attached
hdmi_group                            specifies whether monitor is DMT type (Computers) or CEA type (TV)
hdmi_mode                            specifies the resolution of monitor.
- <3> For hdmi_group value selection : If you’re using output as Computer monitor then replace value ’1′ with ’2′, so the new config will be like :
hdmi_group=2
(Select value 1 for TV, Select value 2 for monitor)
- <4> For hdmi_mode value selection : Now open eLinux RPi config scroll down, there in hdmi_mode two tables are given, select the correct resolution as per your monitor.
(Table1 if you’re using TV & Table2 if you’re using Monitor)
Since my monitor’s resolution is 1440×900 px, hdmi_mode=47 fits me the best. So, the modified config.txt will be like.
hdmi_mode=47
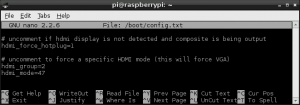
Overall my uncommented lines will look something like :
- <5> adding the "hdmi_drive=2" line at the bottom
- <6> Save your changes by pressing Ctrl-x then Y
- <7> Reboot your Raspberry Pi
pi@raspberrypi ~ $ sudo reboot
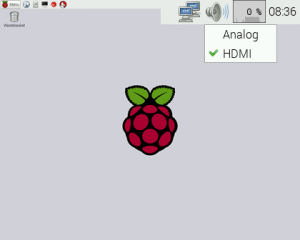
- <8> Mouse right click the speaker icon and select audio output of HDMI
- Testing the IR receiver
- <9> Installing LIRC
pi@raspberrypi ~ $ sudo apt-get install lirc
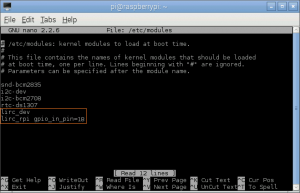
- <10> Add the two lines below to /etc/modules . This will start the modules up on boot. Pin 8 bellow will be used to take the output from the IR sensor.
pi@raspberrypi ~ $ sudo nano /etc/modules
lirc_dev
lirc_rpi gpio_in_pin=18
- <11> Save your changes by pressing Ctrl-x then Y
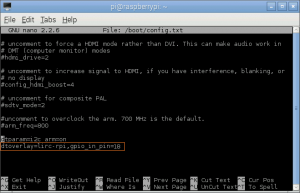
- <12> If you are using 3.18.x RaspberryPi firmware you must modify one additional file for the lirc-rpi kernel extension to be loaded:
Edit your /boot/config.txt file
pi@raspberrypi ~ $ sudo nano /boot/config.txt
and add:
dtoverlay=lirc-rpi,gpio_in_pin=18
- <13> Edit /etc/lirc/hardware.conf and have it appear exactly as shown below.
pi@raspberrypi ~ $ sudo nano /etc/lirc/hardware.conf
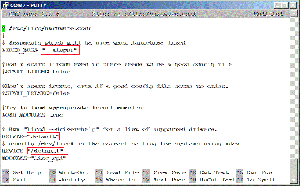
# /etc/lirc/hardware.conf
#
# Arguments which will be used when launching lircd
LIRCD_ARGS="--uinput"
# Don't start lircmd even if there seems to be a good config file
# START_LIRCMD=false
# Don't start irexec, even if a good config file seems to exist.
# START_IREXEC=false
# Try to load appropriate kernel modules
LOAD_MODULES=true
# Run "lircd --driver=help" for a list of supported drivers.
DRIVER="default"
# usually /dev/lirc0 is the correct setting for systems using udev
DEVICE="/dev/lirc0"
MODULES="lirc_rpi"
# Default configuration files for your hardware if any
LIRCD_CONF=""
LIRCMD_CONF=""
- The highlighted text are the parts that will need changing, though it’s worth checking the rest of the text incase you have a different initial configuration.
- <14> Save your changes by pressing Ctrl-x then Y
- <15> Reboot the Raspberry Pi
pi@raspberrypi ~ $ sudo reboot
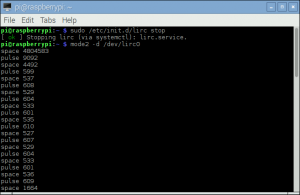
- <16> Run these two commands to stop lircd and start outputting raw data from the IR receiver:
pi@raspberrypi ~ $ sudo /etc/init.d/lirc stop
pi@raspberrypi ~ $ mode2 -d /dev/lirc0
- <17> Point a remote control at your IR receiver and press some buttons. You should see something like this:
D. SATA PORT
The SATA port allows you to connect SATA devices to your Raspberry Pi, a very useful tool for data transfer, backup and cloning.
It supports most SATA devices such as CD ROM, DVD ROM, CD drive, 2.5 inch hard disk and 3.5 inch hard disk.
Installation for SATA drives:
1. Connect you SATA drive to the SATA port with a SATA cable.
2. Connect SATA Power Cable to a power adapter which is used to power hard disk OR to the power connector on X300 (Output voltage of power adapter used must be 12Vdc).
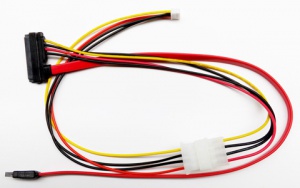
SATA Serial ATA Data and Power Combo Cable
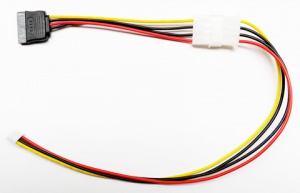
4-Pin to SATA Power Cable Adapter
