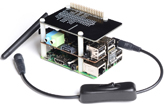
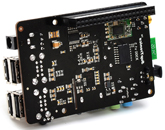
X300 SKU: EZ-0003
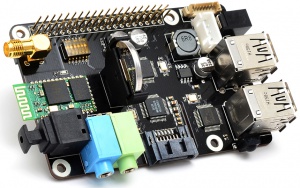
X300 EXPANSION BOARD
KEY FEATURES
| Parameter | Value |
|---|---|
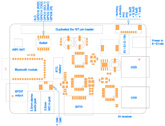
| Input Voltage | 6V to 18Vdc converted to 5V, 4A via step-down DC/DC converter to power the Raspberry Pi |
| SATA | Allows you to connect SATA devices to your Raspberry Pi |
| Audio | 3.5mm MIC in jack
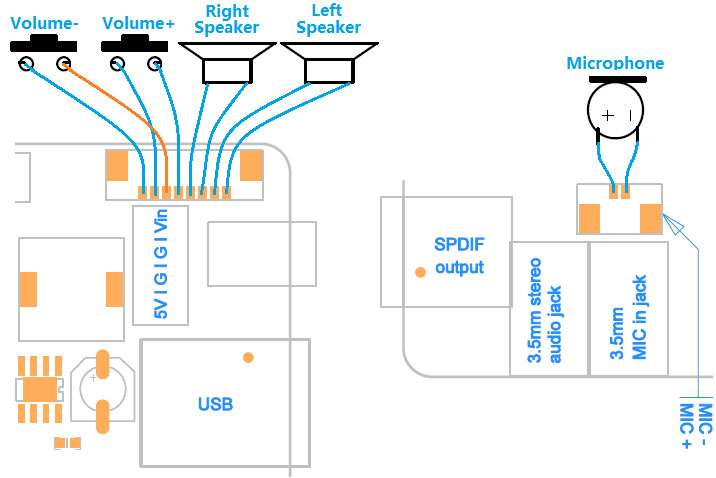
- 3.5mm stereo audio jack - SPDIF output - Audio IO connector (Microphone input and stereo audio amplifier 3.3Wx2) |
| Wireless | WiFi (IEEE 802.11b/g/n) with external antenna
- IR sensor (38KHz) - Bluetooth serial communication |
| USB Storage | Self-powered USB hub with 3 ports |
| Real-time clock (RTC) | Based on DS3231SN with included CR2032 battery |
| Misc | Power output socket
- Camera flex slot so camera can still be used with the expansion board attached - DIP switch to remove connection from RPi’s pin header - Directly connected on top of the Raspberry Pi using the board GPIO header pins - No wiring nor soldering is required - Duplicated the 40-pin header of the R-Pi in order to support existing expansion boards - Suitable for Raspberry Pi Model B+, Raspberry pi 2 Model B and Raspberry Pi 3 Model B NEW! |
| Dimensions | 85 x 56mm (Same size as Raspberry Pi) |
PACKING LIST
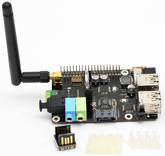
- 1 x X300 expansion board
- 1 x USB adapter
- 1 x 2.4GHz WIFI antenna
- 4 x nylon spacers (M3 x 20mm)
- 8 x nylon screws (M3 x 6mm)
QUICK START GUIDE
- A. Fitting the expansion board
- B. Operation system
- C. Power supply
- D. Microphone input and audio output
- E. Audio input and output interface
- F. Setting RTC time
- G. Testing the IR receiver
- H. SATA port
- I. Bluetooth serial communication
- A. FITTING THE EXPANSION BOARD
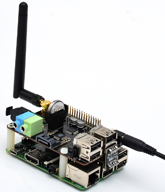
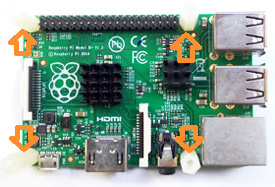
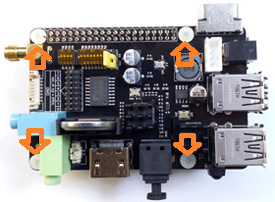
1. Push a screws up through the mounting hole on the underside of the Raspberry Pi and screw the spacer down until it is hand tight
2. Plugs the expansion board straight into your Raspberry Pi B+'s GPIO header and screw down.
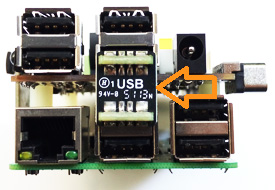
3. Insert the USB adapter
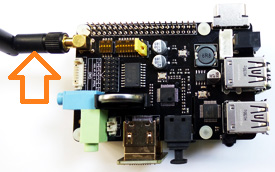
4. Install the WiFi antenna
B. OPERATION SYSTEM
C. POWER SUPPLY
Xseries expansion board supplies the RPi with a regulated +5V through the GPIO header using a 2A poly-resettable (PTC) fuse.
With the wide voltage input range (6~21Vdc), the RPi can be powered from a wide variety of external sources such as batteries, 12V power adapters, solar battery sources, etc.
Recommended Power Adapter : 110~240VAC input, 12VDC 2A output
Dimension of input plug (Unit: mm)

D. MICROPHONE INPUT AND AUDIO OUTPUT
To configure X300 sound card as the default audio device.
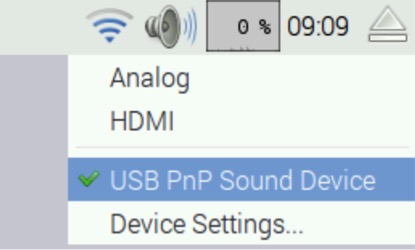
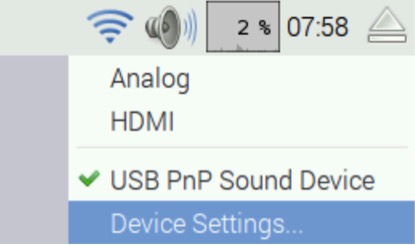
<1> Right-click the volume icon, a pop-up menu appears to allow you to select "USB PnP Sound Device".
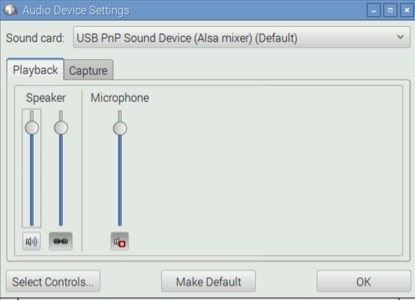
<2> Click "Device Settings..." to allow more detailed control of the X300 audio devices – you can access this either under Device Settings from the volume right-click menu or from the Preferences section of the main menu, where it is listed as Audio Device Settings.
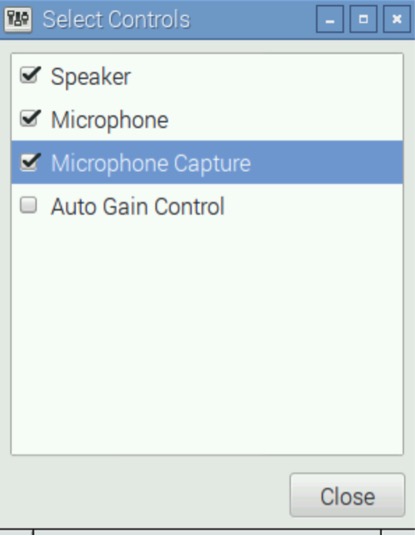
<3> From this dialog, select the device you want to control from the drop-down at the top, and then press the Select Controls button to choose which of the controls the device offers that you want to display. Pressing the Make Default button on this window has the same effect as choosing an output source in the volume right-click menu.
<4> Let's record the sound with LXterminal
pi@raspberrypi ~ $ arecord -D plughw:1,0 -f cd test.wav
<5> Press Ctrl + C to abort recording
<6> Playback the recording with aplay
pi@raspberrypi ~ $ aplay test.wav
E. AUDIO INPUT AND OUTPUT INTERFACE
F. SETTING RTC TIME
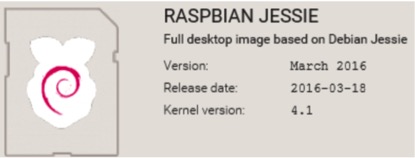
This page details how to setup the RTC Pi on the Raspbian Jessie image from http://www.raspberrypi.org/downloads
- <7> Ensure that the CR2032 coin battery was inserted into the battery holder. Using the expansion board without a battery installed may damage the RTC chip and will stop it from appearing on the I2C bus.
- <8> Follow the instructions on how to install and configure I2C on Raspbian Linux.
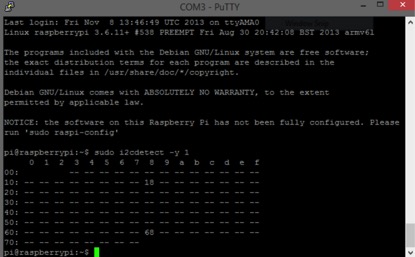
- <9> Once you have installed I2C check that the RTC Pi has been detected using:
pi@raspberrypi ~ $ sudo i2cdetect -y 1
The RTC Pi should appear on channel 68 as shown in the screen shot below.
If the RTC Pi does not appear check that the battery is installed correctly and is fully charged:
- <10> Enable I2C by running:
pi@raspberrypi ~ $ sudo nano /etc/modprobe.d/raspi-blacklist.conf
Find the I2C line where the I2c is black listed
blacklist i2c-bcm2708
Comment it out by replacing it with the line below
#blacklist i2c-bcm2708
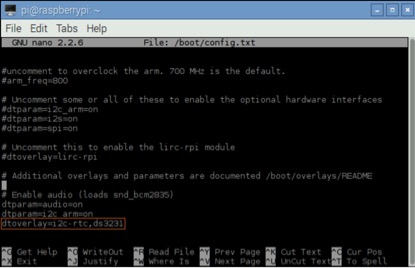
- <11> To ensure that the necessary kernel modules are loaded at boot, ensure your /boot/config.txt file has the entry below …
pi@raspberrypi ~ $  sudo nano /boot/config.txt
dtoverlay=i2c-rtc,ds3231
- <12> Save your changes by pressing Ctrl-x then Y
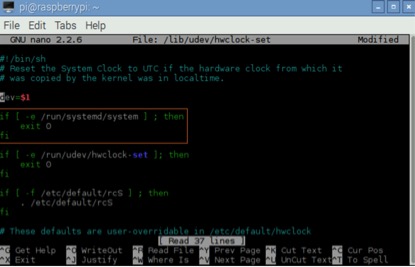
- <13> Edit /lib/udev/hwclock-set with
pi@raspberrypi ~ $ sudo nano /lib/udev/hwclock-set
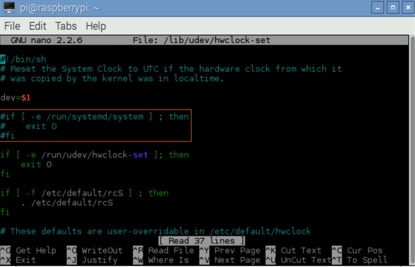
- <14> Locate the lines and edit
- <15> Comment following three lines in config.txt by adding '#' located at start of the line. (check Images below)
- <16> Save your changes by pressing Ctrl-x then Y
- <17> Reboot your Raspberry Pi
pi@raspberrypi ~ $ sudo reboot
- <18> Get the right time set on the Pi ,
pi@raspberrypi ~ $ sudo date MMDDHHMMYYYY.SS
              (MM= Month, DD= Date, HH= Hour, MM= Minute, YYYY= Year, SS= Second )
                                          example:  2013 Jan 4 , 11:39:00 , sudo date 010411392013.00
- <19> Write the system time to the expansion board,
pi@raspberrypi ~ $ sudo hwclock -w
- <20> Verify the time ,
pi@raspberrypi ~ $ sudo hwclock -r
If everything worked correctly the expansion board should be initialised on boot and the current date and time will be loaded into Linux.
G. TESTING THE IR RECEIVER
- <21> Installing LIRC
pi@raspberrypi ~ $ sudo apt-get install lirc
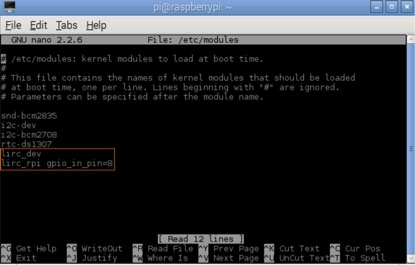
- <22> Add the two lines below to /etc/modules . This will start the modules up on boot. Pin 8 bellow will be used to take the output from the IR sensor.
pi@raspberrypi ~ $ sudo nano /etc/modules
lirc_dev
lirc_rpi gpio_in_pin=8
- <23> Save your changes by pressing Ctrl-x then Y
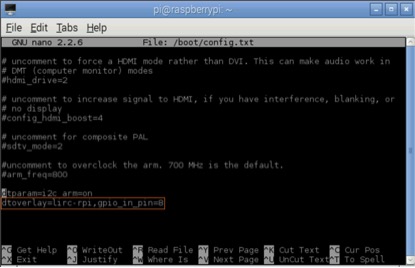
- <24> Edit your /boot/config.txt file
pi@raspberrypi ~ $ sudo nano /boot/config.txt
and add:
dtoverlay=lirc-rpi,gpio_in_pin=8
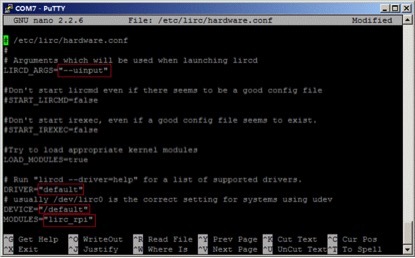
- <25> Edit /etc/lirc/hardware.conf and have it appear exactly as shown below.
pi@raspberrypi ~ $ sudo nano /etc/lirc/hardware.conf
# /etc/lirc/hardware.conf
#
# Arguments which will be used when launching lircd
LIRCD_ARGS="--uinput"
# Don't start lircmd even if there seems to be a good config file
# START_LIRCMD=false
# Don't start irexec, even if a good config file seems to exist.
# START_IREXEC=false
# Try to load appropriate kernel modules
LOAD_MODULES=true
# Run "lircd --driver=help" for a list of supported drivers.
DRIVER="default"
# usually /dev/lirc0 is the correct setting for systems using udev
DEVICE="/dev/lirc0"
MODULES="lirc_rpi"
# Default configuration files for your hardware if any
LIRCD_CONF=""
LIRCMD_CONF=""
The highlighted text are the parts that will need changing, though it’s worth checking the rest of the text incase you have a different initial configuration.
- <26> Save your changes by pressing Ctrl-x then Y
- <27> Reboot the Raspberry Pi
pi@raspberrypi ~ $ sudo reboot
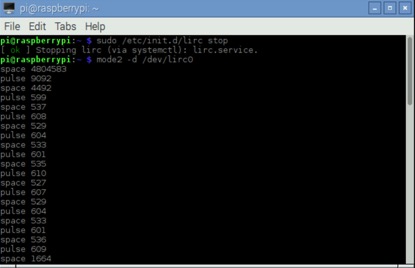
- <28> Run these two commands to stop lircd and start outputting raw data from the IR receiver
pi@raspberrypi ~ $ sudo /etc/init.d/lirc stop
pi@raspberrypi ~ $ mode2 -d /dev/lirc0
- <29> Point a remote control at your IR receiver and press some buttons. You should see something like this:
H. SATA PORT
The SATA port allows you to connect SATA devices to your Raspberry Pi, a very useful tool for data transfer, backup and cloning.
It supports most SATA devices such as CD ROM, DVD ROM, CD drive, 2.5 inch hard disk and 3.5 inch hard disk.
Installation for SATA drives:

1. Connect you SATA drive to the SATA port with a SATA cable.
2. Connect SATA Power Cable to a power adapter which is used to power hard disk OR to the power connector on X300 (Output voltage of power adapter used must be 12Vdc).
I. BLUETOOTH SERIAL COMMUNICATION
- Technical documents Download
File:BC04-B Technical specification.pdf
File:BC04-B AT Command.pdf
- Required additional hardware
A computer or device with a Bluetooth terminal software
To establish a communication with the Raspberry Pi over Bluetooth you need another device that can speak Bluetooth.
If your computer has a Bluetooth adapter then you just need to find a terminal software that you can use to send and receive data, like HyperTerminal on Windows, or screen on OS X and Linux.
A computer is not the only choice, though.
For example, I will use my Android cell phone with the free BlueTerm (download from Google play) app installed.
- Wiring
| RPi GPIO pin | BT module pin |
|---|---|
| N/A | +3.3V |
| GND (Pin #6) | GND |
| TXD (Pin #8) | RXD |
| RXD (Pin #10) | TXD |
- Raspberry Pi configuration
I'm going to assume you are running a recent release of Raspbian on your Raspberry Pi.
If you are running another OS then you will need to find out how the changes below are done in your system.
By default the Raspberry Pi is configured to write boot time messages to the serial port, and also to start a login console on it.
Unfortunately, the default baud rate that the RPi uses for its serial port is 115200 bps, while the Bluetooth module comes preconfigured to 9600 bps.
There are two config files that need to be updated.
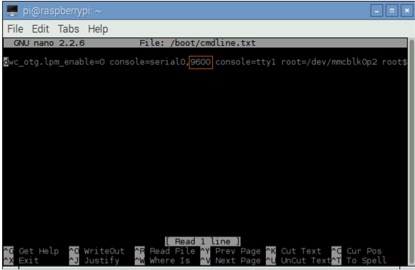
File /boot/cmdline.txt contains the kernel options that are used to boot the system.
In my Raspbian based system this file contains the following options:
pi@raspberrypi ~ $ sudo nano /boot/cmdline.txt
dwc_otg.lpm_enable=0 console=serial0,115200 console=tty1 root=/dev/mmcblk0p2 rootfstype=ext4 elevator=deadline fsck.repair=yes rootwait
Change to
dwc_otg.lpm_enable=0 console=serial0,9600 console=tty1 root=/dev/mmcblk0p2 rootfstype=ext4 elevator=deadline fsck.repair=yes rootwait
Additional setting for Raspberry Pi 3 only (Not suitable for Raspberry Pi 2 and Pi Model B+)
If you've tried to use the UART on the GPIO header of the new Raspberry Pi 3, you may have been frustrated to discover that it doesn't work properly.
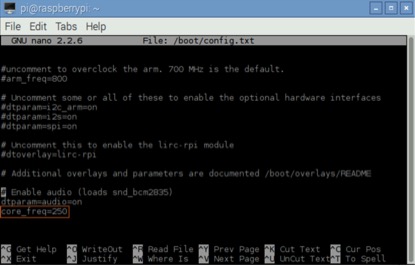
Until we get an official 'proper' fix (possibly setting PLLs correctly or dynamically with any changes to the core frequency), the best option seems to be setting the core clock to 250MHz, with core_freq=250 in /boot/config.txt.
pi@raspberrypi ~ $ sudo nano /boot/config.txt
Add the line core_freq=250 , Save and reboot!
With those changes made the RPi is configured to talk to the Bluetooth module.
If you now power up your Raspberry Pi you will notice that the LED in the Bluetooth module blinks rapidly.
This is the sign that the Bluetooth module is ready and waiting to be paired with another device.
- Connecting from a Bluetooth terminal
Now leave the RPi running with the Bluetooth module in its blinking state and go to the Bluetooth enabled computer or smartphone that you will connect to it.
Your device should now find the Bluetooth module with the name BC04-B when you set it to discover devices.
If you are using an Android device with BlueTerm then start the app and from the app menu select "Connect device".
Android does the baud selection automatically so you don't have to configure it.
From a terminal software running in a computer it is likely that you will need to configure the speed, number of data bits per character, parity, and number of stop bits per character.
The values you need to use are:
- Speed: 9600 bps
- Data bits: 8 bits
- Parity: None
- Stop bits: 1 bit
The Bluetooth module comes preconfigured with a PIN number.
To complete the connection your computer or smartphone will ask you to enter this PIN.
The factory default PIN is 1234.
The LED in the Bluetooth module will now stop blinking and remain lit, indicating that it has made a connection.
And here comes the fun part. You need to reboot the Raspberry Pi so that the new serial port settings take effect. To reboot the RPi run the following command in a local or network shell:
$ sudo reboot
Now watch the Bluetooth terminal on your PC or smartphone while the Pi reboots.
Boot messages should be appearing on your terminal, and as soon as the RPi is up you should get a login prompt there as well.
You can now login from your Bluetooth terminal and use the command line prompt as you normally would over a local or network shell.
- Configuring the Bluetooth module
Firstly you will need to install minicom into your RPi using the following command:
$ sudo apt-get install minicom
The Bluetooth module comes preconfigured from the factory with a set of defaults, which are:
- Baud rate: 9600
- Bluetooth ID: BC04-B
- PIN: 1234
But these values can be changed by sending special commands through the communication channel. Now that the Raspberry Pi is connected to the module we can try this.
These special commands that configure the Bluetooth module can be sent from a connected remote device, or they can be sent from the local system, in this case the Raspberry Pi.
Since the Raspberry Pi is the star of the article I'm going to also use it to do the configuration.
Here is a quick summary of the most useful configuration commands:
| Command | Description |
|---|---|
| AT | Test the communication with the Bluetooth module. |
| AT+VERSION | Report the module's version number |
| AT+NAMEname | Change the Bluetooth ID to name (maximum 20 characters). |
| AT+PINnnnn | Change the PIN to nnnn, which must be a four digit number. |
| AT+BAUDn | Change the baud rate. Use one of the following values for n:
2: 2400bps 3: 4800bps 4: 9600bps 5: 19200bps 6: 38400bps 7: 57600bps 8: 115200bps |
One tricky aspect of sending these commands is that the Bluetooth module has a very short timeout, so all the characters in a command must be entered really quickly.
The safest way to get the entire command in time is to type it in a text editor window and then use copy/paste to send it really fast.
To send the commands we can use minicom. So let's fire it up one more time:
$ minicom -b 9600 -o -D /dev/ttyAMA0
Note that it isn't necessary to have a connection to do this, so you can do this while the Bluetooth module is in its blinking state.
You now need to use any method to get the string AT into the clipboard, and then hit paste inside the minicom window to send the command to the module.
When you send AT the module should respond with this in the minicom window:
OK
If you get this response then you know that everything is all right. If you don't get a response then for some reason the Raspberry Pi is unable to communicate with the Bluetooth module.
When I send AT+VERSION to the module I get the following response:
OKlinvorV1.5
To change the baud rate to the fastest rate of 115200 we need to issue the command AT+BAUD8, and the module will respond with:
OK115200
Because the baud rate was changed now the communication will break, and we will need to exit and restart minicom with the updated speed:
$ minicom -b 115200 -o -D /dev/ttyAMA0
To change the name of the module to MyBT we must issue the command AT+NAMEMyBT, and the module will respond with:
OKsetname
And to change the PIN to 4321 the command is AT+PIN4321 and the response from the Bluetooth module will be:
OKsetPIN
Note that when the name and/or the PIN change the module requires a power cycle for the changes to take effect.
Also don't forget that if you change the baud rate and later want to reestablish the serial console you will need to change the two config files to reflect the new baud rate you have selected in the Bluetooth module.
