ER-0007
Jump to navigation
Jump to search
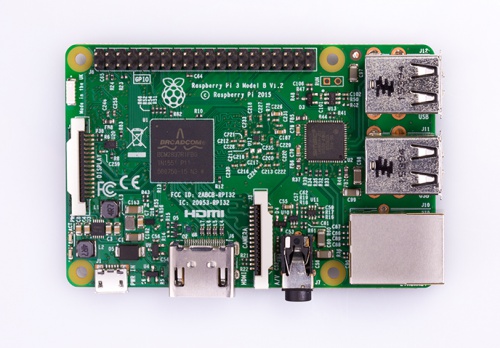
Raspberry Pi 3 Model B
- Purchase URL [ https://52pi.com/products/raspberry-pi-3-model-b-1gb-ram-quad-core-wifi-bluetooth-3b-board ]
Description
The Raspberry Pi 3 is the third generation Raspberry Pi. It replaced the Raspberry Pi 2 Model B in February 2016.
Compared to the Raspberry Pi 2 it has:
- A 1.2GHz 64-bit quad-core ARMv8 CPU
- 802.11n Wireless LAN
- Bluetooth 4.1
- Bluetooth Low Energy (BLE)
Like the Pi 2, it also has:
- 1GB RAM
- 4 USB ports
- 40 GPIO pins
- Full HDMI port
- Ethernet port
- Combined 3.5mm audio jack and composite video
- Camera interface (CSI)
- Display interface (DSI)
- Micro SD card slot (now push-pull rather than push-push)
- VideoCore IV 3D graphics core
- The Raspberry Pi 3 has an identical form factor to the previous Pi 2 (and Pi 1 Model B+) and has complete compatibility with Raspberry Pi 1 and 2.
We recommend the Raspberry Pi 3 Model B for use in schools, or for any general use.
Those wishing to embed their Pi in a project may prefer the Pi Zero or Model A+, which are more useful for embedded projects, and projects which require very low power.
Gallery

Hardware Guide
- [Hardware Guide | https://www.raspberrypi.org/learning/hardware-guide/ ]
- [Software Guide | https://www.raspberrypi.org/learning/software-guide/ ]
- [Addons Guide |https://www.raspberrypi.org/learning/addons-guide/ ]
- [Troubleshooting Guide | https://www.raspberrypi.org/learning/troubleshooting-guide/ ]
- [Parents Guide | https://www.raspberrypi.org/learning/parents-guide/ ]
- [Teachers Guide | https://www.raspberrypi.org/learning/teachers-guide/ ]
WHAT YOU WILL NEED
ESSENTIAL (FOR GENERAL USE)
- SD Card
- We recommend an 16GB class 10 SD card, ideally preinstalled with NOOBS.
- Display and connectivity cable
- Any HDMI/DVI monitor and any TV should work as a display for the Pi. For best results, use one with HDMI input, but other connections are available for older devices.
- Keyboard and mouse
- Any standard USB keyboard and mouse will work with your Raspberry Pi.
- Wireless keyboards and mice will work if already paired.
- For keyboard layout configuration options see raspi-config.
- Power supply
- The Pi is powered by a USB Micro power supply (like most standard mobile phone chargers).
- You'll need a good-quality power supply that can supply at least 2A at 5V for the Model 3B, or 700mA at 5V for the earlier, lower powered models.
- Low current (~700mA) power supplies will work for basic usage, but are likely to cause the Pi to reboot if it draws too much power.
OPTIONAL
- Ethernet (network) cable [Model B/B+/2/3 only]
- An Ethernet cable is used to connect your Pi to a local network and the internet.
- USB wireless dongle
- Alternatively, you can connect to a wireless network using a USB wireless dongle, which will require configuration.
- Audio lead
- Audio can be played through speakers or headphones using a standard 3.5mm jack.
- Without an HDMI cable, an audio lead is necessary to produce sound.
- No separate audio lead is necessary if you're using an HDMI cable to connect to a monitor with speakers, as audio can be played directly through the display; but it is possible to connect one if you prefer to have *the audio played through other speakers - this requires configuration.
- Heatsinks and enclosure.
- Cooling Fan
FAQ
- Raspberry Pi FAQ: [ FAQ | https://www.raspberrypi.org/documentation/faqs/ ]