X300 SKU: EZ-0003: Difference between revisions
Jump to navigation
Jump to search
| Line 17: | Line 17: | ||
|- | |- | ||
! Parameter !! Value | ! Parameter !! Value | ||
|- | |||
|Input Voltage || 6V to 18Vdc converted to 5V, 4A via step-down DC/DC converter to power the Raspberry Pi | |Input Voltage || 6V to 18Vdc converted to 5V, 4A via step-down DC/DC converter to power the Raspberry Pi | ||
|- | |- | ||
| Line 45: | Line 46: | ||
|} | |} | ||
---- | ---- | ||
==PACKING LIST== | ==PACKING LIST== | ||
*1 x X300 expansion board | *1 x X300 expansion board | ||
Revision as of 15:36, 11 October 2016
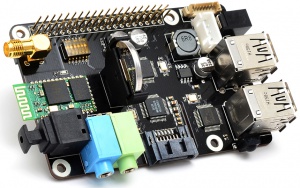
X300 EXPANSION BOARD

 |
 |
 |
 |
 |
KEY FEATURES
| Parameter | Value |
|---|---|
| Input Voltage | 6V to 18Vdc converted to 5V, 4A via step-down DC/DC converter to power the Raspberry Pi |
| SATA | Allows you to connect SATA devices to your Raspberry Pi |
| Audio | 3.5mm MIC in jack
- 3.5mm stereo audio jack - SPDIF output - Audio IO connector (Microphone input and stereo audio amplifier 3.3Wx2) |
| Wireless | WiFi (IEEE 802.11b/g/n) with external antenna
- IR sensor (38KHz) - Bluetooth serial communication |
| USB Storage | Self-powered USB hub with 3 ports |
| Real-time clock (RTC) | Based on DS3231SN with included CR2032 battery |
| Misc | Power output socket
- Camera flex slot so camera can still be used with the expansion board attached - DIP switch to remove connection from RPi’s pin header - Directly connected on top of the Raspberry Pi using the board GPIO header pins - No wiring nor soldering is required - Duplicated the 40-pin header of the R-Pi in order to support existing expansion boards - Suitable for Raspberry Pi Model B+, Raspberry pi 2 Model B and Raspberry Pi 3 Model B NEW! |
| Dimensions | 85 x 56mm (Same size as Raspberry Pi) |
PACKING LIST
- 1 x X300 expansion board
- 1 x USB adapter
- 1 x 2.4GHz WIFI antenna
- 4 x nylon spacers (M3 x 20mm)
- 8 x nylon screws (M3 x 6mm)
QUICK START GUIDE
- A. Fitting the expansion board
- B. Operation system
- C. Power supply
- D. Microphone input and audio output
- E. Audio input and output interface
- F. Setting RTC time
- G. Testing the IR receiver
- H. SATA port
- I. Bluetooth serial communication
- A. FITTING THE EXPANSION BOARD