S-0007: Difference between revisions
Jump to navigation
Jump to search
| (13 intermediate revisions by the same user not shown) | |||
| Line 1: | Line 1: | ||
==0.91 Inch OLED Module== | ==PiOLED (0.91 Inch OLED Module)== | ||
[[File:OLED4.jpg|right|320px]] | [[File:OLED4.jpg|right|320px]] | ||
==Description== | ==Description== | ||
This display is made of 128x32 individual OLED pixels.<br> | This display is made of 128x32 individual OLED pixels.<br> | ||
It communicates with Raspberry pi or Arduino series products via I2C protocol.<br> | |||
Compatible with most of MCU which support I2C protocol support.<br> | Compatible with most of MCU which support I2C protocol support.<br> | ||
There are mounting hole and female pin header on the PCB, so that you can fixed it to Raspberry Pi with screws and nuts.<br> | There are mounting hole and female pin header on the PCB, so that you can fixed it to Raspberry Pi with screws and nuts.<br> | ||
==Features== | ==Features== | ||
* Easy to use | * Easy to use | ||
| Line 13: | Line 14: | ||
* Less GPIO pin occupation | * Less GPIO pin occupation | ||
==Specifications== | ==Specifications== | ||
* Resolution: 128 x 32 | * Device Register Address: <strong>0x3c</strong> | ||
* Work Voltage: 3.3V | * Resolution: <strong>128 x 32</strong> | ||
* Communication Protocol: I2C | * Work Voltage:<strong> 3.3V </strong> | ||
* Communication Protocol: <strong>I2C</strong> | |||
* FP frequency: less than 1 fps | * FP frequency: less than 1 fps | ||
* Wide range of operating temperature: -40°C to 85°C | * Wide range of operating temperature: -40°C to 85°C | ||
| Line 21: | Line 23: | ||
[[File:OLED7.jpg|left|500px]] | [[File:OLED7.jpg|left|500px]] | ||
<br style="clear:both;"> | <br style="clear:both;"> | ||
==Gallery== | ==Gallery== | ||
{| | {| | ||
| Line 29: | Line 32: | ||
==Package Includes== | ==Package Includes== | ||
* 2* 0.91 Inch OLED Module | * 2* 0.91 Inch OLED Module | ||
* 2* | * 2* 5Pin male to female breadboard wire | ||
==How to use== | ==How to use== | ||
===How to wire it up=== | |||
Connect OLED module to Raspberry Pi's GPIO(3.3v,SDA,SCL,GND) | |||
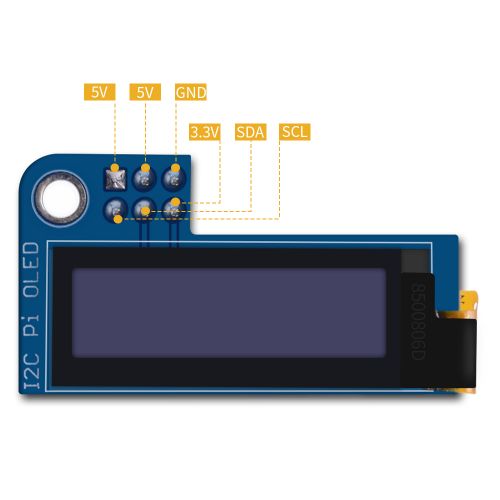
===Pin Definitions=== | |||
[[File:OLEDDef8.jpg|left|500px]] | |||
<br style="clear:both;"> | |||
---- | |||
===How to program it=== | |||
===For Raspberry Pi 4B=== | |||
* Turn on i2c function by using: | |||
<code>sudo raspi-config</code> -> <code>interface options</code> -> <code>i2c</code> -> <code>enable</code> -><code> yes</code><br>. | |||
* Check if the screen has been recognized by Raspberry Pi | |||
<pre>i2cdetect -y 1 </pre> | |||
** If encount command not found error, please install i2c-tools by using: | |||
<pre> sudo apt update && sudo apt -y install i2c-tools</pre> | |||
*Install dependencies libraries: | |||
<pre>sudo apt -y install python3 python3-pip python3-pil libjpeg-dev zlib1g-dev libfreetype6-dev liblcms2-dev libopenjp2-7 libtiff5</pre> | |||
* Grant privilleges to user pi | |||
<pre>sudo usermod -a -G gpio,i2c pi</pre> | |||
* Download sample code from this repo: | |||
<pre>git clone https://github.com/rm-hull/luma.examples.git | |||
cd luma.examples/ | |||
</pre> | |||
* Install the dependencies | |||
<pre>sudo -H pip3 install -e . </pre> | |||
* Entering into example folder and test it. | |||
<pre>cd luma.examples/examples/ | |||
python3 sys_info.py | |||
</pre> | |||
* You should seen this screen on OLED. | |||
==FAQ== | |||
*Question: why does it not show anything that I've tried as your instruction? <br> | |||
**Answer: Please make sure you have already open your i2c function and you can use this command to detect whether it has been turned on already.<br> | |||
**<code> i2cdetect -y 1 </code> | |||
---- | |||
==Application Senario== | |||
* There is a maker made a funny thing called "mobile pi" with this 0.91 Inch OLED Module, you can check it by accessing following link: | |||
[Mobile Pi | https://www.instructables.com/id/My-Fantastic-MobilePi/ ] | |||
---- | |||
Latest revision as of 18:45, 17 February 2022
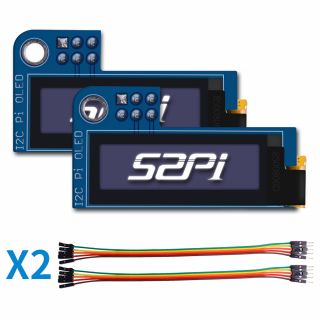
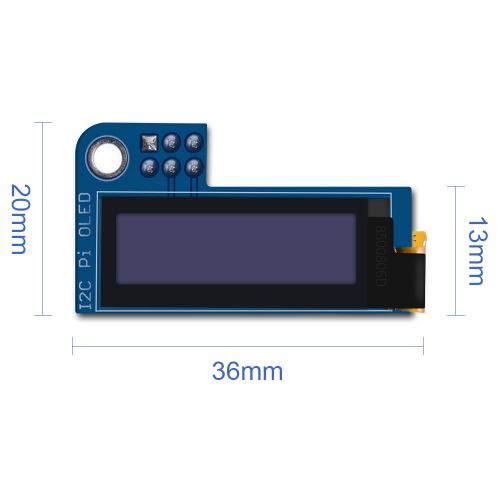
PiOLED (0.91 Inch OLED Module)

Description
This display is made of 128x32 individual OLED pixels.
It communicates with Raspberry pi or Arduino series products via I2C protocol.
Compatible with most of MCU which support I2C protocol support.
There are mounting hole and female pin header on the PCB, so that you can fixed it to Raspberry Pi with screws and nuts.
Features
- Easy to use
- Low power consumption
- Easy to assemble and fixed
- Less GPIO pin occupation
Specifications
- Device Register Address: 0x3c
- Resolution: 128 x 32
- Work Voltage: 3.3V
- Communication Protocol: I2C
- FP frequency: less than 1 fps
- Wide range of operating temperature: -40°C to 85°C
Dimension

Gallery
 |
 |
 |
Package Includes
- 2* 0.91 Inch OLED Module
- 2* 5Pin male to female breadboard wire
How to use
How to wire it up
Connect OLED module to Raspberry Pi's GPIO(3.3v,SDA,SCL,GND)
Pin Definitions

How to program it
For Raspberry Pi 4B
- Turn on i2c function by using:
sudo raspi-config -> interface options -> i2c -> enable -> yes
.
- Check if the screen has been recognized by Raspberry Pi
i2cdetect -y 1
- If encount command not found error, please install i2c-tools by using:
sudo apt update && sudo apt -y install i2c-tools
- Install dependencies libraries:
sudo apt -y install python3 python3-pip python3-pil libjpeg-dev zlib1g-dev libfreetype6-dev liblcms2-dev libopenjp2-7 libtiff5
- Grant privilleges to user pi
sudo usermod -a -G gpio,i2c pi
- Download sample code from this repo:
git clone https://github.com/rm-hull/luma.examples.git
cd luma.examples/
- Install the dependencies
sudo -H pip3 install -e .
- Entering into example folder and test it.
cd luma.examples/examples/
python3 sys_info.py
- You should seen this screen on OLED.
FAQ
- Question: why does it not show anything that I've tried as your instruction?
- Answer: Please make sure you have already open your i2c function and you can use this command to detect whether it has been turned on already.
i2cdetect -y 1
- Answer: Please make sure you have already open your i2c function and you can use this command to detect whether it has been turned on already.
Application Senario
- There is a maker made a funny thing called "mobile pi" with this 0.91 Inch OLED Module, you can check it by accessing following link:
[Mobile Pi | https://www.instructables.com/id/My-Fantastic-MobilePi/ ]