Z-0051: Difference between revisions
Jump to navigation
Jump to search
| (21 intermediate revisions by 2 users not shown) | |||
| Line 2: | Line 2: | ||
==Description== | ==Description== | ||
*Note: The LCD screen without HDMI or VGA cable, un-touch screen version doesn't need drivers. | *Note: The LCD screen without HDMI or VGA cable, un-touch screen version doesn't need drivers. | ||
[[File:7cun.jpg|thumb|left|600px]] | |||
<br style="clear:both;" > | |||
'''<font color=red>Attention</font>''':The following picture shows the latest version of 7-inch-1024x600 Display kit, it has new blue color on board. | |||
[[File:Screen1.jpg|thumb|none|620px]] | |||
<br style="clear:both;" > | |||
---- | ---- | ||
==Feature:== | ==Feature:== | ||
*Operating voltage: 5V (current requirement 1A-2A), for example car power need to add a 5V regulator | *Operating voltage: 5V (current requirement 1A-2A), for example car power need to add a 5V regulator | ||
*Rated power: 6-7W | *Rated power: 6-7W[[File:Screen2.jpg|thumb|right|200px]] | ||
*Signal input: | *Signal input: AV + VGA + HDMI (HDMI 1.2) | ||
*Support 5V DC voltage input, you can use USB, or power bank, but the positive and negative can not be reversed, to avoid damage the circuit board | *Support 5V DC voltage input, you can use USB, or power bank, but the positive and negative can not be reversed, to avoid damage the circuit board | ||
*Resolution: 1024 * 600, | *Resolution: 1024 * 600, [[File:Screen3.jpg|thumb|right|200px]] | ||
*Plug and Play: Support | *Plug and Play: Support | ||
*OSD language: Simplified Chinese, Traditional Chinese, English, Japanese, Korean, Spanish, French, German, Italian, Portuguese | *OSD language: Simplified Chinese, Traditional Chinese, English, Japanese, Korean, Spanish, French, German, Italian, Portuguese | ||
| Line 15: | Line 21: | ||
*Features: Using mature program, clear display | *Features: Using mature program, clear display | ||
*Support image flip up and down, the image can conversion 4: 3 / 16: 9 display format | *Support image flip up and down, the image can conversion 4: 3 / 16: 9 display format | ||
[[File:Screen4.jpg|thumb|right|200px]] | |||
---- | ---- | ||
==LCD screen parameters:== | ==LCD screen parameters:== | ||
| Line 44: | Line 52: | ||
==Documents== | ==Documents== | ||
*How to wire up: | *How to wire up: | ||
[[File:Screen6.jpg|thumb|left|200px]] | |||
<br style="clear:both;" > | |||
---- | |||
==Raspberry Pi Configure== | |||
*How to setup resolution for the screen: | |||
**You can modify /boot/config.txt file with vim.tiny or nano editor, and change the parameters as following chart: | |||
{| class="wikitable" | |||
|- | |||
!Resolution!! config file | |||
|- | |||
|1024x600|| | |||
hdmi_group=2 <br> | |||
hdmi_mode=87 <br> | |||
hdmi_cvt 1024 600 60 3 0 0 0 <br> | |||
hdmi_force_hotplug=1 | |||
|- | |||
|} | |||
<font color=red>Please reboot Raspberry Pi after modifying the /boot/config.txt </font> | |||
---- | |||
==How to setup Resolution Automatically== | |||
There is a easy way to setup resolution of your screen by a shell script, you can download the scripts by git tool and use it to change resolution for your screens as following steps:<br> | |||
<code> git clone https://github.com/yoyojacky/52Pi.git </code><br> | |||
<code> cd ~/52Pi </code> <br> | |||
<code> chmod +x restool.sh </code><br> | |||
<code> ./restool.sh </code><br> | |||
and then follow the step to chose the screen type that you have, and it will automatically setup the resolution for you.<br> | |||
---- | ---- | ||
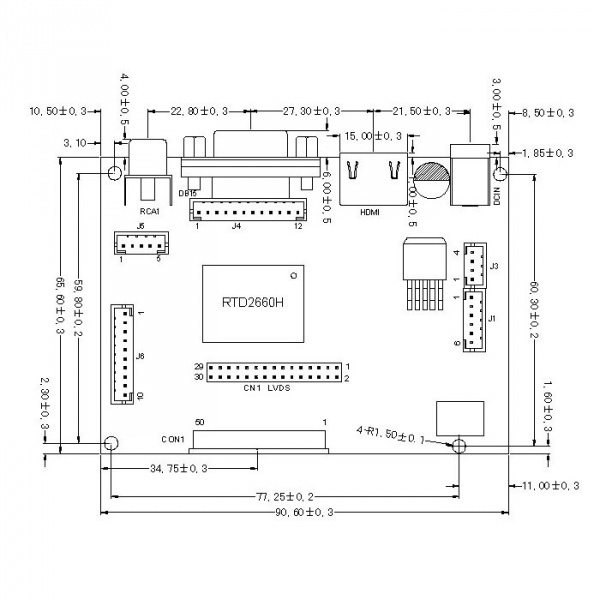
==Video Driver Board Mechanical Drawing== | |||
[[File:Outlinedrawing 7 1 1 1.jpg|left | 600px]] | |||
<br style="clear:both;"> | |||
---- | |||
==FAQ== | ==FAQ== | ||
*Question: | *Question: How can I use this screen in my car ? | ||
**Answer: | **Answer: sorry, we do not recommend you put this screen in your car, it may distract your attention when you driving your car. | ||
*Question: Which wire cable can i use? | |||
**Answer: This screen's driver board can offer both VGA and HDMI cables for output. | |||
---- | ---- | ||
Revision as of 13:35, 21 August 2017
Raspberry Pi 7 inch HDMI HD LCD Screen 1024 * 600 Display Module Kit
Description
- Note: The LCD screen without HDMI or VGA cable, un-touch screen version doesn't need drivers.

Attention:The following picture shows the latest version of 7-inch-1024x600 Display kit, it has new blue color on board.

Feature:
- Operating voltage: 5V (current requirement 1A-2A), for example car power need to add a 5V regulator
- Rated power: 6-7W
- Signal input: AV + VGA + HDMI (HDMI 1.2)
- Support 5V DC voltage input, you can use USB, or power bank, but the positive and negative can not be reversed, to avoid damage the circuit board
- Resolution: 1024 * 600,
- Plug and Play: Support
- OSD language: Simplified Chinese, Traditional Chinese, English, Japanese, Korean, Spanish, French, German, Italian, Portuguese
- Control: Multi-function OSD operation or potentiometer adjust the brightness and color
- Features: Using mature program, clear display
- Support image flip up and down, the image can conversion 4: 3 / 16: 9 display format


LCD screen parameters:
- Display size: 7 inch
- Touch screen: Not support
- Dimensions: 165 (W) × 100 (H) × 5 (D) mm
- Viewing area: 154.08 (H) × 85.92 (V)
- Resolution: 1024 × 3 (RGB) ×600
- Point distance: 0.05 (W) × 0.15 (H) mm
- Viewing angle: L70 ° R70 ° U50 ° D60
- Panel type: TFT
- Display color: 262K
- Contrast ratio: 500: 1
- Brightness: 220cd / m2
- Interface type: Digital
- The number of connection: 50 PIN Digital (TTL) TCON
- Backlight: LED
- Applications: mobile DVD, digital photo frame, car systems, multimedia applications and other audiovisual systems
Package includes:
- 1 x 7-inch LCD screen
- 1 x LCD Driver board
- 1 x White cable (connected to the key board)
- 1 x Long green key board
- 1 x USB to DC5.5 power line
Documents
- How to wire up:

Raspberry Pi Configure
- How to setup resolution for the screen:
- You can modify /boot/config.txt file with vim.tiny or nano editor, and change the parameters as following chart:
| Resolution | config file |
|---|---|
| 1024x600 |
hdmi_group=2 |
Please reboot Raspberry Pi after modifying the /boot/config.txt
How to setup Resolution Automatically
There is a easy way to setup resolution of your screen by a shell script, you can download the scripts by git tool and use it to change resolution for your screens as following steps:
git clone https://github.com/yoyojacky/52Pi.git
cd ~/52Pi
chmod +x restool.sh
./restool.sh
and then follow the step to chose the screen type that you have, and it will automatically setup the resolution for you.
Video Driver Board Mechanical Drawing

FAQ
- Question: How can I use this screen in my car ?
- Answer: sorry, we do not recommend you put this screen in your car, it may distract your attention when you driving your car.
- Question: Which wire cable can i use?
- Answer: This screen's driver board can offer both VGA and HDMI cables for output.